From Bulbapedia, the community-driven Pokémon encyclopedia.
|
|
| Line 286: |
Line 286: |
| {{Itemlist|Ether|Two steps to the west from the third window (from east to west) next to the northern wall ''(hidden)''|FR=yes|LG=yes|display={{DL|Ether|Ether}}}} | | {{Itemlist|Ether|Two steps to the west from the third window (from east to west) next to the northern wall ''(hidden)''|FR=yes|LG=yes|display={{DL|Ether|Ether}}}} |
| {{Itemlist|Burn Heal|Two steps to the west from the fourth window (from east to west) one step south from the northern wall ''(hidden)''|FR=yes|LG=yes|display={{DL|Status condition healing item|Burn Heal}}}} | | {{Itemlist|Burn Heal|Two steps to the west from the fourth window (from east to west) one step south from the northern wall ''(hidden)''|FR=yes|LG=yes|display={{DL|Status condition healing item|Burn Heal}}}} |
| {{Itemlist|Awakening|One step to the west from the fourth window (from west to east) one step south from the northern wall ''(hidden)''|FR=yes|LG=yes|display={{DL|Status condition healing item|Awakening}}}} | | {{Itemlist|Awakening|One step to the west from the fourth window (from west to east) one step north from the southern wall ''(hidden)''|FR=yes|LG=yes|display={{DL|Status condition healing item|Awakening}}}} |
| {{Itemlist|Parlyz Heal|Four steps to the west from the third window (from west to east) one step north from the southern wall ''(hidden)''|FR=yes|LG=yes|display={{DL|Status condition healing item|Parlyz Heal}}}} | | {{Itemlist|Parlyz Heal|Four steps to the west from the third window (from west to east) one step north from the southern wall ''(hidden)''|FR=yes|LG=yes|display={{DL|Status condition healing item|Parlyz Heal}}}} |
| {{Itemlist|Potion|Five steps to the east from the first window (from west to east) one step south from the northern wall ''(hidden)''|FR=yes|LG=yes|display={{DL|Potion|Potion}}}} | | {{Itemlist|Potion|Five steps to the east from the first window (from west to east) one step south from the northern wall ''(hidden)''|FR=yes|LG=yes|display={{DL|Potion|Potion}}}} |
Revision as of 15:24, 23 August 2016
This is the Bulbapedia walkthrough for Pokémon FireRed and LeafGreen.
These pages follow the remade Game Boy Advance iteration, not Pokémon Red and Blue. The guide for those games can be found here.
Rock Tunnel
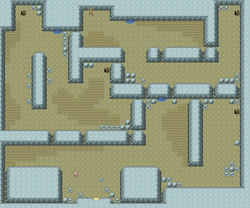
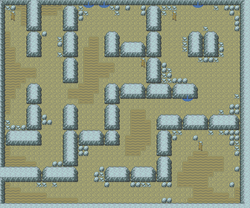
Rock Tunnel can be exhausting, so the player may need to bring a few extra items. Potions are a must with fifteen Trainers wandering around in the darkness, and Repels and Escape Ropes are also helpful. If any of his/her Pokémon know the Dig move, they can return the player to the entrance at any time.
| Available Pokémon
|
| 1F
|
| Pokémon
|
Games
|
Location
|
Levels
|
Rate
|
|
|
FR
|
LG
|
|
15-17
|
35%
|
|
|
FR
|
LG
|
|
15-16
|
30%
|
|
|
FR
|
LG
|
|
16-17
|
15%
|
|
|
FR
|
LG
|
|
16-17
|
15%
|
|
|
FR
|
LG
|
|
13, 15
|
5%
|
| A colored background means that the Pokémon can be found in this location in the specified game. A white background with a colored letter means that the Pokémon cannot be found here.
|
|
| B1F
|
| Pokémon
|
Games
|
Location
|
Levels
|
Rate
|
|
|
FR
|
LG
|
|
15-17
|
35%
|
|
|
FR
|
LG
|
|
15-16
|
30%
|
|
|
FR
|
LG
|
|
16-17
|
15%
|
|
|
FR
|
LG
|
|
17
|
10%
|
|
|
FR
|
LG
|
|
13, 15, 17
|
10%
|
| A colored background means that the Pokémon can be found in this location in the specified game. A white background with a colored letter means that the Pokémon cannot be found here.
|
|
|
1F
The area near the entrance is pretty linear. Grab the Repel, defeat PokéManiac Ashton, and take the ladder down to B1F.
B1F
There are five Trainers in this area, along with a Revive in the southwest corner. Earn some battle experience, and take the next ladder.
1F
Three Trainers lurk in the darkness here. Loop around to the east to get an Escape Rope, then go north to find the ladder.
B1F
Another three Trainers line this part of the tunnel. The final ladder is located in the northwest corner.
A Youngster in the southwest corner offers to teach Rock Slide to one of the player's Pokémon. Rock Slide is a strong attack that may make the target flinch.
1F
Only three Trainers left! Defeat the first two Picnickers, collect the Pearl to the west, and head south to the exit.
Route 10 (south)
For defeating every Trainer in the tunnel, the player has earned about $11,000! There are a few more Trainers on the south side of Route 10, but it is possible to avoid them by taking the eastern path.
| Trainers
|
| Trainer
|
Pokémon
|
|
|
|
|
|
|
|

|
|
|
Hiker Clark
カズノリ Kazunori
Reward: $756
|
|
|
|
|
|
|
|

|
|
|
Hiker Trent
ケンサク Kensaku
Reward: $684
|

|
|
|
|
|
|
|
|
|
|
|
|
| Rematch
|

|
|
|
Hiker Trent
ケンサク Kensaku
Reward: $1116
|

|
|
|
|
|
|
|
|
|
|
|
|
| Trainers with a Vs. Seeker by their names, when alerted for a rematch using the item, may use higher-level Pokémon.
|
|
Lavender Town
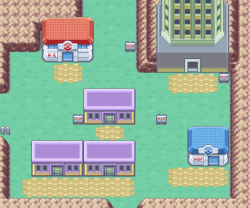
Lavender is a tiny, quiet town, but is not without its own unique landmarks. The most well-known is Pokémon Tower, while the Lavender Volunteer Pokémon House and the Name Rater are also found here. The Poké Mart in the southeast offers some new items, like Revives and Great Balls.
Name Rater
The house on the south side of town belongs to the Name Rater. This man judges the nicknames of the player's Pokémon, and gives him/her the chance to change them. His service is free, and nicknames can be changed at any time.
Pokémon Tower
Pokémon Tower, where departed Pokémon are laid to rest, appears to be the source of the town's problems. Having a connection to the spirit world, most wild Pokémon found inside are Ghosts. Blue is on the tower's second floor, but it is possible to delay that battle by avoiding the tower for now. The spirit world's influence strengthens above the second floor, where ghosts and possessed Channelers are common. But without a Silph Scope, it is impossible to climb to the tower's top floor.
Most ghosts inside the tower are truly Pokémon in disguise that can be battled or captured after obtaining the Silph Scope. The one true ghost in the tower blocks access to the final floor, but since the player cannot do anything but run from it, it is best to ignore it for now. However, there are rumors of a Silph Scope prototype in Celadon City, so pack up and head west.
Volunteer Pokémon House
Kindly old Mr. Fuji, head of the Lavender Volunteer Pokémon House, has gone missing. His disappearance may have some connection to the recent paranormal activity occurring in nearby Pokémon Tower. However, besides keeping an eye open for clues, there is nothing that can be done about it right now.
Route 8
Celadon City lies off to the west, but after Route 8, Saffron City stands in the way. No one is currently allowed through the gate, so enter the building to the north and take the Underground Path.
| Available Pokémon
|
| Pokémon
|
Games
|
Location
|
Levels
|
Rate
|
|
|
FR
|
LG
|
|
18, 20
|
30%
|
|
|
FR
|
LG
|
|
18, 20
|
30%
|
|
|
FR
|
LG
|
|
17, 19
|
20%
|
|
|
FR
|
LG
|
|
17, 19
|
20%
|
|
|
FR
|
LG
|
|
15-18
|
20%
|
|
|
FR
|
LG
|
|
15-18
|
20%
|
| A colored background means that the Pokémon can be found in this location in the specified game. A white background with a colored letter means that the Pokémon cannot be found here.
|
|
| Trainers
|
| Trainer
|
Pokémon
|
| East to West
|

|
|
|
Lass Julia
マユ Mayu
Reward: $352
|
|
|
|
|
|
|
|

|
|
|
Gamer Rich
ソウキ Sōki
Reward: $1728
|

|
|
|
|
|
|
|
|
|
|

|
Muk♂
|
Lv.22
|
| No item
|
|
|
|
|
|

|
|
|
Twins Eli & Anne
リナとカナ Rina and Kana
Reward: $528
|

|
|
|
|
|
|
|

|
|
|
Lass Paige
マイ Mai
Reward: $368
|
|
|
|
|
|
|
|
|
|
|
|
|

|
|
|
Lass Andrea
ミキ Miki
Reward: $384
|
|
|
|
|
|
|
|
|
|

|
|
|
Lass Megan
マミ Mami
Reward: $304
|

|
|
|
|
|
|
|
|
|
|
|
|
|

|
|
|
Biker Jaren
リョウ Ryō
Reward: $480
|

|
|
|
|
|
|
|

|
|
|
Biker Ricardo
ヤスキ Yasuki
Reward: $460
|
|
|
|
|
|
|
|
|
|

|
|
|
Gamer Stan
ケイシ Keishi
Reward: $1584
|
|
|
|
|
|
|
|
|
|
|
|
|
|
|
|
|
|
|
| Rematch
|

|
|
|
Gamer Rich
ソウキ Sōki
Reward: $2160
|

|
|
|
|
|
|
|
|
|

|
Muk♂
|
Lv.28
|
| No item
|
|

|
Muk♂
|
Lv.28
|
| No item
|
|

|
Muk♂
|
Lv.28
|
| No item
|
|
|
|

|
|
|
Twins Eli & Anne
リナとカナ Rina and Kana
Reward: $672
|

|
|
|
|
|
|
|

|
|
|
Lass Megan*
マミ Mami
Reward: $352
|

|
|
|
|
|
|
|
|
|
|
|

|
|
|
Lass Megan*
マミ Mami
Reward: $768
|

|
|
|
|
|
|
|
|
|
|
|
|
|

|
|
|
Biker Jaren
リョウ Ryō
Reward: $600
|

|
|

|
Muk♂
|
Lv.28
|
| No item
|
|

|
Muk♂
|
Lv.30
|
| No item
|
|
| Trainers with a Vs. Seeker by their names, when alerted for a rematch using the item, may use higher-level Pokémon.
|
|
Underground Path
The Underground Path that underneath Saffron. Remember to use the Itemfinder in the tunnel to search for lost valuables. The tunnel emerges on Route 7.
| Items
|
| Item
|
Location
|
Games
|

|
Ice Heal
|
Three steps to the east from the second window (from east to west) one step south from the northern wall (hidden)
|
FR LG
|

|
Antidote
|
Five steps to the west from the second window (from east to west) next to the southern wall (hidden)
|
FR LG
|

|
Ether
|
Two steps to the west from the third window (from east to west) next to the northern wall (hidden)
|
FR LG
|

|
Burn Heal
|
Two steps to the west from the fourth window (from east to west) one step south from the northern wall (hidden)
|
FR LG
|

|
Awakening
|
One step to the west from the fourth window (from west to east) one step north from the southern wall (hidden)
|
FR LG
|
| Parlyz Heal
|
Parlyz Heal
|
Four steps to the west from the third window (from west to east) one step north from the southern wall (hidden)
|
FR LG
|

|
Potion
|
Five steps to the east from the first window (from west to east) one step south from the northern wall (hidden)
|
FR LG
|
|
|
|
Route 7
The tiny Route 7 leads straight into Celadon City. The patch of tall grass here gives the player a chance to train a bit more before challenging the next Gym. The local Fire-type Pokémon—either GrowlitheFR or VulpixLG—will also be useful there.
| Available Pokémon
|
| Pokémon
|
Games
|
Location
|
Levels
|
Rate
|
|
|
FR
|
LG
|
|
17-20
|
40%
|
|
|
FR
|
LG
|
|
19, 22
|
30%
|
|
|
FR
|
LG
|
|
19, 22
|
20%
|
|
|
FR
|
LG
|
|
19, 22
|
20%
|
|
|
FR
|
LG
|
|
18, 20
|
10%
|
|
|
FR
|
LG
|
|
18, 20
|
10%
|
| A colored background means that the Pokémon can be found in this location in the specified game. A white background with a colored letter means that the Pokémon cannot be found here.
|
|


