Hero's Ruin: Difference between revisions
No edit summary |
m (Text replacement - "{{pkmn|anime}}-exclusive" to "{{pkmn|animated series}}-exclusive") |
||
| (27 intermediate revisions by 15 users not shown) | |||
| Line 1: | Line 1: | ||
{{AnimeLocationInfobox | {{AnimeLocationInfobox | ||
|name= | |name=Hero's Ruin | ||
|image= | |image=Hero Ruin.png | ||
|characters=黒き英雄の遺跡 | |characters=黒き英雄の遺跡 | ||
|japanese=Black Hero's ruins | |japanese=Black Hero's ruins | ||
|imagesize=250px | |||
|region=Unova | |region=Unova | ||
|epicode=BW064 | |epicode=BW064 | ||
|episode=Explorers of the Hero's Ruin!}} | |episode=Explorers of the Hero's Ruin! | ||
}} | |||
The ''' | The '''Hero's Ruin''' (Japanese: '''黒き英雄の遺跡''' ''Black Hero's ruins'') is an {{pkmn|animated series}}-exclusive location in the [[Unova]] [[region]]. It appears to be located somewhere near [[Chargestone Cave]]. | ||
{{Ash}}, {{an|Iris}} and {{an|Cilan}} were taken to see | ==History== | ||
{{Ash}}, {{an|Iris}}, and {{an|Cilan}} were taken to see the ruin in ''[[BW064|Explorers of the Hero's Ruin!]]'' by [[Cedric Juniper]]. In the past, the ruin had been where the Black Hero of Unova myth communicated with {{p|Zekrom}}, and Cedric was studying this history. | |||
Upon entering the | Upon entering the ruin, the four found a corridor ending in a wall with a small depression inside it. When Cilan turned the {{p|Venipede}} statue inside the space, the wall moved away, revealing a giant boulder that threatened to crush them. [[Cilan's Pansage]] used {{m|Dig}} to create a hole for them to hide in as the boulder moved past. Next, the group had to choose one of two bridges to cross a chasm, but before Cedric could translate the clue to which was safe, Ash and Cilan stepped on the trap bridge and barely avoided falling. | ||
Deeper in the | Deeper in the ruin, the path splits into three tunnels, themed after {{p|Golett}}, {{p|Krokorok}}, and {{p|Darumaka}}. The Darumaka path led to a trap of fire that required [[Cilan's Stunfisk]]'s {{m|Mud Bomb}} to escape, while the Krokorok path was a dead-end where the walls began closing in until [[Iris's Excadrill]] held them open. | ||
At the end of the Golett path was a room with several identical coffins inside of it, and beyond that, a large, circular chamber with a ring of crystalline pillars in its center. Hidden by the pillars was the resting place of the " | At the end of the Golett path was a room with several identical coffins inside of it, and beyond that, a large, circular chamber with a ring of crystalline pillars in its center. Hidden by the pillars was the resting place of the "Golden [[Dark Stone]]," the mystical item that the Black Hero used to summon Zekrom. Ash nearly took the stone, but Cedric stopped him with a warning of what trap it might activate. Right thereafter, a wild {{p|Sigilyph}} appeared and viciously attacked the group, forcing them to flee back to the room with the coffins. Finding the coffins damaged and open, Cedric suggested they hide inside, and this tactic worked to confuse and ultimately get rid of Sigilyph. | ||
However, another hidden trap awaited—inside one of the coffins was a hiding {{p|Cofagrigus}}, which immediately attacked as well. After rescuing Iris from its clutches, the group fled to another chamber, only to find more coffins and several more Cofagrigus. While fleeing from the Cofagrigus, the group was again attacked by Sigilyph, at which point Cedric admitted he'd taken the | However, another hidden trap awaited—inside one of the coffins was a hiding {{p|Cofagrigus}}, which immediately attacked as well. After rescuing Iris from its clutches, the group fled to another chamber, only to find more coffins and several more Cofagrigus. While fleeing from the Cofagrigus, the group was again attacked by Sigilyph, at which point Cedric admitted he'd taken the Golden Dark Stone anyway. | ||
In a sub-level of the | In a sub-level of the ruin filled with water, Cedric used the Golden Dark Stone to reveal inscriptions telling more of the legend of the Black Hero and Zekrom. This led to the discovery of a tunnel back to the room where the Golden Dark Stone was originally, but even though Cedric returned it to its place, Sigilyph and one of the Cofagrigus attacked again anyway, throwing the group high into the sky. While falling, Cedric reminded the others of how the meaning of the ruin was that it was where the friendship between the Black Hero and Zekrom came true, leading Ash and Iris to recall many of their adventures in Unova. This satisfied Sigilyph and Cofagrigus enough to save the four from falling, and the two Pokémon departed peacefully. | ||
==Pokémon seen in the Hero's Ruin== | |||
{| style="margin:auto; width: 50%" | |||
|- | |||
| {{ActivePoké|Hero's Ruin|Cofagrigus|Hero Ruin Cofagrigus.png|Ghost|link=no|nick=Cofagrigus (multiple)}} | |||
| {{ActivePoké|Hero's Ruin|Sigilyph|Hero Ruin Sigilyph.png|Psychic|Flying|link=no}} | |||
| | |||
|} | |||
==Trivia== | ==Trivia== | ||
* The | * The Hero's Ruin is similar in purpose and appearance to the [[Relic Castle]]; both are the buried ruins of temples riddled with traps that serve to protect one of the stones related to Zekrom or {{p|Reshiram}}. In addition, wild Cofagrigus can be found in both, while Sigilyph appears just outside the Relic Castle, in the [[Desert Resort]] in {{4v|Black|White|2}}. | ||
==In other languages== | |||
{{langtable|color={{colorschemelight|Unova}}|bordercolor={{colorschemedark|Unova}} | |||
|fr=Ruines du Héros | |||
|it=Rovine dell'Eroe | |||
|pl=Ruiny Bohatera | |||
}} | |||
{{Unovaanime}}<br> | {{Unovaanime}}<br> | ||
{{ | {{DoubleProjectTag|Anime|Locations}} | ||
[[Category:Ruins]] | |||
[[ | [[fr:Ruines du Héros]] | ||
[[it:Rovine dell'Eroe]] | |||
[[zh:黑英雄的遺跡]] | |||
Latest revision as of 18:42, 17 September 2024
| Hero's Ruin 黒き英雄の遺跡 Black Hero's ruins | |
 Hero's Ruin | |
| Region | Unova |
| Debut | Explorers of the Hero's Ruin! |
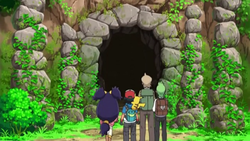
The Hero's Ruin (Japanese: 黒き英雄の遺跡 Black Hero's ruins) is an animated series-exclusive location in the Unova region. It appears to be located somewhere near Chargestone Cave.
History
Ash, Iris, and Cilan were taken to see the ruin in Explorers of the Hero's Ruin! by Cedric Juniper. In the past, the ruin had been where the Black Hero of Unova myth communicated with Zekrom, and Cedric was studying this history.
Upon entering the ruin, the four found a corridor ending in a wall with a small depression inside it. When Cilan turned the Venipede statue inside the space, the wall moved away, revealing a giant boulder that threatened to crush them. Cilan's Pansage used Dig to create a hole for them to hide in as the boulder moved past. Next, the group had to choose one of two bridges to cross a chasm, but before Cedric could translate the clue to which was safe, Ash and Cilan stepped on the trap bridge and barely avoided falling.
Deeper in the ruin, the path splits into three tunnels, themed after Golett, Krokorok, and Darumaka. The Darumaka path led to a trap of fire that required Cilan's Stunfisk's Mud Bomb to escape, while the Krokorok path was a dead-end where the walls began closing in until Iris's Excadrill held them open.
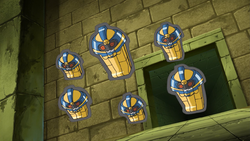
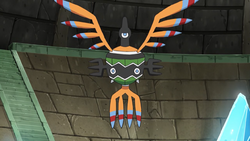
At the end of the Golett path was a room with several identical coffins inside of it, and beyond that, a large, circular chamber with a ring of crystalline pillars in its center. Hidden by the pillars was the resting place of the "Golden Dark Stone," the mystical item that the Black Hero used to summon Zekrom. Ash nearly took the stone, but Cedric stopped him with a warning of what trap it might activate. Right thereafter, a wild Sigilyph appeared and viciously attacked the group, forcing them to flee back to the room with the coffins. Finding the coffins damaged and open, Cedric suggested they hide inside, and this tactic worked to confuse and ultimately get rid of Sigilyph.
However, another hidden trap awaited—inside one of the coffins was a hiding Cofagrigus, which immediately attacked as well. After rescuing Iris from its clutches, the group fled to another chamber, only to find more coffins and several more Cofagrigus. While fleeing from the Cofagrigus, the group was again attacked by Sigilyph, at which point Cedric admitted he'd taken the Golden Dark Stone anyway.
In a sub-level of the ruin filled with water, Cedric used the Golden Dark Stone to reveal inscriptions telling more of the legend of the Black Hero and Zekrom. This led to the discovery of a tunnel back to the room where the Golden Dark Stone was originally, but even though Cedric returned it to its place, Sigilyph and one of the Cofagrigus attacked again anyway, throwing the group high into the sky. While falling, Cedric reminded the others of how the meaning of the ruin was that it was where the friendship between the Black Hero and Zekrom came true, leading Ash and Iris to recall many of their adventures in Unova. This satisfied Sigilyph and Cofagrigus enough to save the four from falling, and the two Pokémon departed peacefully.
Pokémon seen in the Hero's Ruin
 Cofagrigus (multiple) |
 Sigilyph |
Trivia
- The Hero's Ruin is similar in purpose and appearance to the Relic Castle; both are the buried ruins of temples riddled with traps that serve to protect one of the stones related to Zekrom or Reshiram. In addition, wild Cofagrigus can be found in both, while Sigilyph appears just outside the Relic Castle, in the Desert Resort in Black, White, Black 2, and White 2.
In other languages
| |||||||||||||||
|

|
This article is part of both Project Anime and Project Locations, Bulbapedia projects that, together, aim to write comprehensive articles on the Pokémon Anime and Locations, respectively. | 
|