Waterfall Cave: Difference between revisions
m (formatting) |
m (→Gameplay) |
||
| (13 intermediate revisions by 7 users not shown) | |||
| Line 5: | Line 5: | ||
|bordercolorscheme=water | |bordercolorscheme=water | ||
|name=Waterfall Cave | |name=Waterfall Cave | ||
|jname=たきつぼのどうくつ | |jname={{tt|たきつぼのどうくつ|Takitsubo no Dōkutsu}} | ||
|jtrans=Basin Cave | |jtrans=Basin Cave | ||
|image= | |image=Waterfall Cave TDS.png | ||
|recruitable=Yes | |recruitable=Yes | ||
|floors=8 | |floors=8 | ||
| Line 20: | Line 20: | ||
|boss=None | |boss=None | ||
}} | }} | ||
'''Waterfall Cave''' (Japanese: '''たきつぼのどうくつ''' ''Basin Cave'') is | '''Waterfall Cave''' (Japanese: '''たきつぼのどうくつ''' ''Basin Cave'') is the 4th dungeon in {{g|Mystery Dungeon: Explorers of Time and Explorers of Darkness}} and {{g|Mystery Dungeon: Explorers of Sky}}. It has 8 floors and is unlocked after beating {{mdc|Drowzee|2}} on [[Mt. Bristle]], and performing [[Sentry Duty]] at the [[Wigglytuff's Guild|Wigglytuff Guild]]. This is the first dungeon to have [[Kecleon Shop|shops]] in {{g|Mystery Dungeon: Explorers of Time and Explorers of Darkness}} and {{g|Mystery Dungeon: Explorers of Sky}}. | ||
{{spoilers}} | {{spoilers}} | ||
On the first visit, the hero and the partner are asked by {{mdc|Chatot|2}} to explore the Secret Waterfall (Japanese: '''ひみつのたき''' ''Secret Waterfall'') as their first official exploration. When they reach the waterfall, the player has a vision of a lone Pokémon leaping through the waterfall into a hidden cave. The partner decides to trust the player, and the two leap into the waterfall to find themselves in a dungeon. Upon reaching the bottom of the dungeon, they stumble into in an alcove filled with gems and a giant gem is at the back. The partner wants to take the gem back to the guild but finds it difficult to remove. It is at this point when the hero experiences another dizzy spell and sees [[Dimensional Scream|an image of the past]]. A Pokémon had pushed the gem and had accidentally set off a trap that caused a flood to wash it away. Unfortunately, the hero is too late to warn the partner Pokémon as they push the gem and trigger the flood. However, they are flushed away to the [[Hot Spring]] where they first meet {{mdc|Torkoal|2}}. The hero and partner later venture through Waterfall Cave in order to reach the Hot Springs much later in the game. | On the first visit, the hero and the partner are asked by {{mdc|Chatot|2}} to explore the '''Secret Waterfall''' (Japanese: {{tt|'''ひみつのたき'''|Himitsu no Taki}} ''Secret Waterfall'') as their first official exploration. When they reach the waterfall, the player has a vision of a lone Pokémon leaping through the waterfall into a hidden cave. The partner decides to trust the player, and the two leap into the waterfall to find themselves in a dungeon. Upon reaching the bottom of the dungeon, they stumble into in an alcove filled with gems and a giant gem is at the back. The partner wants to take the gem back to the guild but finds it difficult to remove. It is at this point when the hero experiences another dizzy spell and sees [[Dimensional Scream|an image of the past]]. A Pokémon had pushed the gem and had accidentally set off a trap that caused a flood to wash it away. Unfortunately, the hero is too late to warn the partner Pokémon as they push the gem and trigger the flood. However, they are flushed away to the [[Hot Spring]] where they first meet {{mdc|Torkoal|2}}. The hero and partner later venture through Waterfall Cave in order to reach the Hot Springs much later in the game. | ||
{{endspoilers}} | {{endspoilers}} | ||
==Gameplay== | |||
The jobs here are ranked E-B by default, depending on the floor. | |||
All the floors are large, with average amount of rooms varying between floors (with a chance for as few as 3 rooms, to as many as 11). Depending on the floor, the amount of items that can spawn outside of a Kecleon Shop varies from 1-4 to 3-6. There's usually 1-2 Wonder Tiles on each floor, and 2-4 starting enemies. | |||
The [[IQ Booster]] activates on 6th and 8th floor. The turn limit is 1000 on each floor. There is light darkness in the dungeon. The dungeon contains water. | |||
==Pokémon encountered== | ==Pokémon encountered== | ||
| Line 40: | Line 47: | ||
==Items== | ==Items== | ||
===Waterfall Cave=== | |||
{{DungeonItem/h|water}} | {{DungeonItem/h|water}} | ||
{{DungeonItem|Poké|4= | {{DungeonItem|Poké|4=2-40{{sup/md|TD}}/75{{sup/md|S}}|3=B1-8|sprite=Poké currency}} | ||
{{DungeonItem|Power Band|Scarf|B1-8}} | {{DungeonItem|Power Band|Scarf|B1-8}} | ||
{{DungeonItem|Special Band|Scarf|B1-8}} | {{DungeonItem|Special Band|Scarf|B1-8}} | ||
{{DungeonItem|Twist Band|Scarf|B1-8}} | {{DungeonItem|Twist Band|Scarf|B1-8|{{sup/md|d}}{{sup/md|s}}}} | ||
{{DungeonItem|Geo Pebble | {{DungeonItem|Geo Pebble|Throwing item|sprite=MDBag Geo Pebble TDS Sprite|B1-8|5}} | ||
{{DungeonItem|Apple|Apple|B1-8}} | {{DungeonItem|Apple|Apple|B1-8}} | ||
{{DungeonItem|Blue Gummi|Gummi|sprite=MDBag Blue Gummi TDS Sprite|B1-8|{{sup/md|t}}{{sup/md|s}}}} | |||
{{DungeonItem|Grass Gummi|Gummi|sprite=MDBag Grass Gummi TDS Sprite|B1-8|{{sup/md|t}}{{sup/md|s}}}} | |||
{{DungeonItem|Orange Gummi|Gummi|sprite=MDBag Orange Gummi TDS Sprite|B1-8|{{sup/md|t}}{{sup/md|s}}}} | |||
{{DungeonItem|White Gummi|Gummi|sprite=MDBag White Gummi TDS Sprite|B1-8|{{sup/md|t}}{{sup/md|s}}}} | |||
{{DungeonItem|Clear Gummi|Gummi|sprite=MDBag Clear Gummi TDS Sprite|B1-8|{{sup/md|d}}{{sup/md|s}}}} | |||
{{DungeonItem|Gray Gummi|Gummi|sprite=MDBag Gray Gummi TDS Sprite|B1-8|{{sup/md|d}}{{sup/md|s}}}} | |||
{{DungeonItem|Pink Gummi|Gummi|sprite=MDBag Pink Gummi TDS Sprite|B1-8|{{sup/md|d}}{{sup/md|s}}}} | |||
{{DungeonItem|Red Gummi|Gummi|sprite=MDBag Red Gummi TDS Sprite|B1-8|{{sup/md|d}}{{sup/md|s}}}} | |||
{{DungeonItem|Yellow Gummi|Gummi|sprite=MDBag Yellow Gummi TDS Sprite|B1-8|{{sup/md|d}}{{sup/md|s}}}} | |||
{{DungeonItem|Cheri Berry|Cheri Berry|B1-8}} | {{DungeonItem|Cheri Berry|Cheri Berry|B1-8}} | ||
{{DungeonItem|Oran Berry|Oran Berry|B1-8}} | {{DungeonItem|Oran Berry|Oran Berry|B1-8}} | ||
| Line 53: | Line 69: | ||
{{DungeonItem|Pecha Berry|Pecha Berry|B1-8}} | {{DungeonItem|Pecha Berry|Pecha Berry|B1-8}} | ||
{{DungeonItem|Blast Seed|Seed|B1-8}} | {{DungeonItem|Blast Seed|Seed|B1-8}} | ||
{{DungeonItem|Dough Seed|Seed|B1-8}} | {{DungeonItem|Dough Seed|Lookalike Item|sprite=MDBag Seed TDS Sprite|B1-8|{{sup/md|sky}}}} | ||
{{DungeonItem|Dropeye Seed|Seed|B1-8}} | {{DungeonItem|Dropeye Seed|Lookalike Item|sprite=MDBag Seed TDS Sprite|B1-8|{{sup/md|sky}}}} | ||
{{DungeonItem|Heal Seed|Seed|B1-8}} | {{DungeonItem|Heal Seed|Seed|B1-8}} | ||
{{DungeonItem|Reviser Seed|Seed|B1-8|{{sup/md|sky}}}} | {{DungeonItem|Reviser Seed|Lookalike Item|sprite=MDBag Seed TDS Sprite|B1-8|{{sup/md|sky}}}} | ||
{{DungeonItem|Reviver Seed|Seed|B1-8}} | {{DungeonItem|Reviver Seed|Seed|B1-8}} | ||
{{DungeonItem|Sleep Seed|Seed|B1-8}} | {{DungeonItem|Sleep Seed|Seed|B1-8|{{sup/md|t}}{{sup/md|s}}}} | ||
{{DungeonItem|Slip Seed|Seed|B1-8|{{sup/md|sky}}}} | {{DungeonItem|Slip Seed|Lookalike Item|sprite=MDBag Seed TDS Sprite|B1-8|{{sup/md|sky}}}} | ||
{{DungeonItem|Stun Seed|Seed|B1-8}} | {{DungeonItem|Stun Seed|Seed|B1-8|{{sup/md|t}}{{sup/md|s}}}} | ||
{{DungeonItem|Via Seed|Seed|B1-8|{{sup/md|sky}}}} | {{DungeonItem|Via Seed|Lookalike Item|sprite=MDBag Seed TDS Sprite|B1-8|{{sup/md|sky}}}} | ||
{{DungeonItem|Warp Seed|Seed|B1-8|{{sup/md| | {{DungeonItem|Warp Seed|Seed|B1-8|{{sup/md|t}}{{sup/md|s}}}} | ||
{{DungeonItem|X-Eye Seed|Seed|B1-8|{{sup/md| | {{DungeonItem|X-Eye Seed|Seed|B1-8|{{sup/md|d}}{{sup/md|s}}}} | ||
{{DungeonItem|Max Elixir|Health drink|B1-8}} | {{DungeonItem|Max Elixir|Health drink|sprite=MDBag Drink TDS Sprite|B1-8}} | ||
{{DungeonItem|Mix Elixir| | {{DungeonItem|Mix Elixir|Lookalike item|sprite=MDBag Drink TDS Sprite|B1-8|{{sup/md|sky}}}} | ||
{{DungeonItem|All-Hit Orb|Wonder Orb|B1-8}} | {{DungeonItem|All-Hit Orb|Wonder Orb|B1-8|{{sup/md|d}}{{sup/md|s}}}} | ||
{{DungeonItem|Blowback Orb|Wonder Orb|B1-8}} | {{DungeonItem|Blowback Orb|Wonder Orb|B1-8|{{sup/md|t}}{{sup/md|s}}}} | ||
{{DungeonItem|Decoy Orb|Wonder Orb|B1-8}} | {{DungeonItem|Decoy Orb|Wonder Orb|B1-8|{{sup/md|d}}{{sup/md|s}}}} | ||
{{DungeonItem|Drought Orb|Wonder Orb|B1-8}} | {{DungeonItem|Drought Orb|Wonder Orb|B1-8}} | ||
{{DungeonItem|Escape Orb|Wonder Orb|B1-8}} | {{DungeonItem|Escape Orb|Wonder Orb|B1-8}} | ||
{{DungeonItem|Foe-Seal Orb|Wonder Orb|B1-8|{{sup/md|darkness}}{{sup/md|sky}}}} | {{DungeonItem|Foe-Seal Orb|Wonder Orb|B1-8|{{sup/md|darkness}}{{sup/md|sky}}}} | ||
{{DungeonItem|Luminous Orb|Wonder Orb|B1-8}} | {{DungeonItem|Luminous Orb|Wonder Orb|B1-8|{{sup/md|d}}{{sup/md|s}}}} | ||
{{DungeonItem|One-Shot Orb|Wonder Orb|B1-8}} | {{DungeonItem|One-Shot Orb|Wonder Orb|B1-8|{{sup/md|t}}{{sup/md|s}}}} | ||
{{DungeonItem|Radar Orb|Wonder Orb|B1-8}} | {{DungeonItem|Radar Orb|Wonder Orb|B1-8|{{sup/md|t}}{{sup/md|s}}}} | ||
{{DungeonItem|Rollcall Orb|Wonder Orb|B1-8}} | |||
{{DungeonItem|Scanner Orb|Wonder Orb|B1-8|{{sup/md|t}}{{sup/md|s}}}} | |||
{{DungeonItem|Slumber Orb|Wonder Orb|B1-8|{{sup/md|d}}{{sup/md|s}}}} | |||
{{DungeonItem|Spurn Orb|Wonder Orb|B1-8|{{sup/md|t}}{{sup/md|s}}}} | |||
{{DungeonItem|Switcher Orb|Wonder Orb|B1-8|{{sup/md|t}}{{sup/md|s}}}} | |||
{{DungeonItem|Totter Orb|Wonder Orb|B1-8|{{sup/md|d}}{{sup/md|s}}}} | |||
{{DungeonItem|Transfer Orb|Wonder Orb|B1-8|{{sup/md|d}}{{sup/md|s}}}} | |||
{{DungeonItem|Warp Orb|Wonder Orb|B1-8|{{sup/md|t}}{{sup/md|s}}}} | |||
|} | |||
===Kecleon Shop=== | |||
{{DungeonItem/h|water}} | |||
{{DungeonItem|Cheri Berry|Cheri Berry|B1-8}} | |||
{{DungeonItem|Oran Berry|Oran Berry|B1-8}} | |||
{{DungeonItem|Pecha Berry|Pecha Berry|B1-8}} | |||
{{DungeonItem|Rawst Berry|Rawst Berry|sprite=MDBag Rawst Berry Sprite|B1-8}} | |||
{{DungeonItem|Blast Seed|Seed|B1-8}} | |||
{{DungeonItem|Heal Seed|Seed|B1-8}} | |||
{{DungeonItem|Reviver Seed|Seed|B1-8}} | |||
{{DungeonItem|Max Elixir|Health drink|sprite=MDBag Drink TDS Sprite|B1-8}} | |||
{{DungeonItem|Apple|Apple|B1-8}} | |||
{{DungeonItem|Big Apple|Apple|B1-8}} | |||
{{DungeonItem|Blue Gummi|Gummi|sprite=MDBag Blue Gummi TDS Sprite|B1-8|{{sup/md|t}}{{sup/md|s}}}} | |||
{{DungeonItem|Grass Gummi|Gummi|sprite=MDBag Grass Gummi TDS Sprite|B1-8|{{sup/md|t}}{{sup/md|s}}}} | |||
{{DungeonItem|Orange Gummi|Gummi|sprite=MDBag Orange Gummi TDS Sprite|B1-8|{{sup/md|t}}{{sup/md|s}}}} | |||
{{DungeonItem|White Gummi|Gummi|sprite=MDBag White Gummi TDS Sprite|B1-8|{{sup/md|t}}{{sup/md|s}}}} | |||
{{DungeonItem|Clear Gummi|Gummi|sprite=MDBag Clear Gummi TDS Sprite|B1-8|{{sup/md|d}}{{sup/md|s}}}} | |||
{{DungeonItem|Pink Gummi|Gummi|sprite=MDBag Pink Gummi TDS Sprite|B1-8|{{sup/md|d}}{{sup/md|s}}}} | |||
{{DungeonItem|Red Gummi|Gummi|sprite=MDBag Red Gummi TDS Sprite|B1-8|{{sup/md|d}}{{sup/md|s}}}} | |||
{{DungeonItem|Yellow Gummi|Gummi|sprite=MDBag Yellow Gummi TDS Sprite|B1-8|{{sup/md|d}}{{sup/md|s}}}} | |||
{{DungeonItem|Blowback Orb|Wonder Orb|B1-8|{{sup/md|t}}{{sup/md|s}}}} | |||
{{DungeonItem|Drought Orb|Wonder Orb|B1-8}} | |||
{{DungeonItem|Hurl Orb|Wonder Orb|B1-8}} | |||
{{DungeonItem|One-Shot Orb|Wonder Orb|B1-8|{{sup/md|t}}{{sup/md|s}}}} | |||
{{DungeonItem|Petrify Orb|Wonder Orb|B1-8|{{sup/md|t}}{{sup/md|s}}}} | |||
{{DungeonItem|Rollcall Orb|Wonder Orb|B1-8}} | {{DungeonItem|Rollcall Orb|Wonder Orb|B1-8}} | ||
{{DungeonItem| | {{DungeonItem|Warp Orb|Wonder Orb|B1-8|{{sup/md|t}}{{sup/md|s}}}} | ||
{{ | |} | ||
{{ | ==Other encounters== | ||
{| class="roundy sortable" style="text-align: center; background: #{{water color}}; border: 3px solid #{{water color dark}}" | |||
{{ | |- | ||
{{ | ! class="unsortable" style="background: #{{water color light}}; {{roundytl|5px}}" | Image | ||
{{ | ! style="background-color: #{{water color light}}" | {{color2|000|Dungeon tile|Tile}} | ||
{{ | ! style="background-color: #{{water color light}}" data-sort-type="number" | Floor 1-2 | ||
{{ | ! style="background-color: #{{water color light}}" data-sort-type="number" | Floor 3-6 | ||
{{ | ! style="background-color: #{{water color light}}; {{roundytr|5px}}" data-sort-type="number" | Floor 7-8 | ||
{{ | |- style="background: #FFF" | ||
{{ | | [[File:KecleonCarpet.png]] | ||
| '''Kecleon Shop''' | |||
| 8% | |||
| 9% | |||
| 10% | |||
|} | |} | ||
==Layout== | ==Layout== | ||
| Line 101: | Line 152: | ||
! style="background:#{{water color light}}; {{roundytr|5px}}" | Depths | ! style="background:#{{water color light}}; {{roundytr|5px}}" | Depths | ||
|- | |- | ||
| [[File:Waterfall Cave.png|x230px]] | | [[File:Waterfall Cave waterfall TDS.png|x230px]] | ||
| [[File:Waterfall Cave ledge.png|x230px]] | | [[File:Waterfall Cave ledge TDS.png|x230px]] | ||
| [[File:Waterfall Cave gem.png|x230px]] | | [[File:Waterfall Cave gem TDS.png|x230px]] | ||
|- | |- | ||
| colspan=3 style="background:#{{water color light}}; {{roundybottom|5px}}" | | | colspan=3 style="background:#{{water color light}}; {{roundybottom|5px}}" | | ||
|} | |} | ||
==Trivia== | |||
* Waterfall Cave is the only dungeon to be mandatory for the story more than once, first in Chapter 4 and, later on, in Chapter 17. | |||
* The music that plays at Waterfall Cave also plays in the story cutscene in which Manaphy runs a fever. [https://www.youtube.com/watch?v=A4HohFJtKvQ&t=1508s] | |||
==In other languages== | ==In other languages== | ||
| Line 114: | Line 169: | ||
|de=Wasserfallhöhle | |de=Wasserfallhöhle | ||
|it=Grotta della Cascata | |it=Grotta della Cascata | ||
|ko=용소의 동굴 '' | |ko=용소의 동굴 ''Yongso-ui Donggul'' | ||
|es=Cueva Cascada | |es=Cueva Cascada | ||
}} | }} | ||
| Line 131: | Line 186: | ||
{{DoubleProjectTag|Locations|Sidegames}} | {{DoubleProjectTag|Locations|Sidegames}} | ||
[[Category: Pokémon Mystery Dungeon | [[Category: Pokémon Mystery Dungeon: Explorers of Time and Explorers of Darkness locations]] | ||
[[Category:Waterfalls]] | [[Category:Waterfalls]] | ||
[[Category:Caves]] | [[Category:Caves]] | ||
| Line 137: | Line 192: | ||
[[de:Wasserfallhöhle]] | [[de:Wasserfallhöhle]] | ||
[[es:Cueva Cascada]] | [[es:Cueva Cascada]] | ||
[[fr:Grotte Cascade]] | [[fr:Grotte Cascade (Donjon Mystère 2)]] | ||
[[it:Grotta della Cascata]] | [[it:Grotta della Cascata]] | ||
[[ja:たきつぼのどうくつ]] | [[ja:たきつぼのどうくつ]] | ||
[[zh:瀑潭洞窟]] | [[zh:瀑潭洞窟]] | ||
Latest revision as of 08:26, 13 May 2024
|
|
|
| ||||||||||||||||||||||||||||||||||||||||||
| ||||||||||||||||||||||||||||||||||||||||||
| ||||||||||||||||||||||||||||||||||||||||||
| ||||||||||||||||||||||||||||||||||||||||||
Waterfall Cave (Japanese: たきつぼのどうくつ Basin Cave) is the 4th dungeon in Pokémon Mystery Dungeon: Explorers of Time and Explorers of Darkness and Pokémon Mystery Dungeon: Explorers of Sky. It has 8 floors and is unlocked after beating Drowzee on Mt. Bristle, and performing Sentry Duty at the Wigglytuff Guild. This is the first dungeon to have shops in Pokémon Mystery Dungeon: Explorers of Time and Explorers of Darkness and Pokémon Mystery Dungeon: Explorers of Sky.
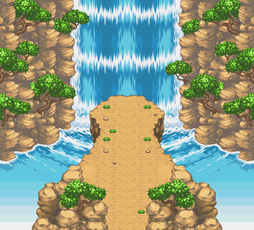
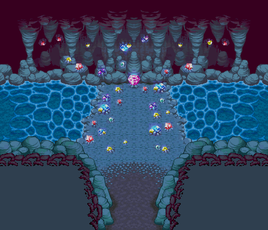
On the first visit, the hero and the partner are asked by Chatot to explore the Secret Waterfall (Japanese: ひみつのたき Secret Waterfall) as their first official exploration. When they reach the waterfall, the player has a vision of a lone Pokémon leaping through the waterfall into a hidden cave. The partner decides to trust the player, and the two leap into the waterfall to find themselves in a dungeon. Upon reaching the bottom of the dungeon, they stumble into in an alcove filled with gems and a giant gem is at the back. The partner wants to take the gem back to the guild but finds it difficult to remove. It is at this point when the hero experiences another dizzy spell and sees an image of the past. A Pokémon had pushed the gem and had accidentally set off a trap that caused a flood to wash it away. Unfortunately, the hero is too late to warn the partner Pokémon as they push the gem and trigger the flood. However, they are flushed away to the Hot Spring where they first meet Torkoal. The hero and partner later venture through Waterfall Cave in order to reach the Hot Springs much later in the game.
| Spoilers end here. |
|---|
Gameplay
The jobs here are ranked E-B by default, depending on the floor.
All the floors are large, with average amount of rooms varying between floors (with a chance for as few as 3 rooms, to as many as 11). Depending on the floor, the amount of items that can spawn outside of a Kecleon Shop varies from 1-4 to 3-6. There's usually 1-2 Wonder Tiles on each floor, and 2-4 starting enemies.
The IQ Booster activates on 6th and 8th floor. The turn limit is 1000 on each floor. There is light darkness in the dungeon. The dungeon contains water.
Pokémon encountered
| Pokémon | Floors | Levels | Recruit Rate | |
|---|---|---|---|---|
| Psyduck | B1-B8 | 9-10 | 8.2% | |
| Poliwag | B1-B8 | 9-10 | 6.4% | |
| Grimer | B1-B8 | 9-10 | 6.4% | |
| Tangela | B1-B8 | 10-11 | 6.4% | |
| Wooper | B1-B8 | 10-11 | 8.2% | |
| Lotad | B1-B8 | 10-11 | 6.4% | |
| Surskit | B1-B8 | 11-12 | 6.4% | |
| Barboach | B1-B8 | 11-12 | 8.2% | |
| Whiscash | B5-B8 | 11-12 | 0.5% | |
Items
Waterfall Cave
| Item | Floors | |
|---|---|---|
| 2-40TD/75S Poké | B1-8F | |
| Power Band | B1-8F | |
| Special Band | B1-8F | |
| DS Twist Band | B1-8F | |
| 5 Geo Pebble | B1-8F | |
| Apple | B1-8F | |
| TS Blue Gummi | B1-8F | |
| TS Grass Gummi | B1-8F | |
| TS Orange Gummi | B1-8F | |
| TS White Gummi | B1-8F | |
| DS Clear Gummi | B1-8F | |
| DS Gray Gummi | B1-8F | |
| DS Pink Gummi | B1-8F | |
| DS Red Gummi | B1-8F | |
| DS Yellow Gummi | B1-8F | |
| Cheri Berry | B1-8F | |
| Oran Berry | B1-8F | |
| S Oren Berry | B1-8F | |
| Pecha Berry | B1-8F | |
| Blast Seed | B1-8F | |
| S Dough Seed | B1-8F | |
| S Dropeye Seed | B1-8F | |
| Heal Seed | B1-8F | |
| S Reviser Seed | B1-8F | |
| Reviver Seed | B1-8F | |
| TS Sleep Seed | B1-8F | |
| S Slip Seed | B1-8F | |
| TS Stun Seed | B1-8F | |
| S Via Seed | B1-8F | |
| TS Warp Seed | B1-8F | |
| DS X-Eye Seed | B1-8F | |
| Max Elixir | B1-8F | |
| S Mix Elixir | B1-8F | |
| DS All-Hit Orb | B1-8F | |
| TS Blowback Orb | B1-8F | |
| DS Decoy Orb | B1-8F | |
| Drought Orb | B1-8F | |
| Escape Orb | B1-8F | |
| DS Foe-Seal Orb | B1-8F | |
| DS Luminous Orb | B1-8F | |
| TS One-Shot Orb | B1-8F | |
| TS Radar Orb | B1-8F | |
| Rollcall Orb | B1-8F | |
| TS Scanner Orb | B1-8F | |
| DS Slumber Orb | B1-8F | |
| TS Spurn Orb | B1-8F | |
| TS Switcher Orb | B1-8F | |
| DS Totter Orb | B1-8F | |
| DS Transfer Orb | B1-8F | |
| TS Warp Orb | B1-8F | |
Kecleon Shop
| Item | Floors | |
|---|---|---|
| Cheri Berry | B1-8F | |
| Oran Berry | B1-8F | |
| Pecha Berry | B1-8F | |
| Rawst Berry | B1-8F | |
| Blast Seed | B1-8F | |
| Heal Seed | B1-8F | |
| Reviver Seed | B1-8F | |
| Max Elixir | B1-8F | |
| Apple | B1-8F | |
| Big Apple | B1-8F | |
| TS Blue Gummi | B1-8F | |
| TS Grass Gummi | B1-8F | |
| TS Orange Gummi | B1-8F | |
| TS White Gummi | B1-8F | |
| DS Clear Gummi | B1-8F | |
| DS Pink Gummi | B1-8F | |
| DS Red Gummi | B1-8F | |
| DS Yellow Gummi | B1-8F | |
| TS Blowback Orb | B1-8F | |
| Drought Orb | B1-8F | |
| Hurl Orb | B1-8F | |
| TS One-Shot Orb | B1-8F | |
| TS Petrify Orb | B1-8F | |
| Rollcall Orb | B1-8F | |
| TS Warp Orb | B1-8F | |
Other encounters
| Image | Tile | Floor 1-2 | Floor 3-6 | Floor 7-8 |
|---|---|---|---|---|
| Kecleon Shop | 8% | 9% | 10% |
Layout
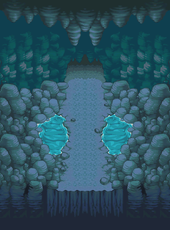
| Secret Waterfall | Entrance | Depths |
|---|---|---|

|

|

|
Trivia
- Waterfall Cave is the only dungeon to be mandatory for the story more than once, first in Chapter 4 and, later on, in Chapter 17.
- The music that plays at Waterfall Cave also plays in the story cutscene in which Manaphy runs a fever. [1]
In other languages
Waterfall Cave
| |||||||||||||||||||||
Secret Waterfall
| |||||||||||||||||||||

|
This article is part of both Project Locations and Project Sidegames, Bulbapedia projects that, together, aim to write comprehensive articles on the Pokémon Locations and Sidegames, respectively. | 
|
