|
|
| (28 intermediate revisions by 14 users not shown) |
| Line 1: |
Line 1: |
| {{incomplete|article|Needs LGPE layout image}}
| |
| {{Infobox location | | {{Infobox location |
| |image=FL Pokemon Mansion.png | | |image=Pokémon Mansion Exterior LGPE.png |
| |image_size=240 | | |image_size=300 |
| |type=ruins | | |type=ruins |
| |mapdesc=A decrepit, burned-down mansion on Cinnabar Island. It got its name because a famous Pokémon researcher lived there. | | |mapdesc=A decrepit, burned-down mansion on Cinnabar Island. It got its name because a famous Pokémon researcher lived there. |
| Line 14: |
Line 13: |
| }} | | }} |
|
| |
|
| The '''Pokémon Mansion''' (Japanese: '''ポケモン{{tt|屋敷|やしき}}''' ''Pokémon Mansion'') is a decrepit, burned-down mansion on [[Cinnabar Island]]. It got its name because a famous Pokémon researcher once lived there. | | The '''Pokémon Mansion''' (Japanese: '''ポケモン{{ruby|屋敷|やしき}}''' ''Pokémon Mansion''), shortened to '''{{PK}}{{MN}} Mansion''' on the [[Generation I]] [[Town Map]], is an abandonded mansion located on [[Cinnabar Island]]. It is the former home of a researcher of Pokémon, and is implied to be the place where {{p|Mewtwo}} was created. |
|
| |
|
| ==In the games== | | ==In the games== |
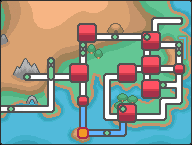
| | [[File:FL Pokemon Mansion.png|thumb|240px|Location preview of Pokémon Mansion in {{game|FireRed and LeafGreen|s}}]] |
| In [[Generation]]s {{gen|I}}, {{gen|III}}, and {{gen|VII}}, the {{player}} has to enter the mansion and find the {{ka|Secret Key}} at its basement to access the [[Cinnabar Gym|Cinnabar Island Gym]]. The abandoned building is full of {{tc|Burglar}}s and {{tc|Scientist}}s, looting whatever valuable they can find. | | In [[Generation]]s {{gen|I}}, {{gen|III}}, and {{gen|VII}}, the {{player}} has to enter the mansion and find the {{ka|Secret Key}} at its basement to access the [[Cinnabar Gym|Cinnabar Island Gym]]. The abandoned building is full of {{tc|Burglar}}s and {{tc|Scientist}}s, looting whatever valuable they can find. |
|
| |
|
| Line 36: |
Line 36: |
| {{Itemlist|Moon Stone|1F, one square north and three squares west of the base of the northwesternmost pillar from the entrance ''(hidden)''|FR=yes|LG=yes}} | | {{Itemlist|Moon Stone|1F, one square north and three squares west of the base of the northwesternmost pillar from the entrance ''(hidden)''|FR=yes|LG=yes}} |
| {{Itemlist|Protein|1F, southeast of the [[Escape Rope]]|FR=yes|LG=yes}} | | {{Itemlist|Protein|1F, southeast of the [[Escape Rope]]|FR=yes|LG=yes}} |
| | {{Itemlist/6|Health Candy|Mighty Candy|Tough Candy|Smart Candy|Courage Candy|Quick Candy| |
| | *1F, near the third pillar north from the entrance, on the east side of the hall ''(hidden)'' (daily) (item determined randomly) |
| | |
| | *2F, near the ladder in the southeast area of the floor, accessible from the southernmost stairs on 3F ''(hidden)'' (daily) (item determined randomly) |
| | |
| | *3F, on the fallen bookshelf in the southwest area of the floor ''(hidden)'' (daily) (item determined randomly) |
| | |
| | *B1F, between two rest beds, on the eastern dresser with a lamp ''(hidden)'' (daily) (item determined randomly) |
| | |
| | *B1F, southwest of the rest beds, on the eastern dresser with a lamp ''(hidden)'' (daily) (item determined randomly) |
| | |
| | *B1F, in the northern room containing bookshelves, on a pile of books near the western wall ''(hidden)'' (daily) (item determined randomly) |
| | |
| | *B1F, in the west area of the floor, next to the southwestern tank ''(hidden)'' (daily) (item determined randomly) |
| | |
| | *B1F, southwestern corner of the floor, in the middle of the eastern bookshelf ''(hidden)'' (daily) (item determined randomly)|LP=yes|LE=yes}} |
| {{Itemlist|Max Repel|1F, in the southwest corner of the northwest room|LP=yes|LE=yes}} | | {{Itemlist|Max Repel|1F, in the southwest corner of the northwest room|LP=yes|LE=yes}} |
| {{Itemlist|Max Elixir|1F, in the room south of the row of pillars|LP=yes|LE=yes}} | | {{Itemlist|Max Elixir|1F, in the room south of the row of pillars|LP=yes|LE=yes}} |
| {{Itemlist|Max Lure|1F, under a table on the west side of the floor|LP=yes|LE=yes}} | | {{Itemlist|Max Lure|1F, under a table on the east side of the floor|LP=yes|LE=yes}} |
| {{Itemlist|Silver Razz Berry|1F, north of the ladder from 3F|LP=yes|LE=yes|display=[[Silver Razz Berry]] ×5}} | | {{Itemlist|Silver Razz Berry|1F, north of the ladder from 3F|LP=yes|LE=yes|display=[[Silver Razz Berry]] ×5}} |
| {{Itemlist|Fire Stone|1F, southwest of the stairs to B1F|LP=yes|LE=yes}} | | {{Itemlist|Fire Stone|1F, southwest of the stairs to B1F|LP=yes|LE=yes}} |
| {{Itemlist|Max Ether|2F, in the room south of the stairs from 1F|LP=yes|LE=yes}}
| |
| {{Itemlist|Mighty Candy|1F, near the third pillar northeast from the entrance ''(hidden)''|LP=yes|LE=yes}}
| |
| {{Itemlist|Calcium|2F, in the northeast area of the floor|R=yes|B=yes|Y=yes|FR=yes|LG=yes}} | | {{Itemlist|Calcium|2F, in the northeast area of the floor|R=yes|B=yes|Y=yes|FR=yes|LG=yes}} |
| {{Itemlist|HP Up|2F, in the east area of the floor, accessible from the southernmost stairs on 3F|FR=yes|LG=yes}} | | {{Itemlist|HP Up|2F, in the east area of the floor, accessible from the southernmost stairs on 3F|FR=yes|LG=yes}} |
| {{Itemlist|Zinc|2F, on the balcony|FR=yes|LG=yes}} | | {{Itemlist|Zinc|2F, on the balcony|FR=yes|LG=yes}} |
| | {{Itemlist|Max Ether|2F, in the room south of the stairs from 1F|LP=yes|LE=yes}} |
| {{Itemlist|Max Revive|2F, in the northeast area of the floor|LP=yes|LE=yes}} | | {{Itemlist|Max Revive|2F, in the northeast area of the floor|LP=yes|LE=yes}} |
| {{Itemlist|Ultra Ball|2F, on the balcony|LP=yes|LE=yes|display=[[Ultra Ball]] ×3}} | | {{Itemlist|Ultra Ball|2F, on the balcony|LP=yes|LE=yes|display=[[Ultra Ball]] ×3}} |
| Line 59: |
Line 74: |
| *3F, in the southwest area of the floor | | *3F, in the southwest area of the floor |
| *B1F, in the northern area of the floor|LP=yes|LE=yes|display=[[Rare Candy]] ×2}} | | *B1F, in the northern area of the floor|LP=yes|LE=yes|display=[[Rare Candy]] ×2}} |
| {{Itemlist|Courage Candy|3F, on the fallen bookshelf in the southwest area of the floor ''(hidden)''|LP=yes|LE=yes}}
| |
| {{Itemlist|Full Heal|3F, in the middle north area of the floor|LP=yes|LE=yes}} | | {{Itemlist|Full Heal|3F, in the middle north area of the floor|LP=yes|LE=yes}} |
| {{Itemlist|TM Dark VI|3F, in the northeast area of the floor|LP=yes|LE=yes|display={{TM|21|Foul Play}}}} | | {{Itemlist|TM Dark VI|3F, in the northeast area of the floor|LP=yes|LE=yes|display={{TM|21|Foul Play}}}} |
| Line 77: |
Line 91: |
| {{Itemlist|Max Potion|B1F, in the southwest area of the floor|LP=yes|LE=yes}} | | {{Itemlist|Max Potion|B1F, in the southwest area of the floor|LP=yes|LE=yes}} |
| {{Itemlist|Max Elixir|B1F, in the northwest area of the floor|LP=yes|LE=yes}} | | {{Itemlist|Max Elixir|B1F, in the northwest area of the floor|LP=yes|LE=yes}} |
| {{Itemlist|Health Candy|B1F, in the west area of the floor, next to the southwestern tank ''(hidden)''|LP=yes|LE=yes}}
| |
| {{Itemlist|Smart Candy|B1F, southwest of the rest beds, on the eastern dresser with a lamp ''(hidden)''|LP=yes|LE=yes}}
| |
| {{Itemlist|Tough Candy|B1F, southwestern corner of the room, in the middle of the eastern bookshelf ''(hidden)''|LP=yes|LE=yes}}
| |
| {{itlistfoot|ruins}} | | {{itlistfoot|ruins}} |
|
| |
|
| Line 208: |
Line 219: |
| ===Generation I=== | | ===Generation I=== |
| {{trainerheader|ruins}} | | {{trainerheader|ruins}} |
| {{trainerentry|Spr RG Burglar.png|Burglar||3060|2|004|Charmander||34|None|005|Charmeleon||34|None|}} | | {{trainerentry|Spr RG Burglar.png|game=1|Burglar||3060|2|004|Charmander||34|None|005|Charmeleon||34|None|}} |
| {{trainerdiv|ruins}} | | {{trainerdiv|ruins}} |
| {{trainerentry|Spr RG Burglar.png|Burglar||3420|1|038|Ninetales||38|None|}} | | {{trainerentry|Spr RG Burglar.png|game=1|Burglar||3420|1|038|Ninetales||38|None|}} |
| {{trainerdiv|ruins}} | | {{trainerdiv|ruins}} |
| {{trainerentry|Spr RG Scientist.png|Scientist||1650|3|081|Magnemite||33|None|082|Magneton||33|None|100|Voltorb||33|None|}} | | {{trainerentry|Spr RG Scientist.png|game=1|Scientist||1650|3|081|Magnemite||33|None|082|Magneton||33|None|100|Voltorb||33|None|}} |
| {{trainerdiv|ruins}} | | {{trainerdiv|ruins}} |
| {{trainerentry|Spr RG Scientist.png|Scientist||1450|2|101|Electrode||29|None|110|Weezing||29|None|}} | | {{trainerentry|Spr RG Scientist.png|game=1|Scientist||1450|2|101|Electrode||29|None|110|Weezing||29|None|}} |
| {{trainerdiv|ruins}} | | {{trainerdiv|ruins}} |
| {{trainerentry|Spr RG Burglar.png|Burglar||3060|2|058|Growlithe||34|None|077|Ponyta||34|None|}} | | {{trainerentry|Spr RG Burglar.png|game=1|Burglar||3060|2|058|Growlithe||34|None|077|Ponyta||34|None|}} |
| {{trainerdiv|ruins}} | | {{trainerdiv|ruins}} |
| {{trainerentry|Spr RG Scientist.png|Scientist||1700|2|081|Magnemite||34|None|101|Electrode||34|None|}} | | {{trainerentry|Spr RG Scientist.png|game=1|Scientist||1700|2|081|Magnemite||34|None|101|Electrode||34|None|}} |
| {{trainerfooter|ruins|1}} | | {{trainerfooter|ruins|1}} |
|
| |
|
| Line 240: |
Line 251: |
| ===Generation VII=== | | ===Generation VII=== |
| {{trainerheader|ruins}} | | {{trainerheader|ruins}} |
| {{trainerentry|VSBurglar PE.png{{!}}90px|Burglar|Arnie|3,520<br>3 {{i|Poké Ball}}s|1|078|Rapidash|♀|44|None|36=トヨジ|37=Toyoji}} | | {{trainerentry|VSBurglar PE.png{{!}}90px|game=PE|Burglar|Arnie|3,520<br>3 {{i|Poké Ball}}s|1|078|Rapidash|♀|44|None|36=トヨジ|37=Toyoji}} |
| {{trainerdiv|ruins}} | | {{trainerdiv|ruins}} |
| {{trainerentry|VSCoach Trainer F PE.png{{!}}90px|Coach Trainer|Rita|4,700|3|075|Graveler|♂|46|None|051|Dugtrio|♂|46|None|062|Poliwrath|♀|47|None|36=ヨシカ|37=Yoshika}} | | {{trainerentry|VSCoach Trainer F PE.png{{!}}90px|game=PE|Coach Trainer|Rita|4,700|3|075|Graveler|♂|46|None|051|Dugtrio|♂|46|None|062|Poliwrath|♀|47|None|36=ヨシカ|37=Yoshika}} |
| {{trainerdiv|ruins}} | | {{trainerdiv|ruins}} |
| {{trainerentry|VSBurglar PE.png{{!}}90px|Burglar|Simon|3,520<br>3 {{i|Poké Ball}}s|2|126|Magmar|♂|44|None|089|Muk|♂|44|None|36=ヤスノブ|37=Yasunobu}} | | {{trainerentry|VSBurglar PE.png{{!}}90px|game=PE|Burglar|Simon|3,520<br>3 {{i|Poké Ball}}s|2|126|Magmar|♂|44|None|089|Muk|♂|44|None|36=ヤスノブ|37=Yasunobu}} |
| {{trainerdiv|ruins}} | | {{trainerdiv|ruins}} |
| {{trainerentry|VSScientist PE.png{{!}}90px|Scientist|Braydon|2,700|3|110|Weezing|♂|45|None|082|Magneton||45|None|126|Magmar|♀|45|None|36=アオバ|37=Aoba}} | | {{trainerentry|VSScientist PE.png{{!}}90px|game=PE|Scientist|Braydon|2,700|3|110|Weezing|♂|45|None|082|Magneton||45|None|126|Magmar|♀|45|None|36=アオバ|37=Aoba}} |
| {{trainerdiv|ruins}} | | {{trainerdiv|ruins}} |
| {{trainerentry|VSAce Trainer M PE.png{{!}}90px|Ace Trainer|Louis|4,600<br>5 [[Ultra Ball]]s|2|099|Kingler|♂|45|None|057|Primeape|♂|46|None|36=クニヒコ|37=Kunihiko}} | | {{trainerentry|VSAce Trainer M PE.png{{!}}90px|game=PE|Ace Trainer|Louis|4,600<br>5 [[Ultra Ball]]s|2|099|Kingler|♂|45|None|057|Primeape|♂|46|None|36=クニヒコ|37=Kunihiko}} |
| {{trainerdiv|ruins}} | | {{trainerdiv|ruins}} |
| {{trainerentry|VSScientist PE.png{{!}}90px|Scientist|Ted|2,700|2|101|Electrode||45|None|089|Muk|♂|45|None|36=ノブヒサ|37=Nobuhisa}} | | {{trainerentry|VSScientist PE.png{{!}}90px|game=PE|Scientist|Ted|2,700|2|101|Electrode||45|None|089|Muk|♂|45|None|36=ノブヒサ|37=Nobuhisa}} |
| {{trainerdiv|ruins}} | | {{trainerdiv|ruins}} |
| {{trainerentry|VSBurglar PE.png{{!}}90px|Burglar|Lewis|3,520<br>3 {{i|Poké Ball}}s|4|109|Koffing|♂|44|None|109|Koffing|♂|44|None|109|Koffing|♂|44|None|110|Weezing|♂|44|None|36=エイタ|37=Eita}} | | {{trainerentry|VSBurglar PE.png{{!}}90px|game=PE|Burglar|Lewis|3,520<br>3 {{i|Poké Ball}}s|4|109|Koffing|♂|44|None|109|Koffing|♂|44|None|109|Koffing|♂|44|None|110|Weezing|♂|44|None|36=エイタ|37=Eita}} |
| {{trainerdiv|ruins}} | | {{trainerdiv|ruins}} |
| {{trainerentry|VSScientist PE.png{{!}}90px|Scientist|Ivan|2,700|1|125|Electabuzz|♂|45|None|36=ヨシタカ|37=Yoshitaka}} | | {{trainerentry|VSScientist PE.png{{!}}90px|game=PE|Scientist|Ivan|2,700|1|125|Electabuzz|♂|45|None|36=ヨシタカ|37=Yoshitaka}} |
| {{trainerdiv|ruins|After becoming Champion}} | | {{trainerdiv|ruins|After becoming Champion}} |
| {{trainerentry/master|VSAce Trainer M Master PE.png{{!}}90px|Ace Trainer|Jace|126|Magmar|♂|75|Poison|Toxic|Ghost|Confuse Ray|Psychic|Psychic|Fire|Fire Spin|36=シュンスケ|37=Shunsuke}} | | {{trainerentry/master|VSAce Trainer M Master PE.png{{!}}90px|Ace Trainer|Jace|126|Magmar|♂|75|Poison|Toxic|Ghost|Confuse Ray|Psychic|Psychic|Fire|Fire Spin|36=シュンスケ|37=Shunsuke}} |
| Line 261: |
Line 272: |
| {{trainerfooter|ruins|PE}} | | {{trainerfooter|ruins|PE}} |
|
| |
|
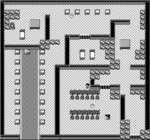
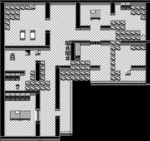
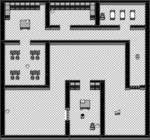
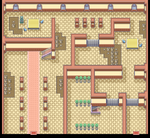
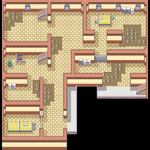
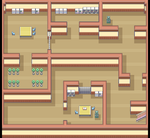
| ==Layout== | | ==Gallery== |
| ===Inside design=== | | ===Inside design=== |
| {| class="roundy" style="margin:auto; background: #000; border: 3px solid #{{locationcolor/dark|ruins}}" | | {| class="roundy" style="margin:auto; background: #000; border: 3px solid #{{locationcolor/dark|ruins}}" |
| Line 288: |
Line 299: |
| |- | | |- |
| ! style="background:#{{leafgreen color}}" | {{color2|000|Pokémon FireRed and LeafGreen Versions|LeafGreen}} | | ! style="background:#{{leafgreen color}}" | {{color2|000|Pokémon FireRed and LeafGreen Versions|LeafGreen}} |
| | |- |
| | ! style="background:#{{Let's Go Pikachu color}}" | {{color2|000|Pokémon Let's Go, Pikachu! and Let's Go, Eevee!|Let's Go, Pikachu!}} |
| | | rowspan="2" | [[File:Pokémon Mansion 1F LGPE.png|150px]] |
| | | rowspan="2" | [[File:Pokémon Mansion 2F LGPE.png|150px]] |
| | | rowspan="2" | [[File:Pokémon Mansion 3F LGPE.png|150px]] |
| | | rowspan="2" | [[File:Pokémon Mansion B1F LGPE.png|150px]] |
| | |- |
| | ! style="background:#{{Let's Go Eevee color}}" | {{color2|000|Pokémon Let's Go, Pikachu! and Let's Go, Eevee!|Let's Go, Eevee!}} |
| |- | | |- |
| | colspan="5" style="background:#{{locationcolor/light|ruins}}; {{roundybottom|5px}}" | | | | colspan="5" style="background:#{{locationcolor/light|ruins}}; {{roundybottom|5px}}" | |
| Line 301: |
Line 320: |
| |genIII=Pokémon Mansion FRLG.png | | |genIII=Pokémon Mansion FRLG.png |
| |sizeIII=112px | | |sizeIII=112px |
| | |genVII=Pokémon Mansion Exterior LGPE.png |
| | |sizeVII=250px |
| }} | | }} |
| | |
| | ===[[Environment]]s=== |
| | {| style="margin:auto; text-align:center; {{roundy|5px}} border: 2px solid #{{locationcolor/dark|ruins}}; background: #{{locationcolor/med|ruins}}; font-size:80%" |
| | |- |
| | <!--|style="{{roundy|5px}} border: 2px solid #{{locationcolor/dark|ruins}}; background: #{{locationcolor/light|ruins}}; overflow:hidden; width:80px"| [[File:BattleEnvironmentFRLGPokemonMansion.png|250px]]--> |
| | |style="{{roundy|5px}} border: 2px solid #{{locationcolor/dark|ruins}}; background: #{{locationcolor/light|ruins}}; overflow:hidden; width:80px"| [[File:BattleEnvironmentLGPEPokemonMansion.png|250px]] |
| | |- |
| | <!--| {{color2|000|Generation III}}--> |
| | | {{color2|000|Generation VII}} |
| | |} |
| | |
| | ==Walking Pokémon quotes== |
| | [[Walking Pokémon]] can have reactions unique to Pokémon Mansion. |
| | |
| | {| class="roundy" style="margin: auto; text-align: center; background-color: #{{locationcolor/med|ruins}}; border: 3px solid #{{locationcolor/dark|ruins}}" |
| | |- style="background-color: #{{locationcolor/light|ruins}}" |
| | ! Games |
| | ! Pokémon |
| | ! Area |
| | ! Quote |
| | |- style="background-color: #FFF" |
| | ! {{GameIcon|LGP}}{{GameIcon|LGE}} |
| | | [[File:150MSPE.png]]<br>{{p|Mewtwo}} |
| | | B1F |
| | | ''"Mewtwo seems to be pondering things"'' |
| | |- style="background-color: #{{locationcolor/light|ruins}}" |
| | ! colspan="4" | Can happen automatically |
| | |- style="background-color: #FFF" |
| | ! {{GameIcon|LGP}}{{GameIcon|LGE}} |
| | | [[File:150MSPE.png]]<br>{{p|Mewtwo}} |
| | | '''B1F'''<br><small>Near the cloning machine</small> |
| | | ''"Mewtwo is staring ahead at the large machine..."<br>"Mewtwo is staring quietly at the large machine..."'' |
| | |} |
|
| |
|
| ==In the anime== | | ==In the anime== |
| Line 314: |
Line 368: |
| [[File:Kanto Pokémon Mansion Adventures.png|thumb|220px|The Pokémon Mansion in [[Pokémon Adventures]]]] | | [[File:Kanto Pokémon Mansion Adventures.png|thumb|220px|The Pokémon Mansion in [[Pokémon Adventures]]]] |
| ===Pokémon Adventures=== | | ===Pokémon Adventures=== |
| ===={{chap|Red, Green & Blue}}==== | | ===={{MangaArc|Red, Green & Blue}}==== |
| In Pokémon Adventures, instead of being burned-down and deserted, the Pokémon Mansion appears to be well-kept and habitable. It made a brief appearance in ''[[PS026|Holy Moltres]]'', where multiple {{tc|Team Rocket Grunt}}s were seen raiding the building, searching for clues of [[Blaine]]'s whereabouts in order to find and punish him for leaving [[Team Rocket]]. | | In Pokémon Adventures, instead of being burned-down and deserted, the Pokémon Mansion appears to be well-kept and habitable. It made a brief appearance in ''[[PS026|Holy Moltres]]'', where multiple {{tc|Team Rocket Grunt}}s were seen raiding the building, searching for clues of [[Blaine]]'s whereabouts in order to find and punish him for leaving [[Team Rocket]]. |
| {{-}} | | {{-}} |
|
| |
|
| ==Trivia== | | ==Trivia== |
| | [[File:Pokémon Mansion Lab B1F LGPE.png|thumb|240px|The four cloning tanks]] |
| * Some of the [[wild Pokémon]] found here in [[Generation I]] were moved to [[One Island]] in [[Generation III]], such as {{p|Ponyta}} and {{p|Magmar}}. In [[Generation VII]], due to the [[Sevii Islands]] being inaccessible, Magmar is available in here once again. | | * Some of the [[wild Pokémon]] found here in [[Generation I]] were moved to [[One Island]] in [[Generation III]], such as {{p|Ponyta}} and {{p|Magmar}}. In [[Generation VII]], due to the [[Sevii Islands]] being inaccessible, Magmar is available in here once again. |
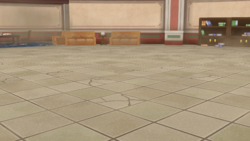
| * In Generation VII, a cloning laboratory is added to the west side of the basement. If the player brings a {{p|Mew}} or {{p|Mewtwo}} along as the [[walking Pokémon]] to the laboratory, it will stop next to the largest glass container and stare quietly at it. | | * In Generation VII, a cloning laboratory is added to the west side of the basement. If the player brings a {{p|Mew}} or {{p|Mewtwo}} along as the [[walking Pokémon]] to the laboratory, it will stop next to the largest glass container and stare quietly at it. |
