|
|
| (16 intermediate revisions by 8 users not shown) |
| Line 1: |
Line 1: |
| {{incomplete|article|Needs LGPE layout image}}
| |
| {{Route infobox | | {{Route infobox |
| |number=2 | | |number=2 |
| |size=100
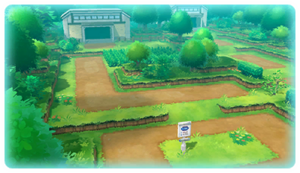
| | |image=Kanto Route 2 PE.png |
| |image=Kanto Route 2 HGSS.png | |
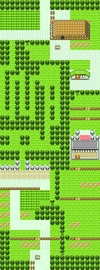
| |imageI=Kanto Route 2 RBY.png | | |imageI=Kanto Route 2 RBY.png |
| |imageII=Kanto Route 2 GSC.png | | |imageII=Kanto Route 2 GSC.png |
| Line 36: |
Line 34: |
| In Generations II and IV, Trainers from the [[Johto region]] can initially only reach the western path from the eastern path via the southeast entrance of Diglett's Cave and using Cut on the cuttable trees, as the entrance to Route 2 from the south (via {{rt|19|Kanto}}) is blocked off until later in their adventure. | | In Generations II and IV, Trainers from the [[Johto region]] can initially only reach the western path from the eastern path via the southeast entrance of Diglett's Cave and using Cut on the cuttable trees, as the entrance to Route 2 from the south (via {{rt|19|Kanto}}) is blocked off until later in their adventure. |
|
| |
|
| South of the cave lies a building that plays home to a Trainer who is looking to part ways with a rare {{p|Mr. Mime}} in exchange for an {{p|Abra}}{{sup/1|RB}}{{sup/3|FRLG}} or a {{p|Clefairy}}.{{sup/1|Y}} In [[Generation VII]], this building contains one of [[Professors' aides|Professor Oak's aides]], who will trach the [[Secret Technique]] Light Up to the {{player}}'s {{ga|Partner Pokémon}} once they have ten Pokémon registered as "Owned" in the Pokédex. | | South of the cave lies a building that plays home to a Trainer who is looking to part ways with a rare {{p|Mr. Mime}} in exchange for an {{p|Abra}}{{sup/1|RB}}{{sup/3|FRLG}} or a {{p|Clefairy}}.{{sup/1|Y}} In [[Generation VII]], this building contains one of [[Professor's assistant|Professor Oak's aides]], who will trach the [[Secret Technique]] Light Up to the {{player}}'s {{OBP|Partner Pokémon|Let's Go, Pikachu! and Let's Go, Eevee!}} once they have ten Pokémon registered as "Owned" in the Pokédex. |
|
| |
|
| Beyond another cuttable tree, the route begins to slope downhill as it approaches a gate. In Generations I and III, Trainers that have at least ten Pokémon registered as "Owned" in their Pokédex can receive {{HM|05|Flash}} from one of Professor Oak's aides. | | Beyond another cuttable tree, the route begins to slope downhill as it approaches a gate. In Generations I and III, Trainers that have at least ten Pokémon registered as "Owned" in their Pokédex can receive {{HM|05|Flash}} from one of Professor Oak's aides. |
| Line 49: |
Line 47: |
| {{Itemlist|Ether|South of the first pair of [[ledge]]s south of the eastern [[gate]] (requires {{m|Cut}})|FR=yes|LG=yes}} | | {{Itemlist|Ether|South of the first pair of [[ledge]]s south of the eastern [[gate]] (requires {{m|Cut}})|FR=yes|LG=yes}} |
| {{Itemlist|Paralyze Heal|South of the second pair of [[ledge]]s south of the eastern [[gate]] (requires {{m|Cut}})|FR=yes|LG=yes|display=[[Paralyze Heal|Parlyz Heal]]}} | | {{Itemlist|Paralyze Heal|South of the second pair of [[ledge]]s south of the eastern [[gate]] (requires {{m|Cut}})|FR=yes|LG=yes|display=[[Paralyze Heal|Parlyz Heal]]}} |
| {{Itemlist|HM Normal|Obtained from one of [[Professor Oak]]'s [[Professors' aides|aides]] in the [[gate]] as a reward for registering 10 {{OBP|Pokémon|species}} in the [[Pokédex]] (requires {{m|Cut}})|R=yes|B=yes|Y=yes|FR=yes|LG=yes|display={{HM|05|Flash}}}} | | {{Itemlist|HM Normal|Obtained from one of [[Professor Oak]]'s [[Professor's assistant|aide]] in the [[gate]] as a reward for registering 10 {{OBP|Pokémon|species}} in the [[Pokédex]] (requires {{m|Cut}})|R=yes|B=yes|Y=yes|FR=yes|LG=yes|display={{HM|05|Flash}}}} |
| {{Itemlist|Great Ball|North of Diglett's Cave (requires [[Secret Technique|Chop Down]])|LP=yes|LE=yes|display=[[Great Ball]] ×3}} | | {{Itemlist|Great Ball|North of Diglett's Cave (requires [[Secret Technique|Chop Down]])|LP=yes|LE=yes|display=[[Great Ball]] ×3}} |
| {{Itemlist|Leaf Stone|Southeast of the first pair of [[ledge]]s south of the eastern [[gate]] (requires [[Secret Technique|Chop Down]])|LP=yes|LE=yes}} | | {{Itemlist|Leaf Stone|Southeast of the first pair of [[ledge]]s south of the eastern [[gate]] (requires [[Secret Technique|Chop Down]])|LP=yes|LE=yes}} |
| {{Itemlist|Super Potion|Southeast of the second pair of [[ledge]]s south of the eastern [[gate]] (requires [[Secret Technique|Chop Down]])|LP=yes|LE=yes}} | | {{Itemlist|Super Potion|Southeast of the second pair of [[ledge]]s south of the eastern [[gate]] (requires [[Secret Technique|Chop Down]])|LP=yes|LE=yes}} |
| {{Itemlist|None|sprite=Light Up icon|size=30px|Taught by one of [[Professor Oak]]'s [[Professors' aides|assistants]] in the house south of the northern entrance to [[Diglett's Cave]] (requires [[Secret Technique|Chop Down]])|LP=yes|LE=yes|display=[[Secret Technique|Light Up]]}} | | {{Itemlist|None|sprite=Light Up icon|size=30px|Taught by one of [[Professor Oak]]'s [[Professor's assistant|assistants]] in the house south of the northern entrance to [[Diglett's Cave]] (requires [[Secret Technique|Chop Down]])|LP=yes|LE=yes|display=[[Secret Technique|Light Up]]}} |
| {{Itemlist|Dire Hit|Near south opening of tree maze|G=yes|S=yes|C=yes}} | | {{Itemlist|Dire Hit|Near south opening of tree maze|G=yes|S=yes|C=yes}} |
| {{Itemlist|Full Heal|In the tree maze, in the space northeast of the Max Potion ''(hidden)''|G=yes|S=yes|C=yes}} | | {{Itemlist|Full Heal|In the tree maze, in the space northeast of the Max Potion ''(hidden)''|G=yes|S=yes|C=yes}} |
| Line 62: |
Line 60: |
| {{Itemlist|Revive|In the tree maze, at the bottom right corner ''(hidden)''|G=yes|S=yes|C=yes}} | | {{Itemlist|Revive|In the tree maze, at the bottom right corner ''(hidden)''|G=yes|S=yes|C=yes}} |
| {{Itemlist|Pink Apricorn|East of [[Viridian Forest]] (daily)|HG=yes|SS=yes|display=[[Pink Apricorn|Pnk Apricorn]]}} | | {{Itemlist|Pink Apricorn|East of [[Viridian Forest]] (daily)|HG=yes|SS=yes|display=[[Pink Apricorn|Pnk Apricorn]]}} |
| {{Itemlist|Sacred Ash|Obtained from one of [[Professor Oak]]'s [[Professors' aides|aides]] in the gate|HG=yes|SS=yes}} | | {{Itemlist|Sacred Ash|Obtained from one of [[Professor Oak]]'s [[Professor's assistant|aide]] in the gate|HG=yes|SS=yes}} |
| {{Itemlist|Carbos|Northeast of [[Diglett's Cave]]|G=yes|S=yes|C=yes|HG=yes|SS=yes}} | | {{Itemlist|Carbos|Northeast of [[Diglett's Cave]]|G=yes|S=yes|C=yes|HG=yes|SS=yes}} |
| {{Itemlist|Elixir|Southernmost point of the eastern section|G=yes|S=yes|C=yes|HG=yes|SS=yes}} | | {{Itemlist|Elixir|Southernmost point of the eastern section|G=yes|S=yes|C=yes|HG=yes|SS=yes}} |
| Line 138: |
Line 136: |
| {{Catch/entryhs|015|Beedrill|no|yes|Grass|7|10%|0%|0%|type1=Bug|type2=Poison}} | | {{Catch/entryhs|015|Beedrill|no|yes|Grass|7|10%|0%|0%|type1=Bug|type2=Poison}} |
| {{Catch/entryhs|015|Beedrill|no|yes|Grass|10|0%|0%|4%|type1=Bug|type2=Poison}} | | {{Catch/entryhs|015|Beedrill|no|yes|Grass|10|0%|0%|4%|type1=Bug|type2=Poison}} |
| {{Catch/entryhs|016|Pidgey|yes|no|Grass|3|30%|20%|0%|type1=Normal|type2=Flying}} | | {{Catch/entryhs|016|Pidgey|yes|no|Grass|3|30%|0%|0%|type1=Normal|type2=Flying}} |
| {{Catch/entryhs|016|Pidgey|yes|no|Grass|3-5|0%|30%|0%|type1=Normal|type2=Flying}} | | {{Catch/entryhs|016|Pidgey|yes|no|Grass|3, 5|0%|50%|0%|type1=Normal|type2=Flying}} |
| {{Catch/entryhs|016|Pidgey|no|yes|Grass|3|20%|10%|0%|type1=Normal|type2=Flying}} | | {{Catch/entryhs|016|Pidgey|no|yes|Grass|3|20%|0%|0%|type1=Normal|type2=Flying}} |
| {{Catch/entryhs|016|Pidgey|no|yes|Grass|3-7|0%|30%|0%|type1=Normal|type2=Flying}} | | {{Catch/entryhs|016|Pidgey|no|yes|Grass|3, 7|0%|40%|0%|type1=Normal|type2=Flying}} |
| {{Catch/entryhs|017|Pidgeotto|yes|no|Grass|7|5%|0%|0%|type1=Normal|type2=Flying}} | | {{Catch/entryhs|017|Pidgeotto|yes|no|Grass|7|5%|0%|0%|type1=Normal|type2=Flying}} |
| {{Catch/entryhs|017|Pidgeotto|yes|no|Grass|7-10|0%|9%|0%|type1=Normal|type2=Flying}} | | {{Catch/entryhs|017|Pidgeotto|yes|no|Grass|7, 10|0%|9%|0%|type1=Normal|type2=Flying}} |
| {{Catch/entryhs|017|Pidgeotto|no|yes|Grass|7|0%|5%|0%|type1=Normal|type2=Flying}} | | {{Catch/entryhs|017|Pidgeotto|no|yes|Grass|7|0%|5%|0%|type1=Normal|type2=Flying}} |
| {{Catch/entryhs|163|Hoothoot|yes|no|Grass|3-5|0%|0%|50%|type1=Normal|type2=Flying}} | | {{Catch/entryhs|163|Hoothoot|yes|no|Grass|3, 5|0%|0%|50%|type1=Normal|type2=Flying}} |
| {{Catch/entryhs|163|Hoothoot|no|yes|Grass|3-5|0%|0%|60%|type1=Normal|type2=Flying}} | | {{Catch/entryhs|163|Hoothoot|no|yes|Grass|3, 5|0%|0%|60%|type1=Normal|type2=Flying}} |
| {{Catch/entryhs|164|Noctowl|yes|no|Grass|7-10|0%|0%|14%|type1=Normal|type2=Flying}} | | {{Catch/entryhs|164|Noctowl|yes|no|Grass|7, 10|0%|0%|14%|type1=Normal|type2=Flying}} |
| {{Catch/entryhs|164|Noctowl|no|yes|Grass|7|0%|0%|14%|type1=Normal|type2=Flying}} | | {{Catch/entryhs|164|Noctowl|no|yes|Grass|7|0%|0%|14%|type1=Normal|type2=Flying}} |
| {{Catch/entryhs|165|Ledyba|no|yes|Grass|3|30%|0%|0%|type1=Bug|type2=Flying}} | | {{Catch/entryhs|165|Ledyba|no|yes|Grass|3|30%|0%|0%|type1=Bug|type2=Flying}} |
| {{Catch/entryhs|165|Ledyba|no|yes|Grass|10|0%|4%|0%|type1=Bug|type2=Flying}} | | {{Catch/entryhs|165|Ledyba|no|yes|Grass|10|0%|4%|0%|type1=Bug|type2=Flying}} |
| {{Catch/entryhs|166|Ledian|no|yes|Grass|7-10|9%|0%|0%|type1=Bug|type2=Flying}} | | {{Catch/entryhs|166|Ledian|no|yes|Grass|7, 10|9%|0%|0%|type1=Bug|type2=Flying}} |
| {{Catch/entryhs|167|Spinarak|yes|no|Grass|10|4%|0%|0%|type1=Bug|type2=Poison}} | | {{Catch/entryhs|167|Spinarak|yes|no|Grass|10|4%|0%|0%|type1=Bug|type2=Poison}} |
| {{Catch/entryhs|167|Spinarak|yes|no|Grass|3-4|0%|0%|31%|type1=Bug|type2=Poison}} | | {{Catch/entryhs|167|Spinarak|yes|no|Grass|3-4|0%|0%|31%|type1=Bug|type2=Poison}} |
| Line 167: |
Line 165: |
| {{Catch/entryhs|311|Plusle|yes|yes|Hoenn|3|all=20%|type1=Electric}} | | {{Catch/entryhs|311|Plusle|yes|yes|Hoenn|3|all=20%|type1=Electric}} |
| {{Catch/entryhs|312|Minun|yes|yes|Hoenn|5|all=20%|type1=Electric}} | | {{Catch/entryhs|312|Minun|yes|yes|Hoenn|5|all=20%|type1=Electric}} |
| {{Catch/entryhs|403|Shinx|yes|yes|Sinnoh|3-5|all=40%|type1=Electric}} | | {{Catch/entryhs|403|Shinx|yes|yes|Sinnoh|3, 5|all=40%|type1=Electric}} |
| {{Catch/footer|forest}} | | {{Catch/footer|forest}} |
|
| |
|
| Line 182: |
Line 180: |
| {{Catch/entryhs|015|Beedrill|no|yes|Grass|7|10%|0%|0%|type1=Bug|type2=Poison}} | | {{Catch/entryhs|015|Beedrill|no|yes|Grass|7|10%|0%|0%|type1=Bug|type2=Poison}} |
| {{Catch/entryhs|015|Beedrill|no|yes|Grass|10|0%|0%|4%|type1=Bug|type2=Poison}} | | {{Catch/entryhs|015|Beedrill|no|yes|Grass|10|0%|0%|4%|type1=Bug|type2=Poison}} |
| {{Catch/entryhs|016|Pidgey|yes|no|Grass|3|30%|10%|0%|type1=Normal|type2=Flying}} | | {{Catch/entryhs|016|Pidgey|yes|no|Grass|3|30%|0%|0%|type1=Normal|type2=Flying}} |
| {{Catch/entryhs|016|Pidgey|yes|no|Grass|3-8|0%|30%|0%|type1=Normal|type2=Flying}} | | {{Catch/entryhs|016|Pidgey|yes|no|Grass|3, 7-8|0%|40%|0%|type1=Normal|type2=Flying}} |
| {{Catch/entryhs|016|Pidgey|no|yes|Grass|3|20%|10%|0%|type1=Normal|type2=Flying}} | | {{Catch/entryhs|016|Pidgey|no|yes|Grass|3|20%|0%|0%|type1=Normal|type2=Flying}} |
| {{Catch/entryhs|016|Pidgey|no|yes|Grass|3-7|0%|30%|0%|type1=Normal|type2=Flying}} | | {{Catch/entryhs|016|Pidgey|no|yes|Grass|3, 7|0%|40%|0%|type1=Normal|type2=Flying}} |
| {{Catch/entryhs|017|Pidgeotto|yes|no|Grass|7|5%|0%|0%|type1=Normal|type2=Flying}} | | {{Catch/entryhs|017|Pidgeotto|yes|no|Grass|7|5%|0%|0%|type1=Normal|type2=Flying}} |
| {{Catch/entryhs|017|Pidgeotto|yes|no|Grass|7-10|0%|9%|0%|type1=Normal|type2=Flying}} | | {{Catch/entryhs|017|Pidgeotto|yes|no|Grass|7, 10|0%|9%|0%|type1=Normal|type2=Flying}} |
| {{Catch/entryhs|017|Pidgeotto|no|yes|Grass|7|0%|5%|0%|type1=Normal|type2=Flying}} | | {{Catch/entryhs|017|Pidgeotto|no|yes|Grass|7|0%|5%|0%|type1=Normal|type2=Flying}} |
| {{Catch/entryhs|163|Hoothoot|yes|no|Grass|3-5|0%|0%|50%|type1=Normal|type2=Flying}} | | {{Catch/entryhs|163|Hoothoot|yes|no|Grass|3-5|0%|0%|50%|type1=Normal|type2=Flying}} |
| {{Catch/entryhs|163|Hoothoot|no|yes|Grass|3-5|0%|0%|60%|type1=Normal|type2=Flying}} | | {{Catch/entryhs|163|Hoothoot|no|yes|Grass|3-5|0%|0%|60%|type1=Normal|type2=Flying}} |
| {{Catch/entryhs|164|Noctowl|yes|no|Grass|7-10|0%|0%|14%|type1=Normal|type2=Flying}} | | {{Catch/entryhs|164|Noctowl|yes|no|Grass|7-8, 10|0%|0%|14%|type1=Normal|type2=Flying}} |
| {{Catch/entryhs|164|Noctowl|no|yes|Grass|7|0%|0%|14%|type1=Normal|type2=Flying}} | | {{Catch/entryhs|164|Noctowl|no|yes|Grass|7|0%|0%|14%|type1=Normal|type2=Flying}} |
| {{Catch/entryhs|165|Ledyba|no|yes|Grass|3|30%|0%|0%|type1=Bug|type2=Flying}} | | {{Catch/entryhs|165|Ledyba|no|yes|Grass|3|30%|0%|0%|type1=Bug|type2=Flying}} |
| Line 211: |
Line 209: |
| {{Catch/entryhs|311|Plusle|yes|yes|Hoenn|3|all=20%|type1=Electric}} | | {{Catch/entryhs|311|Plusle|yes|yes|Hoenn|3|all=20%|type1=Electric}} |
| {{Catch/entryhs|312|Minun|yes|yes|Hoenn|5|all=20%|type1=Electric}} | | {{Catch/entryhs|312|Minun|yes|yes|Hoenn|5|all=20%|type1=Electric}} |
| {{Catch/entryhs|403|Shinx|yes|yes|Sinnoh|3-5|all=40%|type1=Electric}} | | {{Catch/entryhs|403|Shinx|yes|yes|Sinnoh|3, 5|all=40%|type1=Electric}} |
| {{Catch/footer|forest}} | | {{Catch/footer|forest}} |
|
| |
|
| Line 263: |
Line 261: |
| {{Trainerdiv|forest}} | | {{Trainerdiv|forest}} |
| {{Trainerentry|Spr GS Bug Catcher.png|Bug Catcher|Ed|480|3|015|Beedrill|♂|30|None|015|Beedrill|♂|30|None|015|Beedrill|♂|30|None|36=ヨウジ|37=Yōji}} | | {{Trainerentry|Spr GS Bug Catcher.png|Bug Catcher|Ed|480|3|015|Beedrill|♂|30|None|015|Beedrill|♂|30|None|015|Beedrill|♂|30|None|36=ヨウジ|37=Yōji}} |
| {{Trainerdiv|forest}}
| |
| {{Trainerfooter|forest|II}} | | {{Trainerfooter|forest|II}} |
|
| |
|
| Line 293: |
Line 290: |
|
| |
|
| ==Differences among generations== | | ==Differences among generations== |
| | [[File:Kanto Route 2 HGSS.png|thumb|200px|Route 2 in {{game|HeartGold and SoulSilver|s}}]] |
| ===Generations I, III, and VII=== | | ===Generations I, III, and VII=== |
| The depiction of Route 2 is almost identical in [[Generation]]s {{Gen|I}}, {{Gen|III}}, and {{Gen|VII}}. Only trivial changes are visible between these three [[Generation]]s. In Generation I, there are three trees to use {{m|Cut}} on south of the gate whereas there are only two in Generations III and VII, the latter of which uses the [[Secret Technique]] Chop Down instead of Cut. | | The depiction of Route 2 is almost identical in [[Generation]]s {{Gen|I}}, {{Gen|III}}, and {{Gen|VII}}. Only trivial changes are visible between these three [[Generation]]s. In Generation I, there are three trees to use {{m|Cut}} on south of the gate whereas there are only two in Generations III and VII, the latter of which uses the [[Secret Technique]] Chop Down instead of Cut. |
| Line 311: |
Line 309: |
|
| |
|
| By traveling south past Viridian Forest, two Trainers can be found. The first one can be found by jumping off the ledge or go through the grass, while the second one can be found by traveling further south. Now a single path once again, Route 2 travels to the south towards [[Viridian City]]. | | By traveling south past Viridian Forest, two Trainers can be found. The first one can be found by jumping off the ledge or go through the grass, while the second one can be found by traveling further south. Now a single path once again, Route 2 travels to the south towards [[Viridian City]]. |
| | ==Music== |
| | {| class="roundtable" style="margin:auto; text-align: center; background: #{{locationcolor/med|road}}; border: 3px solid #{{locationcolor/dark|road}}" |
| | |- style="background:#{{locationcolor/light|road}}" |
| | ! Games |
| | ! Song name |
| | ! Composition |
| | ! Arrangement |
| | |- style="background:#FFF" |
| | ! {{GameIcon|R}}{{GameIcon|Gr}}{{GameIcon|B}}{{GameIcon|Y}} |
| | | [[Pokémon Red & Pokémon Green: Super Music Collection|Road to Viridian City: Leaving Pallet Town]] |
| | | [[Junichi Masuda]] |
| | | [[Junichi Masuda]] |
| | |- style="background:#FFF" |
| | ! {{GameIcon|G}}{{GameIcon|S}}{{GameIcon|C}} |
| | | [[Pokémon HeartGold & Pokémon SoulSilver: Super Music Collection|Viridian Forest]] |
| | | [[Junichi Masuda]] and [[Go Ichinose]] |
| | | [[Go Ichinose]] |
| | |- style="background:#FFF" |
| | ! {{GameIcon|FR}}{{GameIcon|LG}} |
| | | [[Pokémon FireRed & Pokémon LeafGreen: Super Music Collection|Road to Viridian City: Leaving Pallet Town]] || [[Junichi Masuda]] || [[Go Ichinose]] |
| | |- style="background:#FFF" |
| | ! {{GameIcon|HG}}{{GameIcon|SS}} |
| | | [[Pokémon HeartGold & Pokémon SoulSilver: Super Music Collection|Route 3]] || [[Junichi Masuda]] || [[Takuto Kitsuta]]<br><small>[[GB Sounds]]:</small> [[Go Ichinose]] |
| | |- style="background:#FFF" |
| | ! {{GameIcon|LGP}}{{GameIcon|LGE}} |
| | | [[Pokémon: Let's Go, Pikachu! & Pokémon: Let's Go, Eevee! Super Music Collection|Road to Viridian City: Leaving Pallet Town]] || [[Junichi Masuda]] || [[Shota Kageyama]] |
| | |} |
|
| |
|
| ==In the anime== | | ==In the anime== |
| Line 316: |
Line 341: |
| [[File:Kanto Route 2 PO.png|thumb|left|220px|Route 2 in [[Pokémon Origins]]]] | | [[File:Kanto Route 2 PO.png|thumb|left|220px|Route 2 in [[Pokémon Origins]]]] |
| ===Main series=== | | ===Main series=== |
| | ====[[Original series]]==== |
| The north part of Route 2 made a brief cameo in ''[[EP005|Showdown in Pewter City]]'', connecting to [[Pewter City]]. | | The north part of Route 2 made a brief cameo in ''[[EP005|Showdown in Pewter City]]'', connecting to [[Pewter City]]. |
|
| |
|


