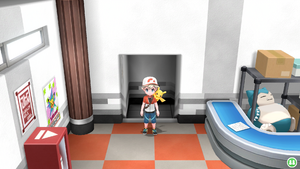
Team Rocket Hideout: Difference between revisions
(→Items) |
mNo edit summary |
||
| (163 intermediate revisions by 54 users not shown) | |||
| Line 2: | Line 2: | ||
---- | ---- | ||
{{Infobox location | {{Infobox location | ||
|image= | |image=Rocket Hideout Entrance LGPE.png | ||
|image_size= | |image_size=300px | ||
|type=building | |type=building | ||
|location_name=Rocket Hideout | |location_name=Team Rocket Hideout | ||
|japanese_name= | |japanese_name=ロケット{{tt|団|だん}}アジト | ||
|translated_name=Team Rocket Hideout | |translated_name=Team Rocket Hideout | ||
|other_info=Rocket Hideout | |||
|location=[[Celadon City]] | |location=[[Celadon City]] | ||
|region=Kanto | |region=Kanto | ||
|generation={{gen|I}}, {{gen|III}} | |generation={{gen|I}}, {{gen|III}}, {{gen|VII}} | ||
|map= | |map=Kanto Celadon City Map.png | ||
}} | }} | ||
The '''Rocket Hideout''' (Japanese: ''' | The '''Team Rocket Hideout''' (Japanese: '''ロケット{{tt|団|だん}}アジト''' ''Team Rocket Hideout''), called '''Rocket Hideout''' in the [[Generation I]] and {{gen|III}} games, and also known as '''Rocket HQ''' in the [[Generation I]] [[Town Map]], is a four-floored underground complex beneath the [[Celadon Game Corner|Rocket Game Corner]] in [[Celadon City]]. It is a secret base built and used by [[Team Rocket]] to facilitate and administer their operations. | ||
==Access== | ==Access== | ||
[[File:Game | [[File:Game Corner switch FRLG.png|thumb|150px|left|The secret switch concealed behind a poster in the Game Corner]] | ||
The Rocket Hideout is accessed by pressing a switch behind a poster in the [[Rocket Game Corner]] in [[Celadon City]]. A {{tc|Team Rocket Grunt}} is guarding the poster in question when the player first approaches it. After being defeated, the | [[File:FL Rocket Hideout.png|thumb|200px|Location preview of Team Rocket Hideout in Generation III]] | ||
The Rocket Hideout is accessed by pressing a switch behind a poster in the [[Celadon Game Corner|Rocket Game Corner]] in [[Celadon City]]. A {{tc|Team Rocket Grunt}} is guarding the poster in question when the {{player}} first approaches it. After being defeated, the Grunt retreats into the base, leaving the poster unguarded, and enabling the player to approach. Once the player activates a switch behind the poster, the stairs to the hideout will appear. In [[Generation VII]], the Grunt will only battle the player once {{p|Cubone}} has been kidnapped in [[Lavender Town]]. | |||
In Generation II, the Rocket Hideout is referred to when the player walks and selects the poster at the back of the | In Generation II, the Rocket Hideout is referred to when the player walks and selects the poster at the back of the Rocket Game Corner in Celadon City. The words, "''Hey! Under this poster... There's nothing!''" will appear, a reference to the original access point. | ||
{{-}} | |||
==Features== | ==Features== | ||
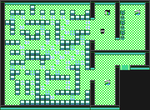
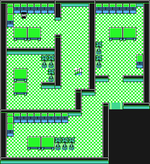
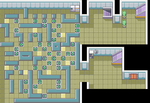
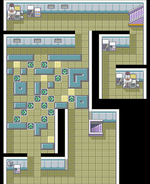
This is the first time that the player encounters [[ | This is the first time that the player encounters [[spin tile]]s, a special type of tile that, when stepped on, will uncontrollably spin the player in the direction of the arrows until they hit a stop tile. These are used on the second and third basement floors to create a complex maze. | ||
==Items== | ==Items== | ||
{{itlisth|building}} | {{itlisth|building}} | ||
{{ | {{Itemlist|Clothing Trunk|B1F, from the spy disguised as a female {{tc|Team Rocket Grunt}} directly south of the stairs|LP=yes|LE=yes|display={{DL|List of clothing in Pokémon: Let's Go, Pikachu! and Let's Go, Eevee!|Team Rocket Set}}}} | ||
{{ | {{Itemlist|PP Up|B1F, on the southeasternmost plant of the plants in the center of the floor ''(hidden)''|R=yes|B=yes|Y=yes|FR=yes|LG=yes}} | ||
{{ | {{Itemlist|Escape Rope|B1F, west of the plants in the center of the floor|R=yes|B=yes|Y=yes|FR=yes|LG=yes}} | ||
{{ | {{Itemlist|Ultra Ball|B1F, south of the table in the western room|LP=yes|LE=yes|display=[[Ultra Ball]] ×3}} | ||
{{ | {{Itemlist|Mighty Candy|B1F, under the southwest corner of the table in the eastern room|LP=yes|LE=yes|display=[[Mighty Candy]] ×3}} | ||
{{ | {{Itemlist|Great Ball|B1F, north of the stairs in the southwest area of the floor, accessible from the southern stairs of B2F|LP=yes|LE=yes|display=[[Great Ball]] ×5}} | ||
{{ | {{Itemlist|Hyper Potion|B1F, in the northwest corner of the southwest area of the floor, accessible from the southern stairs of B2F|R=yes|B=yes|Y=yes|FR=yes|LG=yes|LP=yes|LE=yes}} | ||
{{ | {{Itemlist|Full Heal|B1F, in the cardboard box by the northmost desk in the southwest area of the floor, accessible from the southern stairs of B2F ''(hidden)''|LP=yes|LE=yes}} | ||
{{ | {{Itemlist|Nugget|B2F, in the northeast of the [[spin tile]] maze|R=yes|B=yes|Y=yes|LP=yes|LE=yes}} | ||
{{ | {{Itemlist|X Speed|B2F, in the northeast of the spin tile maze|FR=yes|LG=yes}} | ||
{{ | {{Itemlist|Moon Stone|B2F, in the northwest of the spin tile maze|R=yes|B=yes|Y=yes|FR=yes|LG=yes}} | ||
{{ | {{Itemlist|Awakening|B2F, in the northwest of the spin tile maze|LP=yes|LE=yes}} | ||
{{ | {{Itemlist|TM Psychic VI|B2F, in the center of the northern part of the spin tile maze|LP=yes|LE=yes|display={{TM|05|Rest}}}} | ||
{{ | {{Itemlist|PP Up|B2F, in the southwest of the spin tile maze|LP=yes|LE=yes}} | ||
{{ | {{Itemlist|X Accuracy|B2F, on the south side of the large block in the middle of the spin tile maze ''(hidden)''|LP=yes|LE=yes}} | ||
{{ | {{Itemlist|TM Normal|B2F, southeast of the [[Moon Stone]]|R=yes|B=yes|Y=yes|display={{TM|07|Horn Drill}}}} | ||
{{ | {{Itemlist|TM Dark|B2F, southeast of the Moon Stone|FR=yes|LG=yes|display={{TM|12|Taunt}}}} | ||
{{ | {{Itemlist|Super Potion|B2F, in the southwest area of the spin tile maze|R=yes|B=yes|Y=yes|FR=yes|LG=yes}} | ||
{{ | {{Itemlist|TM Normal|B3F, south of the staircase leading to B2F|R=yes|B=yes|Y=yes|display={{TM|10|Double-Edge}}}} | ||
{{ | {{Itemlist|TM Normal|B3F, south of the staircase leading to B2F|FR=yes|LG=yes|display={{TM|21|Frustration}}}} | ||
{{ | {{Itemlist|TM Dark VI|B3F, south of the staircase leading to B2F|LP=yes|LE=yes|display={{TM|20|Dark Pulse}}}} | ||
{{ | {{Itemlist|Nugget|B3F, one square east of [[TM10]] ''(hidden)'' ([[Broken hidden items|broken]] in Japanese {{2v2|Red|Green}})|R=yes|B=yes|Y=yes}} | ||
{{ | {{Itemlist|Nugget|B3F, one square south of the northwest corner of the floor ''(hidden)''|FR=yes|LG=yes}} | ||
{{ | {{Itemlist|Guard Spec.|B3F, on the electronics boxes south of the machine with Poké Balls in it ''(hidden)''|LP=yes|LE=yes}} | ||
{{ | {{Itemlist|Revive|B3F, in the northwest corner|LP=yes|LE=yes}} | ||
{{Itemlist|Rare Candy|B3F, on the east side of the spin tile maze|R=yes|B=yes|Y=yes|FR=yes|LG=yes|LP=yes|LE=yes}} | |||
{{Itemlist|X Speed|B3F, in the northwest of the spin tile maze|LP=yes|LE=yes}} | |||
{{Itemlist|BlackGlasses|B3F, south of the staircase leading to B4F|FR=yes|LG=yes|display=[[Black Glasses|BlackGlasses]]}} | |||
{{Itemlist|HP Up|B4F, west of the staircase leading to B3F|R=yes|B=yes|Y=yes}} | |||
{{Itemlist|Max Ether|B4F, west of the staircase leading to B3F|FR=yes|LG=yes}} | |||
{{Itemlist|Hyper Potion|B4F, in the room west of the stairs to B3F, in the north of the room|LP=yes|LE=yes}} | |||
{{Itemlist|PP Up|B4F, in the room west of the stairs to B3F, in the southwest corner of the room|LP=yes|LE=yes}} | |||
{{Itemlist|TM Normal|B4F, in the northwest area of the floor|R=yes|B=yes|Y=yes|display={{TM|02|Razor Wind}}}} | |||
{{Itemlist|TM Dark|B4F, in the northwest area of the floor|FR=yes|LG=yes|display={{TM|49|Snatch}}}} | |||
{{Itemlist|Lift Key III|B4F, dropped by the Team Rocket Grunt in the northwest area of the floor when defeated|R=yes|B=yes|Y=yes|FR=yes|LG=yes|display=[[Lift Key]]}} | |||
{{Itemlist|Lift Key|B4F, on top of a wall in the middle of the floor after defeating the Team Rocket Grunt in the northwest area (must be retrieved by {{OBP|partner Pokémon|Let's Go, Pikachu! and Let's Go, Eevee!}})|LP=yes|LE=yes}} | |||
{{Itemlist|Iron|B4F, in the southwest area of the floor (requires [[Lift Key]])|R=yes|B=yes|Y=yes}} | |||
{{Itemlist|Calcium|B4F, in the southwest area of the floor (requires [[Lift Key]])|FR=yes|LG=yes}} | |||
{{Itemlist|Elixir|B4F, in the southwest area of the floor (requires [[Lift Key]])|LP=yes|LE=yes}} | |||
{{Itemlist|Super Potion|B4F, on the machine north of [[Giovanni]] (requires [[Lift Key]]) ''(hidden)''|R=yes|B=yes|Y=yes}} | |||
{{Itemlist|Net Ball|B4F, between the potted plants southwest of Giovanni (requires [[Lift Key]]) ''(hidden)''|FR=yes|LG=yes}} | |||
{{Itemlist|Nest Ball|B4F, between the potted plants southeast of Giovanni (requires [[Lift Key]]) ''(hidden)''|FR=yes|LG=yes}} | |||
{{Itemlist|Max Revive|B4F, on the eastern chest of draws behind Giovanni's desk (requires [[Lift Key]]) ''(hidden)'' (daily)|LP=yes|LE=yes}} | |||
{{Itemlist|Silph Scope III|B4F, dropped by Giovanni after his defeat (requires [[Lift Key]])|R=yes|B=yes|Y=yes|FR=yes|LG=yes|display=[[Silph Scope]]}} | |||
{{Itemlist|Silph Scope|B4F, received from Giovanni after his defeat (requires [[Lift Key]])|LP=yes|LE=yes}} | |||
{{itlistfoot|building}} | {{itlistfoot|building}} | ||
| Line 57: | Line 80: | ||
====B1F==== | ====B1F==== | ||
{{Trainerheader|building}} | {{Trainerheader|building}} | ||
{{Trainerentry| | {{Trainerentry|Spr RG Rocket.png|game=1|Rocket||630|2|096|Drowzee||21|None|066|Machop||21|None|}} | ||
{{Trainerdiv|building}} | {{Trainerdiv|building}} | ||
{{Trainerentry| | {{Trainerentry|Spr RG Rocket.png|game=1|Rocket||630|2|020|Raticate||21|None|020|Raticate||21|None|}} | ||
{{Trainerdiv|building}} | {{Trainerdiv|building}} | ||
{{Trainerentry| | {{Trainerentry|Spr RG Rocket.png|game=1|Rocket||600|3|088|Grimer||20|None|109|Koffing||20|None|109|Koffing||20|None|}} | ||
{{Trainerdiv|building}} | {{Trainerdiv|building}} | ||
{{Trainerentry| | {{Trainerentry|Spr RG Rocket.png|game=1|Rocket||570|4|019|Rattata||19|None|020|Raticate||19|None|020|Raticate||19|None|019|Rattata||19|None|}} | ||
{{Trainerdiv|building}} | {{Trainerdiv|building|Requires Lift Key}} | ||
{{Trainerentry| | {{Trainerentry|Spr RG Rocket.png|game=1|Rocket||660|2|088|Grimer||22|None|109|Koffing||22|None|}} | ||
{{Trainerfooter|building|1}} | {{Trainerfooter|building|1}} | ||
====B2F==== | ====B2F==== | ||
{{Trainerheader|building}} | {{Trainerheader|building}} | ||
{{Trainerentry| | {{Trainerentry|Spr RG Rocket.png|game=1|Rocket||510|5|041|Zubat||17|None|109|Koffing||17|None|088|Grimer||17|None|041|Zubat||17|None|020|Raticate||17|None|}} | ||
{{Trainerfooter|building|1}} | {{Trainerfooter|building|1}} | ||
====B3F==== | ====B3F==== | ||
{{Trainerheader|building}} | {{Trainerheader|building}} | ||
{{Trainerentry| | {{Trainerentry|Spr RG Rocket.png|game=1|Rocket||630|2|066|Machop||21|None|066|Machop||21|None|}} | ||
{{Trainerdiv|building}} | {{Trainerdiv|building}} | ||
{{Trainerentry| | {{Trainerentry|Spr RG Rocket.png|game=1|Rocket||600|3|019|Rattata||20|None|020|Raticate||20|None|096|Drowzee||20|None|}} | ||
{{Trainerfooter|building|1}} | {{Trainerfooter|building|1}} | ||
====B4F==== | ====B4F==== | ||
{{Trainerheader|building}} | {{Trainerheader|building}} | ||
{{Trainerentry| | {{Trainerentry|Spr RG Rocket.png|game=1|Rocket||630|2|109|Koffing||21|None|041|Zubat||21|None|}} | ||
{{Trainerdiv|building|Requires Lift Key}} | |||
{{Trainerentry|Spr RG Rocket.png|game=1|Rocket|{{sup/1|RB}}|690|3|027|Sandshrew||23|None|023|Ekans||23|None|028|Sandslash||23|None|}} | |||
{{Trainerdiv|building}} | {{Trainerdiv|building}} | ||
{{Trainerentry| | {{Trainerentry|Spr RG Rocket.png|game=1|Rocket|{{sup/1|RB}}|690|3|023|Ekans||23|None|027|Sandshrew||23|None|024|Arbok||23|None|}} | ||
{{ | |||
{{Trainerfooter|building|1}} | {{Trainerfooter|building|1}} | ||
====={{ | ====={{game|Red and Blue|s}}===== | ||
{{ | Giovanni has one [[Guard Spec.]] per Pokémon, using it randomly 25% of the time. | ||
|sprite=Giovanni | {{Party/Single | ||
|prize={{ | |color=666 | ||
|bordercolor=C00 | |||
|headcolor=CCC | |||
|sprite=Spr RG Giovanni.png | |||
|prize={{PDollar}}2871 | |||
<!--GEN I HAD NO CLASSES--> | <!--GEN I HAD NO CLASSES--> | ||
|name={{color2| | |name={{color2|000|Giovanni}} | ||
|game=RGB | |game=RGB | ||
|location=Rocket Hideout | |location=Team Rocket Hideout | ||
|pokemon=3 | |locationname=Rocket Hideout | ||
| | |pokemon=3}} | ||
|level=25|type1=Rock|type2=Ground | |{{Pokémon/1 | ||
|move1= | |game=Red and Blue | ||
|ndex=095 | |||
|pokemon=Onix | |||
|level=25 | |||
|type1=Rock|type2=Ground | |||
|move1=Screech|move1type=Normal | |||
|move2=Bind|move2type=Normal | |move2=Bind|move2type=Normal | ||
|move3= | |move3=Rock Throw|move3type=Rock | ||
|move4= | |move4=Rage|move4type=Normal}} | ||
| | |{{Pokémon/1 | ||
|level=24|type1=Ground|type2=Rock | |game=Red and Blue | ||
|ndex=111 | |||
|pokemon=Rhyhorn | |||
|level=24 | |||
|type1=Ground|type2=Rock | |||
|move1=Horn Attack|move1type=Normal}} | |move1=Horn Attack|move1type=Normal}} | ||
| | |{{Pokémon/1 | ||
|level=29|type1=Normal | |game=Red and Blue | ||
|ndex=115 | |||
|pokemon=Kangaskhan | |||
|level=29 | |||
|type1=Normal | |||
|move1=Comet Punch|move1type=Normal | |move1=Comet Punch|move1type=Normal | ||
|move2=Rage|move2type=Normal | |move2=Rage|move2type=Normal | ||
|move3=Bite|move3type=Normal}}}} | |move3=Bite|move3type=Normal}} | ||
{{Party/Footer}} | |||
====={{game|Yellow}}===== | ====={{game|Yellow}}===== | ||
{{ | {{Party/Single | ||
|sprite= | |color=666 | ||
|prize={{ | |bordercolor=C00 | ||
|name={{color2| | |headcolor=CCC | ||
|sprite=Spr Y Jessie James.png | |||
|prize={{PDollar}}750 | |||
|name={{color2|000|Team Rocket trio|Rocket}} | |||
|game=Y | |game=Y | ||
|location=Rocket Hideout | |location=Team Rocket Hideout | ||
|pokemon=3 | |locationname=Rocket Hideout | ||
| | |pokemon=3}} | ||
|level=25|type1=Poison | |{{Pokémon/1 | ||
|move1= | |game=Yellow | ||
|move2= | |ndex=109 | ||
|pokemon=Koffing | |||
|level=25 | |||
| | |type1=Poison | ||
|level=25|type1=Normal | |move1=Tackle|move1type=Normal | ||
|move1= | |move2=Smog|move2type=Poison}} | ||
|move2= | |{{Pokémon/1 | ||
|game=Yellow | |||
|ndex=052 | |||
|pokemon=Meowth | |||
|level=25 | |||
|type1=Normal | |||
|move1=Growl|move1type=Normal | |||
|move2=Bite|move2type=Normal | |||
|move3=Pay Day|move3type=Normal | |move3=Pay Day|move3type=Normal | ||
|move4=Screech|move4type=Normal}} | |move4=Screech|move4type=Normal}} | ||
| | |{{Pokémon/1 | ||
|level=25|type1=Poison | |game=Yellow | ||
|move1= | |ndex=023 | ||
|move2= | |pokemon=Ekans | ||
}} | |level=25 | ||
|type1=Poison | |||
|move1=Leer|move1type=Normal | |||
|move2=Poison Sting|move2type=Poison | |||
|move3=Bite|move3type=Normal | |||
|move4=Glare|move4type=Normal}} | |||
{{Party/Footer}} | |||
{{ | Giovanni has one [[Guard Spec.]] per Pokémon, using it randomly 25% of the time. | ||
|sprite= | {{Party/Single | ||
|prize={{ | |color=666 | ||
|bordercolor=C00 | |||
|headcolor=CCC | |||
|sprite=Spr Y Giovanni.png | |||
|prize={{PDollar}}2871 | |||
<!--GEN I HAD NO CLASSES--> | <!--GEN I HAD NO CLASSES--> | ||
|name={{color2| | |name={{color2|000|Giovanni}} | ||
|game=Y | |game=Y | ||
|location=Rocket Hideout | |location=Team Rocket Hideout | ||
|pokemon=3 | |locationname=Rocket Hideout | ||
| | |pokemon=3}} | ||
|level=25|type1=Rock|type2=Ground | |{{Pokémon/1 | ||
|move1= | |game=Yellow | ||
|ndex=095 | |||
|pokemon=Onix | |||
|level=25 | |||
|type1=Rock|type2=Ground | |||
|move1=Screech|move1type=Normal | |||
|move2=Bind|move2type=Normal | |move2=Bind|move2type=Normal | ||
|move3= | |move3=Rock Throw|move3type=Rock | ||
|move4= | |move4=Rage|move4type=Normal}} | ||
| | |{{Pokémon/1 | ||
|level=24|type1=Ground|type2=Rock | |game=Yellow | ||
|ndex=111 | |||
|pokemon=Rhyhorn | |||
|level=24 | |||
|type1=Ground|type2=Rock | |||
|move1=Horn Attack|move1type=Normal}} | |move1=Horn Attack|move1type=Normal}} | ||
| | |{{Pokémon/1 | ||
|level=29|type1=Normal | |game=Yellow | ||
|move1= | |ndex=053 | ||
|move2= | |pokemon=Persian | ||
|move3= | |level=29 | ||
|move4= | |type1=Normal | ||
|move1=Growl|move1type=Normal | |||
|move2=Bite|move2type=Normal | |||
|move3=Screech|move3type=Normal | |||
|move4=Pay Day|move4type=Normal}} | |||
{{Party/Footer}} | |||
===Generation III=== | ===Generation III=== | ||
====B1F==== | ====B1F==== | ||
{{trainerheader| | {{trainerheader|building}} | ||
{{trainerentry| | {{trainerentry|Spr FRLG Team Rocket Grunt M.png|Team Rocket Grunt||672|2|096|Drowzee|♂|21||066|Machop|♂|21||}} | ||
{{trainerdiv| | {{trainerdiv|building}} | ||
{{trainerentry| | {{trainerentry|Spr FRLG Team Rocket Grunt M.png|Team Rocket Grunt||672|2|020|Raticate|♂|21||020|Raticate|♂|21||}} | ||
{{trainerdiv| | {{trainerdiv|building}} | ||
{{trainerentry| | {{trainerentry|Spr FRLG Team Rocket Grunt M.png|Team Rocket Grunt||608|4|019|Rattata|♂|19||020|Raticate|♂|19||020|Raticate|♂|19||019|Rattata|♂|19||}} | ||
{{trainerdiv| | {{trainerdiv|building}} | ||
{{trainerentry| | {{trainerentry|Spr FRLG Team Rocket Grunt M.png|Team Rocket Grunt||640|3|088|Grimer|♂|20||109|Koffing|♂|20||109|Koffing|♂|20||}} | ||
{{trainerdiv| | {{trainerdiv|building|Requires Lift Key}} | ||
{{trainerentry| | {{trainerentry|Spr FRLG Team Rocket Grunt M.png|Team Rocket Grunt||704|2|088|Grimer|♂|22||109|Koffing|♂|22||}} | ||
{{trainerfooter| | {{trainerfooter|building}} | ||
====B2F==== | ====B2F==== | ||
{{trainerheader| | {{trainerheader|building}} | ||
{{trainerentry| | {{trainerentry|Spr FRLG Team Rocket Grunt M.png|Team Rocket Grunt||544|5|041|Zubat|♂|17||109|Koffing|♂|17||088|Grimer|♂|17||041|Zubat|♂|17||020|Raticate|♂|17||}} | ||
{{trainerfooter| | {{trainerfooter|building}} | ||
====B3F==== | ====B3F==== | ||
{{trainerheader| | {{trainerheader|building}} | ||
{{trainerentry| | {{trainerentry|Spr FRLG Team Rocket Grunt M.png|Team Rocket Grunt||672|2|066|Machop|♂|21||066|Machop|♂|21||}} | ||
{{trainerdiv| | {{trainerdiv|building}} | ||
{{trainerentry| | {{trainerentry|Spr FRLG Team Rocket Grunt M.png|Team Rocket Grunt||640|3|019|Rattata|♂|20||020|Raticate|♂|20||096|Drowzee|♂|20||}} | ||
{{trainerfooter| | {{trainerfooter|building}} | ||
====B4F==== | ====B4F==== | ||
{{trainerheader| | {{trainerheader|building}} | ||
{{trainerentry| | {{trainerentry|Spr FRLG Team Rocket Grunt M.png|Team Rocket Grunt||672|2|109|Koffing|♂|21||041|Zubat|♂|21||}} | ||
{{trainerdiv| | {{trainerdiv|building|Requires Lift Key}} | ||
{{trainerentry| | {{trainerentry|Spr FRLG Team Rocket Grunt M.png|Team Rocket Grunt||736|3|027|Sandshrew|♂|23||023|Ekans|♂|23||028|Sandslash|♂|23||}} | ||
{{trainerdiv| | {{trainerdiv|building}} | ||
{{trainerentry| | {{trainerentry|Spr FRLG Team Rocket Grunt M.png|Team Rocket Grunt||736|3|023|Ekans|♂|23||027|Sandshrew|♂|23||024|Arbok|♂|23||}} | ||
{{trainerfooter| | {{trainerfooter|building}} | ||
{{ | {{Party/Single | ||
|sprite= | |color=666 | ||
|prize={{ | |bordercolor=C00 | ||
|headcolor=CCC | |||
|sprite=Spr FRLG Giovanni.png | |||
|prize={{PDollar}}2900 | |||
|class=Boss | |class=Boss | ||
|name={{color2| | |classlink=Giovanni | ||
|name={{color2|000|Giovanni}} | |||
|game=FRLG | |game=FRLG | ||
|location=Rocket Hideout | |location=Team Rocket Hideout | ||
|pokemon=3 | |locationname=Rocket Hideout | ||
| | |pokemon=3}} | ||
|level=25|gender=male|ability=Rock Head|type1=Rock|type2=Ground | |{{Pokémon/3 | ||
|game=FireRed | |||
|ndex=095 | |||
|pokemon=Onix | |||
|level=25 | |||
|gender=male | |||
|ability=Rock Head | |||
|type1=Rock|type2=Ground | |||
|move1=Rock Throw|move1type=Rock | |move1=Rock Throw|move1type=Rock | ||
|move2=Bind|move2type=Normal | |move2=Bind|move2type=Normal | ||
|move3=Rage|move3type=Normal | |move3=Rage|move3type=Normal | ||
|move4=Harden|move4type=Normal}} | |move4=Harden|move4type=Normal}} | ||
| | |{{Pokémon/3 | ||
|level=24|gender=male|ability=Rock Head|type1=Ground|type2=Rock | |game=FireRed | ||
|ndex=111 | |||
|pokemon=Rhyhorn | |||
|level=24 | |||
|gender=male | |||
|ability=Rock Head | |||
|type1=Ground|type2=Rock | |||
|move1=Stomp|move1type=Normal | |move1=Stomp|move1type=Normal | ||
|move2=Fury Attack|move2type=Normal | |move2=Fury Attack|move2type=Normal | ||
|move3=Scary Face|move3type=Normal | |move3=Scary Face|move3type=Normal | ||
|move4=Tail Whip|move4type=Normal}} | |move4=Tail Whip|move4type=Normal}} | ||
| | |{{Pokémon/3 | ||
|level=29|gender=female|ability=Early Bird|type1=Normal | |game=FireRed | ||
|ndex=115 | |||
|pokemon=Kangaskhan | |||
|level=29 | |||
|gender=female | |||
|ability=Early Bird | |||
|type1=Normal | |||
|move1=Fake Out|move1type=Normal | |move1=Fake Out|move1type=Normal | ||
|move2=Mega Punch|move2type=Normal | |move2=Mega Punch|move2type=Normal | ||
|move3=Bite|move3type=Dark | |move3=Bite|move3type=Dark | ||
|move4=Tail Whip|move4type=Normal}}}} | |move4=Tail Whip|move4type=Normal}} | ||
{{Party/Footer}} | |||
== | ===Generation VII=== | ||
====Pre–[[Hall of Fame]]==== | |||
After Giovanni has been defeated, the Team Rocket Grunts inside the hideout disappear, and the locked gate on B1F opens by itself. | |||
=====B1F===== | |||
{{trainerheader|building}} | |||
{{trainerentry|VSTeam Rocket Grunt M PE.png{{!}}90px|game=PE|Team Rocket Grunt||812|1|042|Golbat|♀|29|None}} | |||
{{trainerdiv|building}} | |||
{{trainerentry|VSTeam Rocket Grunt M PE.png{{!}}90px|game=PE|Team Rocket Grunt||812|3|109|Koffing|♂|29|None|019|Rattata|♂|29|None|019|Rattata|♂|29|None}} | |||
{{trainerdiv|building}} | |||
{{trainerentry|VSTeam Rocket Grunt M PE.png{{!}}90px|game=PE|Team Rocket Grunt||812|1|100|Voltorb||29|None}} | |||
{{trainerdiv|building}} | |||
{{trainerentry|VSTeam Rocket Grunt F PE.png{{!}}90px|game=PE|Team Rocket Grunt||812|2|023|Ekans|♀|29|None|024|Arbok|♀|29|None}} | |||
{{trainerdiv|building|Requires Lift Key}} | |||
{{trainerentry|VSTeam Rocket Grunt M PE.png{{!}}90px|game=PE|Team Rocket Grunt||812|2|041|Zubat|♀|29|None|092|Gastly|♂|29|None}} | |||
{{trainerfooter|building|PE}} | |||
=====B2F===== | |||
{{trainerheader|building}} | |||
{{trainerentry|VSTeam Rocket Grunt M PE.png{{!}}90px|game=PE|Team Rocket Grunt||812|1|097|Hypno|♂|29|None}} | |||
{{trainerfooter|building|PE}} | |||
=====B3F===== | |||
{{trainerheader|building}} | |||
{{trainerentry|VSTeam Rocket Grunt F PE.png{{!}}90px|game=PE|Team Rocket Grunt||812|1|042|Golbat|♂|29|None}} | |||
{{trainerdiv|building}} | |||
{{trainerentry|VSTeam Rocket Grunt M PE.png{{!}}90px|game=PE|Team Rocket Grunt||812|2|019|Rattata|♂|29|None|100|Voltorb||29|None}} | |||
{{trainerfooter|building|PE}} | |||
=====B4F===== | |||
{{trainerheader|building}} | |||
{{trainerentry|VSTeam Rocket Grunt M PE.png{{!}}90px|game=PE|Team Rocket Grunt||812|1|088|Grimer|♀|29|None}} | |||
{{trainerfooter|building|PE}} | |||
;Requires Lift Key | |||
{{Party/Tag | |||
|color=666 | |||
|bordercolor=C00 | |||
|headcolor=CCC | |||
|color1=EE8BCD | |||
|headcolor1=F5BCE2 | |||
|bordercolor1=E44EB2 | |||
|color2=8BB2FF | |||
|headcolor2=CCDDFF | |||
|bordercolor2=4D88FF | |||
|class=Team Rocket | |||
|classlink=Team Rocket | |||
|sprite=VSJessie PE.png | |||
|size=80x80px | |||
|class2=Team Rocket | |||
|classlink2=Team Rocket | |||
|sprite2=VSJames PE.png | |||
|size2=80x80px | |||
|prize={{Pdollar}}3,072 | |||
|name={{color2|000|Jessie}} | |||
|name2={{color2|000|James}} | |||
|game=LGPE | |||
|location=Team Rocket Hideout | |||
|pokemon1=1 | |||
|pokemon2=1}} | |||
| style="margin: auto;" |{{Pokémon/7/LG | |||
|game=PE | |||
|ndex=024 | |||
|pokemon=Arbok | |||
|gender=male | |||
|level=32 | |||
|type1=Poison | |||
|move1=Poison Jab|move1type=Poison|move1cat=Physical | |||
|move2=Glare|move2type=Normal|move2cat=Status | |||
|move3=Crunch|move3type=Dark|move3cat=Physical}} | |||
{{Party/Div|color=8BB2FF}} | |||
| style="margin: auto;" |{{Pokémon/7/LG | |||
|game=PE | |||
|ndex=110 | |||
|pokemon=Weezing | |||
|gender=male | |||
|level=32 | |||
|type1=Poison | |||
|move1=Toxic|move1type=Poison|move1cat=Status | |||
|move2=Sludge|move2type=Poison|move2cat=Special}} | |||
{{Party/Footer}} | |||
{{Party/Single|color=666|bordercolor=C00|headcolor=CCC | |||
|sprite=VSArcher PE.png | |||
|size=90px | |||
|prize={{PDollar}}3,300 | |||
|class=Team Rocket Admin | |||
|classlink=Executive (Trainer class) | |||
|name={{color2|000|Archer}} | |||
|game=PE | |||
|location=Team Rocket Hideout | |||
|pokemon=2}} | |||
|{{Pokémon/7/LG | |||
|game=LPE | |||
|ndex=110 | |||
|pokemon=Weezing | |||
|level=33 | |||
|type1=Poison | |||
|gender=male | |||
|move1=Sludge Bomb|move1type=Poison|move1cat=Special | |||
|move2=Flamethrower|move2type=Fire|move2cat=Special | |||
|move3=Dark Pulse|move3type=Dark|move3cat=Special}} | |||
|{{Pokémon/7/LG | |||
|game=LPE | |||
|ndex=042 | |||
|pokemon=Golbat | |||
|level=33 | |||
|type1=Poison|type2=Flying | |||
|gender=male | |||
|move1=Air Slash|move1type=Flying|move1cat=Special | |||
|move2=Crunch|move2type=Dark|move2cat=Physical}} | |||
{{Party/Footer}} | |||
{{Party/Single | |||
|color=666 | |||
|bordercolor=C00 | |||
|headcolor=CCC | |||
|sprite=VSGiovanni PE.png | |||
|size=80x80px | |||
|prize={{PDollar}}5,600 | |||
|class=Team Rocket Boss | |||
|classlink=Giovanni | |||
|name={{color2|000|Giovanni}} | |||
|game=PE | |||
|location=Team Rocket Hideout | |||
|pokemon=2}} | |||
|{{Pokémon/7/LG | |||
|game=PE | |||
|ndex=053 | |||
|pokemon=Persian | |||
|level=35 | |||
|gender=male | |||
|type1=Normal | |||
|move1=Slash|move1type=Normal|move1cat=Physical | |||
|move2=Feint|move2type=Normal|move2cat=Physical | |||
|move3=Fake Out|move3type=Normal|move3cat=Physical}} | |||
|{{Pokémon/7/LG | |||
|game=PE | |||
|ndex=111 | |||
|pokemon=Rhyhorn | |||
|level=35 | |||
|gender=male | |||
|type1=Ground|type2=Rock | |||
|move1=Drill Run|move1type=Ground|move1cat=Physical | |||
|move2=Take Down|move2type=Normal|move2cat=Physical | |||
|move3=Megahorn|move3type=Bug|move3cat=Physical | |||
|move4=Rock Throw|move4type=Rock|move4cat=Physical}} | |||
{{Party/Footer}} | |||
====Post–Hall of Fame==== | |||
=====B1F===== | |||
{{trainerheader|building}} | |||
{{trainerentry/master|VSScientist Master PE.png{{!}}90px|Scientist|Adam|024|Arbok|♂|75|Normal|Glare|Normal|Facade|Normal|Wrap|Dark|Sucker Punch|36=ガク|37=Gaku}} | |||
{{trainerfooter|building|PE}} | |||
=====B2F===== | |||
{{trainerheader|building}} | |||
{{trainerentry/master|VSHiker Master PE.png{{!}}90px|Hiker|Eugine|112|Rhydon|♂|75|Ground|Earthquake|Normal|Horn Drill|36=マサヒコ|37=Masahiko}} | |||
{{trainerfooter|building|PE}} | |||
=====B3F===== | |||
{{trainerheader|building}} | |||
{{trainerentry/master|VSScientist Master PE.png{{!}}90px|Scientist|Donnie|110|Weezing|♂|75|Fire|Flamethrower|Electric|Thunderbolt|Dark|Taunt|36=コウジ|37=Kōji}} | |||
{{trainerfooter|building|PE}} | |||
=====B4F===== | |||
{{trainerheader|building}} | |||
{{trainerentry/master|VSYoungster Master PE.png{{!}}90px|Youngster|Shawn|053|Persian|♂|75|Psychic|Hypnosis|Psychic|Dream Eater|Dark|Nasty Plot|Normal|Hyper Beam|36=ユウヤ|37=Yūya}} | |||
{{trainerfooter|building|PE}} | |||
{{Party/Single|color=666|bordercolor=C00|headcolor=CCC | |||
|sprite=VSArcher PE.png | |||
|size=90px | |||
|prize={{PDollar}}5,400 | |||
|class=Pokémon Trainer | |||
|classlink=Pokémon Trainer | |||
|name={{color2|000|Archer}} | |||
|game=PE | |||
|location=Team Rocket Hideout | |||
|pokemon=4}} | |||
|{{Pokémon/7/LG | |||
|game=LPE | |||
|ndex=101 | |||
|pokemon=Electrode | |||
|level=54 | |||
|type1=Electric | |||
|move1=Thunder|move1type=Electric|move1cat=Special | |||
|move2=Foul Play|move2type=Dark|move2cat=Physical | |||
|move3=Explosion|move3type=Normal|move3cat=Physical | |||
|move4=Reflect|move4type=Psychic|move4cat=Status}} | |||
|{{Pokémon/7/LG | |||
|game=LPE | |||
|ndex=042 | |||
|pokemon=Golbat | |||
|level=54 | |||
|type1=Poison|type2=Flying | |||
|gender=male | |||
|move1=Air Slash|move1type=Flying|move1cat=Special | |||
|move2=Crunch|move2type=Dark|move2cat=Physical | |||
|move3=Sludge Bomb|move3type=Poison|move3cat=Special | |||
|move4=U-turn|move4type=Bug|move4cat=Physical}} | |||
{{Party/Div|color=666}} | |||
|{{Pokémon/7/LG | |||
|game=LPE | |||
|ndex=126 | |||
|pokemon=Magmar | |||
|level=54 | |||
|type1=Fire | |||
|gender=male | |||
|move1=Fire Punch|move1type=Fire|move1cat=Physical | |||
|move2=Thunder Punch|move2type=Electric|move2cat=Physical | |||
|move3=Clear Smog|move3type=Poison|move3cat=Special | |||
|move4=Brick Break|move4type=Fighting|move4cat=Physical}} | |||
|{{Pokémon/7/LG | |||
|game=LPE | |||
|ndex=110 | |||
|pokemon=Weezing | |||
|level=54|type1=Poison | |||
|gender=male | |||
|move1=Dark Pulse|move1type=Dark|move1cat=Special | |||
|move2=Flamethrower|move2type=Fire|move2cat=Special | |||
|move3=Sludge Bomb|move3type=Poison|move3cat=Special | |||
|move4=Shadow Ball|move4type=Ghost|move4cat=Special}} | |||
{{Party/Footer}} | |||
==Layout== | ==Layout== | ||
{| class="roundy" style="margin: auto; background: #000; border: 3px solid #C00;" | |||
{| | ! style="background: #CCC; {{roundytl|5px}};" | Version | ||
! style="background: #CCC;" | B1F | |||
! style="background: #CCC;" | B2F | |||
! style="background: #CCC;" | B3F | |||
! style="background: #CCC; {{roundytr|5px}};" | B4F | |||
|- | |||
! style="background: #{{Red color}};" | {{color2|000|Pokémon Red and Blue Versions|Red}} | |||
| rowspan="3" | [[File:Rocket Hideout B1F RBY.png|150px]] | |||
| rowspan="3" | [[File:Rocket Hideout B2F RBY.png|150px]] | |||
| rowspan="3" | [[File:Rocket Hideout B3F RBY.png|150px]] | |||
| rowspan="3" | [[File:Rocket Hideout B4F RBY.png|150px]] | |||
|- | |||
! style="background: #{{Blue color}};" | {{color2|FFF|Pokémon Red and Blue Versions|Blue}} | |||
|- | |- | ||
! | ! style="background: #{{Yellow color}};" | {{color2|000|Pokémon Yellow Version|Yellow}} | ||
|- | |- | ||
! | ! style="background: #{{FireRed color}};" | {{color2|000|Pokémon FireRed and LeafGreen Versions|FireRed}} | ||
| rowspan="2" | [[File:Rocket Hideout B1F FRLG.png|150px]] | |||
| rowspan="2" | [[File:Rocket Hideout B2F FRLG.png|150px]] | |||
| rowspan="2" | [[File:Rocket Hideout B3F FRLG.png|150px]] | |||
| rowspan="2" | [[File:Rocket Hideout B4F FRLG.png|150px]] | |||
|- | |- | ||
! | ! style="background: #{{LeafGreen color}};" | {{color2|000|Pokémon FireRed and LeafGreen Versions|LeafGreen}} | ||
|- | |- | ||
! | ! style="background: #{{Let's Go Pikachu color}};" | {{color2|000|Pokémon Let's Go, Pikachu! and Let's Go, Eevee!|Let's Go, Pikachu!}} | ||
| rowspan="2" | [[File:Rocket Hideout | | rowspan="2" | [[File:Rocket Hideout B1F LGPE.png|150px]] | ||
| rowspan="2" | [[File:Rocket Hideout | | rowspan="2" | [[File:Rocket Hideout B2F LGPE.png|150px]] | ||
| rowspan="2" | [[File:Rocket Hideout | | rowspan="2" | [[File:Rocket Hideout B3F LGPE.png|150px]] | ||
| rowspan="2" | [[File:Rocket Hideout | | rowspan="2" | [[File:Rocket Hideout B4F LGPE.png|150px]] | ||
|- | |- | ||
! | ! style="background: #{{Let's Go Eevee color}};" | {{color2|000|Pokémon Let's Go, Pikachu! and Let's Go, Eevee!|Let's Go, Eevee!}} | ||
|- | |- | ||
| colspan="5" style="background:# | | colspan="5" style="background: #CCC; {{roundybottom|5px}};" | | ||
|} | |} | ||
==In the anime== | |||
[[File:Rocket Hideout PO.png|thumb|250px|Giovanni's Rocket Hideout office in [[Pokémon Origins]]]] | |||
===Pokémon Origins=== | |||
The Rocket Hideout briefly appeared at the beginning of ''[[PO03|File 3: Giovanni]]'', where {{OBP|Red|Origins}} was seen freeing some imprisoned Pokémon in there, as well as encountering [[Giovanni]] for the first time. | |||
{{-}} | |||
==In the manga== | |||
[[File:Rocket Hideout Adventures.png|thumb|250px|Rocket Hideout in [[Pokémon Adventures]]]] | |||
===Pokémon Adventures=== | |||
===={{MangaArc|Red, Green & Blue}}==== | |||
The Rocket Hideout appeared in ''[[PS016|Tauros the Tyrant]]'' and ''[[PS017|The Jynx Jinx]]'', where {{adv|Red}} inflitrated it, disguised as a {{tc|Team Rocket Grunt}}, in order to get information regarding {{adv|Green}}'s whereabouts. Like in the games, the entrance to the hideout could be opened by pressing a switch behind a poster in the Rocket Game Corner. In the hideout, Red found a laboratory, where Team Rocket was creating {{adv|Mewtwo|an artificial Pokémon}} from {{adv|Mew}}'s cells, intending it to be their ultimate weapon. However, they were lacking enough genetic material to complete their creation. [[Blaine]] was one of the [[Team Rocket scientist|scientists]] working on the project. After the Pokémon was completed later, it escaped, presumably destroying the hideout. | |||
[[File:Rocket Hideout Zensho.png|thumb|left|230px|Rocket Hideout in [[Pokémon Zensho]]]] | |||
===Pokémon Zensho=== | |||
The Rocket Hideout appeared in [[PZ05]]. After being scared away by {{OBP|ghost|Pokémon Tower}}s inside the [[Pokémon Tower]], {{zensho|Satoshi}} followed a pair of Team Rocket Grunts leaving the tower into their hideout and snatched one of their [[Silph Scope]]s before leaving. His infiltration was observed by [[Giovanni]] through surveillance cameras, ordering his minions to leave him alone out of curiosity in the intruding child. | |||
{{-}} | |||
==In the TCG== | |||
The following is a list of cards mentioning or featuring Team Rocket's Hideout in the [[Pokémon Trading Card Game]]. | |||
{{cardlist/header|Team Rocket's Hideout|Darkness|char=yes}} | |||
{{cardlist/entry|cardname={{TCG ID|Neo Revelation|Rocket's Hideout|63}}|type=Trainer|type2=Stadium|enset=Neo Revelation|enrarity=Uncommon|ennum=63/64|enset2=EX Team Rocket Returns|enrarity2=Uncommon|ennum2=87/109|jpset=Awakening Legends|jprarity=Uncommon|jpset2=Rocket Gang Strikes Back|jprarity2=Uncommon|jpnum2=081/085}} | |||
{{cardlist/entry|cardname={{TCG ID|Unbroken Bonds|Giovanni's Exile|174}}|type=Supporter|expanded=yes|enset=Unbroken Bonds|enrarity=Uncommon|ennum=174/214|jpset=Double Blaze|jprarity=U|jpnum=085/095|jpset2=Tag All Stars|jpnum2=151/173}} | |||
{{cardlist/footer|Darkness}} | |||
==Trivia== | |||
* In [[Generation I]], it is possible to skip the entire Rocket Hideout. Due to an oversight, the player can use a [[Poké Doll]] bought at the [[Celadon Department Store]] to flee from the {{OBP|Marowak|ghost}} {{OBP|ghost|Pokémon Tower}} at [[Pokémon Tower]] and progress without the [[Silph Scope]]. This was corrected in {{game|FireRed and LeafGreen|s}}. | |||
** If the player skips the Rocket Hideout using this method, it is still possible to enter this place at any point later and potentially [[sequence breaking|break the normal gameplay sequence]]. For instance, once the player obtains the {{badge|Earth}}, [[Giovanni]] appears to disband the Team Rocket and permanently leave the current game as expected in normal gameplay. However, as long as the player has not obtained the Silph Scope, then Giovanni and the Team Rocket members still permanently remain in the Rocket Hideout as if the Team Rocket was never disbanded. | |||
==In other languages== | ==In other languages== | ||
{{langtable|color= | {{langtable|color=666|bordercolor=C00|textcolor=FFF | ||
| | |zh_yue=火箭隊基地 ''{{tt|Fójin Déui Gēideih|Team Rocket Base}}'' {{tt|*|Games}}<br>火箭兵團的秘密基地 ''{{tt|Fójin Bīngtyùhn-dīk Beimaht Gēideih|Team Rocket Secret Base}}'' {{tt|*|PS016, Let's Find Pokémon!}}<br>火箭隊秘密指揮部 ''{{tt|Fójin Déui Beimaht Jífāibouh|Team Rocket Secret HQ}}'' {{tt|*|RGB Guidebook}} | ||
| | |zh_cmn=火箭隊基地 / 火箭队基地 ''{{tt|Huǒjiàn Duì-de Jīdì|Team Rocket Base}}'' {{tt|*|Games}}<br>火箭隊的秘密基地 / 火箭队的秘密基地 ''{{tt|Huǒjiàn Duì-de Mìmì Jīdì|Team Rocket Secret Base}}'' {{tt|*|PS016 (Taiwan), Let's Find Pokémon! (Mainland China)}} | ||
|fr=Repaire Rocket | |fr={{tt|Repaire Rocket|Repaire de la Team Rocket}} | ||
|it=Rifugio Rocket | |de=Rocket-Versteck{{sup/7|PE}}<br>{{tt|Rocket HQ|Team Rocket-Hauptquartier}}{{sup/1|RBY}}{{sup/3|FRLG}} | ||
| | |it={{tt|Rifugio Rocket|Rifugio di Team Rocket}} | ||
|ko=로켓단아지트 ''{{tt|Rocket-dan Ajiteu|Team Rocket Hideout}}'' | |||
|es=Guarida Rocket{{sup/3|FRLG}}{{sup/7|PE}}<br>{{tt|CG Rocket|Cuartel General del Team Rocket}}{{sup/1|RBY}} | |||
}} | |||
{{Kanto}} | ==Related articles== | ||
{{Kanto}}{{Team Rocket}}{{Team Rocket Adventures}}<br> | |||
{{Project Locations notice}} | {{Project Locations notice}} | ||
[[Category:Team Rocket]] | [[Category:Team Rocket]] | ||
[[Category:Kanto locations]] | [[Category:Kanto locations]] | ||
[[Category:Villainous team bases]] | |||
[[Category:Red, Blue and Yellow locations]] | [[Category:Red, Blue and Yellow locations]] | ||
[[Category:FireRed and LeafGreen locations]] | [[Category:FireRed and LeafGreen locations]] | ||
[[Category:Let's Go, Pikachu! and Let's Go, Eevee! locations]] | |||
[[de:Rocket | [[de:Rocket-Versteck (Prismania City)]] | ||
[[es:Guarida Rocket]] | |||
[[fr:Repaire Rocket]] | |||
[[it:Rifugio Rocket]] | |||
[[ja:ロケットだんアジト (タマムシシティ)]] | [[ja:ロケットだんアジト (タマムシシティ)]] | ||
[[zh:火箭隊基地(關都)]] | |||
Latest revision as of 11:03, 14 September 2024
- This article is about the Celadon City hideout. For the Mahogany Town hideout, see Team Rocket HQ.
| ||||
| ||||
| Location: | Celadon City | |||
|---|---|---|---|---|
| Region: | Kanto | |||
| Generations: | I, III, VII | |||
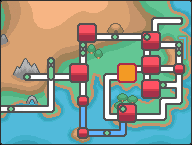 Location of Team Rocket Hideout in Kanto. | ||||
| Pokémon world locations | ||||
The Team Rocket Hideout (Japanese: ロケット団アジト Team Rocket Hideout), called Rocket Hideout in the Generation I and III games, and also known as Rocket HQ in the Generation I Town Map, is a four-floored underground complex beneath the Rocket Game Corner in Celadon City. It is a secret base built and used by Team Rocket to facilitate and administer their operations.
Access
The Rocket Hideout is accessed by pressing a switch behind a poster in the Rocket Game Corner in Celadon City. A Team Rocket Grunt is guarding the poster in question when the player first approaches it. After being defeated, the Grunt retreats into the base, leaving the poster unguarded, and enabling the player to approach. Once the player activates a switch behind the poster, the stairs to the hideout will appear. In Generation VII, the Grunt will only battle the player once Cubone has been kidnapped in Lavender Town.
In Generation II, the Rocket Hideout is referred to when the player walks and selects the poster at the back of the Rocket Game Corner in Celadon City. The words, "Hey! Under this poster... There's nothing!" will appear, a reference to the original access point.
Features
This is the first time that the player encounters spin tiles, a special type of tile that, when stepped on, will uncontrollably spin the player in the direction of the arrows until they hit a stop tile. These are used on the second and third basement floors to create a complex maze.
Items
| Item | Location | Games | |
|---|---|---|---|
| Team Rocket Set | B1F, from the spy disguised as a female Team Rocket Grunt directly south of the stairs | P E | |
| PP Up | B1F, on the southeasternmost plant of the plants in the center of the floor (hidden) | R B Y FR LG | |
| Escape Rope | B1F, west of the plants in the center of the floor | R B Y FR LG | |
| Ultra Ball ×3 | B1F, south of the table in the western room | P E | |
| Mighty Candy ×3 | B1F, under the southwest corner of the table in the eastern room | P E | |
| Great Ball ×5 | B1F, north of the stairs in the southwest area of the floor, accessible from the southern stairs of B2F | P E | |
| Hyper Potion | B1F, in the northwest corner of the southwest area of the floor, accessible from the southern stairs of B2F | R B Y FR LG P E | |
| Full Heal | B1F, in the cardboard box by the northmost desk in the southwest area of the floor, accessible from the southern stairs of B2F (hidden) | P E | |
| Nugget | B2F, in the northeast of the spin tile maze | R B Y P E | |
| X Speed | B2F, in the northeast of the spin tile maze | FR LG | |
| Moon Stone | B2F, in the northwest of the spin tile maze | R B Y FR LG | |
| Awakening | B2F, in the northwest of the spin tile maze | P E | |
| TM05 (Rest) | B2F, in the center of the northern part of the spin tile maze | P E | |
| PP Up | B2F, in the southwest of the spin tile maze | P E | |
| X Accuracy | B2F, on the south side of the large block in the middle of the spin tile maze (hidden) | P E | |
| TM07 (Horn Drill) | B2F, southeast of the Moon Stone | R B Y | |
| TM12 (Taunt) | B2F, southeast of the Moon Stone | FR LG | |
| Super Potion | B2F, in the southwest area of the spin tile maze | R B Y FR LG | |
| TM10 (Double-Edge) | B3F, south of the staircase leading to B2F | R B Y | |
| TM21 (Frustration) | B3F, south of the staircase leading to B2F | FR LG | |
| TM20 (Dark Pulse) | B3F, south of the staircase leading to B2F | P E | |
| Nugget | B3F, one square east of TM10 (hidden) (broken in Japanese Red and Green) | R B Y | |
| Nugget | B3F, one square south of the northwest corner of the floor (hidden) | FR LG | |
| Guard Spec. | B3F, on the electronics boxes south of the machine with Poké Balls in it (hidden) | P E | |
| Revive | B3F, in the northwest corner | P E | |
| Rare Candy | B3F, on the east side of the spin tile maze | R B Y FR LG P E | |
| X Speed | B3F, in the northwest of the spin tile maze | P E | |
| BlackGlasses | B3F, south of the staircase leading to B4F | FR LG | |
| HP Up | B4F, west of the staircase leading to B3F | R B Y | |
| Max Ether | B4F, west of the staircase leading to B3F | FR LG | |
| Hyper Potion | B4F, in the room west of the stairs to B3F, in the north of the room | P E | |
| PP Up | B4F, in the room west of the stairs to B3F, in the southwest corner of the room | P E | |
| TM02 (Razor Wind) | B4F, in the northwest area of the floor | R B Y | |
| TM49 (Snatch) | B4F, in the northwest area of the floor | FR LG | |
| Lift Key | B4F, dropped by the Team Rocket Grunt in the northwest area of the floor when defeated | R B Y FR LG | |
| Lift Key | B4F, on top of a wall in the middle of the floor after defeating the Team Rocket Grunt in the northwest area (must be retrieved by partner Pokémon) | P E | |
| Iron | B4F, in the southwest area of the floor (requires Lift Key) | R B Y | |
| Calcium | B4F, in the southwest area of the floor (requires Lift Key) | FR LG | |
| Elixir | B4F, in the southwest area of the floor (requires Lift Key) | P E | |
| Super Potion | B4F, on the machine north of Giovanni (requires Lift Key) (hidden) | R B Y | |
| Net Ball | B4F, between the potted plants southwest of Giovanni (requires Lift Key) (hidden) | FR LG | |
| Nest Ball | B4F, between the potted plants southeast of Giovanni (requires Lift Key) (hidden) | FR LG | |
| Max Revive | B4F, on the eastern chest of draws behind Giovanni's desk (requires Lift Key) (hidden) (daily) | P E | |
| Silph Scope | B4F, dropped by Giovanni after his defeat (requires Lift Key) | R B Y FR LG | |
| Silph Scope | B4F, received from Giovanni after his defeat (requires Lift Key) | P E | |
Trainers
Generation I
B1F
| Trainer | Pokémon | |||||||||
|---|---|---|---|---|---|---|---|---|---|---|
|
| |||||||||
| ||||||||||
|
| |||||||||
| ||||||||||
|
| |||||||||
| ||||||||||
| ||||||||||
|
| |||||||||
| ||||||||||
| ||||||||||
| ||||||||||
| Requires Lift Key | ||||||||||
|
| |||||||||
| ||||||||||
B2F
| Trainer | Pokémon | |||||||||
|---|---|---|---|---|---|---|---|---|---|---|
|
| |||||||||
| ||||||||||
| ||||||||||
| ||||||||||
| ||||||||||
B3F
| Trainer | Pokémon | |||||||||
|---|---|---|---|---|---|---|---|---|---|---|
|
| |||||||||
| ||||||||||
|
| |||||||||
| ||||||||||
| ||||||||||
B4F
| Trainer | Pokémon | |||||||||
|---|---|---|---|---|---|---|---|---|---|---|
|
| |||||||||
| ||||||||||
| Requires Lift Key | ||||||||||
|
| |||||||||
| ||||||||||
| ||||||||||
|
| |||||||||
| ||||||||||
| ||||||||||
Pokémon Red and Blue
Giovanni has one Guard Spec. per Pokémon, using it randomly 25% of the time.
|
||||||||||||||||||||||||||||||||||||||||||||||||||||||||||||||||||||||||||||||||
| ||||||||||||||||||||||||||||||||||||||||||||||||||||||||||||||||||||||||||||||||
Pokémon Yellow
|
||||||||||||||||||||||||||||||||||||||||||||||||||||||||||||||||||||||
| ||||||||||||||||||||||||||||||||||||||||||||||||||||||||||||||||||||||
Giovanni has one Guard Spec. per Pokémon, using it randomly 25% of the time.
|
|||||||||||||||||||||||||||||||||||||||||||||||||||||||||||||||||||||||||||||
| |||||||||||||||||||||||||||||||||||||||||||||||||||||||||||||||||||||||||||||
Generation III
B1F
| Trainer | Pokémon | |||||||||||
|---|---|---|---|---|---|---|---|---|---|---|---|---|
|
| |||||||||||
| ||||||||||||
|
| |||||||||||
| ||||||||||||
|
| |||||||||||
| ||||||||||||
| ||||||||||||
| ||||||||||||
|
| |||||||||||
| ||||||||||||
| ||||||||||||
| Requires Lift Key | ||||||||||||
|
| |||||||||||
| ||||||||||||
| Trainers with a Vs. Seeker by their names, when alerted for a rematch using the item, may use higher-level Pokémon. | ||||||||||||
B2F
| Trainer | Pokémon | |||||||||||
|---|---|---|---|---|---|---|---|---|---|---|---|---|
|
| |||||||||||
| ||||||||||||
| ||||||||||||
| ||||||||||||
| ||||||||||||
| Trainers with a Vs. Seeker by their names, when alerted for a rematch using the item, may use higher-level Pokémon. | ||||||||||||
B3F
| Trainer | Pokémon | |||||||||||
|---|---|---|---|---|---|---|---|---|---|---|---|---|
|
| |||||||||||
| ||||||||||||
|
| |||||||||||
| ||||||||||||
| ||||||||||||
| Trainers with a Vs. Seeker by their names, when alerted for a rematch using the item, may use higher-level Pokémon. | ||||||||||||
B4F
| Trainer | Pokémon | |||||||||||
|---|---|---|---|---|---|---|---|---|---|---|---|---|
|
| |||||||||||
| ||||||||||||
| Requires Lift Key | ||||||||||||
|
| |||||||||||
| ||||||||||||
| ||||||||||||
|
| |||||||||||
| ||||||||||||
| ||||||||||||
| Trainers with a Vs. Seeker by their names, when alerted for a rematch using the item, may use higher-level Pokémon. | ||||||||||||
|
||||||||||||||||||||||||||||||||||||||||||||||||||||||||||||||||||||||||||||||||
| ||||||||||||||||||||||||||||||||||||||||||||||||||||||||||||||||||||||||||||||||
Generation VII
Pre–Hall of Fame
After Giovanni has been defeated, the Team Rocket Grunts inside the hideout disappear, and the locked gate on B1F opens by itself.
B1F
| Trainer | Pokémon | |||||||||
|---|---|---|---|---|---|---|---|---|---|---|
|
| |||||||||
|
| |||||||||
| ||||||||||
| ||||||||||
|
| |||||||||
|
| |||||||||
| ||||||||||
| Requires Lift Key | ||||||||||
|
| |||||||||
| ||||||||||
B2F
| Trainer | Pokémon | |||||||||
|---|---|---|---|---|---|---|---|---|---|---|
|
| |||||||||
B3F
| Trainer | Pokémon | |||||||||
|---|---|---|---|---|---|---|---|---|---|---|
|
| |||||||||
|
| |||||||||
| ||||||||||
B4F
| Trainer | Pokémon | |||||||||
|---|---|---|---|---|---|---|---|---|---|---|
|
| |||||||||
- Requires Lift Key
|
||||||||||||||||||||||||||||||||||||||||||||||||||||||||||||||
| ||||||||||||||||||||||||||||||||||||||||||||||||||||||||||||||
|
||||||||||||||||||||||||||||||||||||||||||||||||||||||||||||||||
| ||||||||||||||||||||||||||||||||||||||||||||||||||||||||||||||||
|
||||||||||||||||||||||||||||||||||||||||||||||||||||||||||||||
| ||||||||||||||||||||||||||||||||||||||||||||||||||||||||||||||
Post–Hall of Fame
B1F
| Trainer | Pokémon | |||||||||||||||
|---|---|---|---|---|---|---|---|---|---|---|---|---|---|---|---|---|
|
| |||||||||||||||
B2F
| Trainer | Pokémon | |||||||||||||||
|---|---|---|---|---|---|---|---|---|---|---|---|---|---|---|---|---|
|
| |||||||||||||||
B3F
| Trainer | Pokémon | |||||||||||||||
|---|---|---|---|---|---|---|---|---|---|---|---|---|---|---|---|---|
|
| |||||||||||||||
B4F
| Trainer | Pokémon | |||||||||||||||
|---|---|---|---|---|---|---|---|---|---|---|---|---|---|---|---|---|
|
| |||||||||||||||
|
|||||||||||||||||||||||||||||||||||||||||||||||||||||||||||||
| |||||||||||||||||||||||||||||||||||||||||||||||||||||||||||||
Layout
| Version | B1F | B2F | B3F | B4F |
|---|---|---|---|---|
| Red | 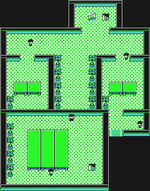
|
|

|
|
| Blue | ||||
| Yellow | ||||
| FireRed | 
|
|
|
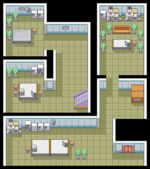
|
| LeafGreen | ||||
| Let's Go, Pikachu! | 
|

|

|

|
| Let's Go, Eevee! | ||||
In the anime

Pokémon Origins
The Rocket Hideout briefly appeared at the beginning of File 3: Giovanni, where Red was seen freeing some imprisoned Pokémon in there, as well as encountering Giovanni for the first time.
In the manga

Pokémon Adventures
Red, Green & Blue arc
The Rocket Hideout appeared in Tauros the Tyrant and The Jynx Jinx, where Red inflitrated it, disguised as a Team Rocket Grunt, in order to get information regarding Green's whereabouts. Like in the games, the entrance to the hideout could be opened by pressing a switch behind a poster in the Rocket Game Corner. In the hideout, Red found a laboratory, where Team Rocket was creating an artificial Pokémon from Mew's cells, intending it to be their ultimate weapon. However, they were lacking enough genetic material to complete their creation. Blaine was one of the scientists working on the project. After the Pokémon was completed later, it escaped, presumably destroying the hideout.

Pokémon Zensho
The Rocket Hideout appeared in PZ05. After being scared away by ghosts inside the Pokémon Tower, Satoshi followed a pair of Team Rocket Grunts leaving the tower into their hideout and snatched one of their Silph Scopes before leaving. His infiltration was observed by Giovanni through surveillance cameras, ordering his minions to leave him alone out of curiosity in the intruding child.
In the TCG
The following is a list of cards mentioning or featuring Team Rocket's Hideout in the Pokémon Trading Card Game.
| Team Rocket's Hideout Cards listed with a blue background are only legal to use in the current Expanded format. Cards listed with a green background are legal to use in both the current Standard and Expanded formats. | |||||||
|---|---|---|---|---|---|---|---|
| Card | Type | English Expansion |
Rarity | # | Japanese Expansion |
Rarity | # |
| Rocket's Hideout | T [St] | Neo Revelation | 63/64 | Awakening Legends | |||
| EX Team Rocket Returns | 87/109 | Rocket Gang Strikes Back | 081/085 | ||||
| Giovanni's Exile | Su | Unbroken Bonds | 174/214 | Double Blaze | 085/095 | ||
| Tag All Stars | 151/173 | ||||||
Trivia
- In Generation I, it is possible to skip the entire Rocket Hideout. Due to an oversight, the player can use a Poké Doll bought at the Celadon Department Store to flee from the Marowak ghost at Pokémon Tower and progress without the Silph Scope. This was corrected in Pokémon FireRed and LeafGreen.
- If the player skips the Rocket Hideout using this method, it is still possible to enter this place at any point later and potentially break the normal gameplay sequence. For instance, once the player obtains the Earth Badge, Giovanni appears to disband the Team Rocket and permanently leave the current game as expected in normal gameplay. However, as long as the player has not obtained the Silph Scope, then Giovanni and the Team Rocket members still permanently remain in the Rocket Hideout as if the Team Rocket was never disbanded.
In other languages
| ||||||||||||||||||||||||||
Related articles
| Kanto | ||||||||
|---|---|---|---|---|---|---|---|---|
|
| ||||||||
|
| Rocket Game Corner • Team Rocket Hideout • Viridian Gym • Team Rocket HQ • Rocket Warehouse | |||||
| Boss | Admins | ||||

|

|

|

| ||
| Giovanni (Masters • Pocket Monsters) |
Archer (Masters) |
Ariana (Masters) |
Petrel (Masters) |
Proton (Masters) | |
| Other members | |||||
| Jessie (Masters) • James (Masters) • Meowth • Team Rocket Grunts (Rocket Siblings) • Scientists (Gideon) Grey (Golden Boys) • Kaede (How I Became a Pokémon Card) | |||||
See also: Pokémon the Series • Adventures • Team GO Rocket • Team Rainbow Rocket
| |||||
| |||||||||||||||||||||||||||||||

|
This article is part of Project Locations, a Bulbapedia project that aims to write comprehensive articles on every location in the Pokémon world. |
