|
|
| Line 114: |
Line 114: |
| {{Catch/entryhs|073|Tentacruel|yes|yes|Surf|35|all=10%|type1=Water|type2=Poison}} | | {{Catch/entryhs|073|Tentacruel|yes|yes|Surf|35|all=10%|type1=Water|type2=Poison}} |
| {{Catch/div|ocean|Fishing}} | | {{Catch/div|ocean|Fishing}} |
| | {{Catch/entryhs|072|Tentacool|yes|yes|Fish Old|10|all=5%|type1=Water|type2=Poison}} |
| {{Catch/entryhs|129|Magikarp|yes|yes|Fish Old|10|all=95%|type1=Water}} | | {{Catch/entryhs|129|Magikarp|yes|yes|Fish Old|10|all=95%|type1=Water}} |
| {{Catch/entryhs|072|Tentacool|yes|yes|Fish Old|10|all=5%|type1=Water|type2=Poison}} | | {{Catch/entryhs|072|Tentacool|yes|yes|Fish Good|20|all=30%|type1=Water|type2=Poison}} |
| | {{Catch/entryhs|090|Shellder|yes|yes|Fish Good|20|all=3%|type1=Water}} |
| {{Catch/entryhs|129|Magikarp|yes|yes|Fish Good|20|all=60%|type1=Water}} | | {{Catch/entryhs|129|Magikarp|yes|yes|Fish Good|20|all=60%|type1=Water}} |
| {{Catch/entryhs|072|Tentacool|yes|yes|Fish Good|20|all=30%|type1=Water|type2=Poison}}
| |
| {{Catch/entryhs|170|Chinchou|yes|yes|Fish Good|20|all=7%|type1=Water|type2=Electric}} | | {{Catch/entryhs|170|Chinchou|yes|yes|Fish Good|20|all=7%|type1=Water|type2=Electric}} |
| {{Catch/entryhs|090|Shellder|yes|yes|Fish Good|20|all=3%|type1=Water}} | | {{Catch/entryhs|073|Tentacruel|yes|yes|Fish Super|40|all=7%|type1=Water|type2=Poison}} |
| | {{Catch/entryhs|090|Shellder|yes|yes|Fish Super|40|all=30%|type1=Water}} |
| {{Catch/entryhs|170|Chinchou|yes|yes|Fish Super|40|all=60%|type1=Water|type2=Electric}} | | {{Catch/entryhs|170|Chinchou|yes|yes|Fish Super|40|all=60%|type1=Water|type2=Electric}} |
| {{Catch/entryhs|090|Shellder|yes|yes|Fish Super|40|all=30%|type1=Water}}
| |
| {{Catch/entryhs|073|Tentacruel|yes|yes|Fish Super|40|all=7%|type1=Water|type2=Poison}}
| |
| {{Catch/entryhs|171|Lanturn|yes|yes|Fish Super|40|all=3%|type1=Water|type2=Electric}} | | {{Catch/entryhs|171|Lanturn|yes|yes|Fish Super|40|all=3%|type1=Water|type2=Electric}} |
| {{catch/div|ocean|Headbutt}} | | {{catch/div|ocean|Headbutt}} |
| Line 128: |
Line 128: |
| {{catch/entryhs|163|Hoothoot|yes|yes|Headbutt|24-26|all=50%|type1=Normal|type2=Flying|10=k}} | | {{catch/entryhs|163|Hoothoot|yes|yes|Headbutt|24-26|all=50%|type1=Normal|type2=Flying|10=k}} |
| {{catch/entryhs|163|Hoothoot|yes|yes|Headbutt|27-30|all=80%|type1=Normal|type2=Flying|10=k}} | | {{catch/entryhs|163|Hoothoot|yes|yes|Headbutt|27-30|all=80%|type1=Normal|type2=Flying|10=k}} |
| | {{catch/entryhs|165|Ledyba|no|yes|Headbutt|24-26|all=30%|type1=Bug|type2=Flying|10=k}} |
| | {{catch/entryhs|167|Spinarak|yes|no|Headbutt|24-26|all=30%|type1=Bug|type2=Poison|10=k}} |
| {{catch/entryhs|265|Wurmple|yes|yes|Headbutt|24-30|all=20%|type1=Bug|10=k}} | | {{catch/entryhs|265|Wurmple|yes|yes|Headbutt|24-30|all=20%|type1=Bug|10=k}} |
| {{catch/entryhs|167|Spinarak|yes|no|Headbutt|24-26|all=30%|type1=Bug|type2=Poison|10=k}}
| |
| {{catch/entryhs|165|Ledyba|no|yes|Headbutt|24-26|all=30%|type1=Bug|type2=Flying|10=k}}
| |
| {{Catch/div|ocean|Special}} | | {{Catch/div|ocean|Special}} |
| {{catch/entryhs|264|Linoone|yes|yes|Hoenn|35|all=20%|type1=Normal}} | | {{catch/entryhs|264|Linoone|yes|yes|Hoenn|35|all=20%|type1=Normal}} |
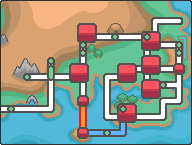
Route 21 (Japanese: 21ばんすいどう Water Route 21), known as Sea Route 21 in the Generation I games, is a water route located in southwest Kanto, connecting Pallet Town and Cinnabar Island.
Route description
From Pallet, the route begins as a small channel of water. South of the town, an outcrop of land on the route's east side holds the only grassy area on any water route in Pokémon history up until Generation IV. Past the grassy area, the mainland terminates and the route widens significantly in size.
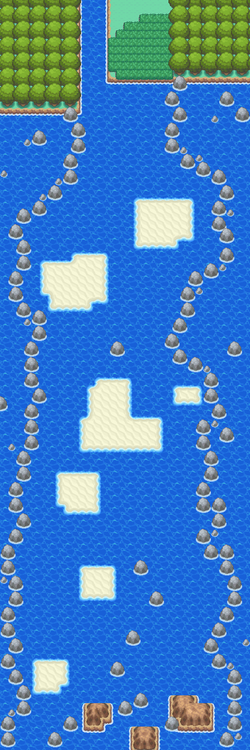
South of this point, the look of the route varies greatly by Generation. In Generation I, there are two small bridges containing two Trainers each spread out along the route. Five other Trainers are also found along the route. In Generation II, the bridges remain but only one Trainer is found on one of the bridges. Two more Trainers are located in the water. Generation III replaced the bridges with sandy islands and added five additional islands as well. Trainers can be found on four of the islands, as well as in five locations in the water, making a total of nine Trainers.
In every Generation, the route runs directly north-south in the water, reaching its southern terminus at Cinnabar near the southernmost Trainer.
Items
| Item
|
Location
|
Games
|

|
Pearl
|
On the island next to Swimmer Spencer after delivering the Sapphire to Celio (hidden)
|
FR LG
|

|
Stardust ×3
|
- On the sandbar closest to Pallet Town (hidden)
- On a sandbar with no Trainers in the center of the route (×2) (hidden)
|
HG SS
|
|
|
Pokémon
Generation I
| Pokémon
|
Games
|
Location
|
Levels
|
Rate
|
|
|
R
|
B
|
Y
|
|
21, 23
|
25%
|
|
|
R
|
B
|
Y
|
|
11, 13, 15, 17
|
60%
|
|
|
R
|
B
|
Y
|
|
30, 32
|
15%
|
|
|
R
|
B
|
Y
|
|
15, 17, 19
|
10%
|
|
|
R
|
B
|
Y
|
|
21, 23
|
35%
|
|
|
R
|
B
|
Y
|
|
13, 15
|
25%
|
|
|
R
|
B
|
Y
|
|
30
|
15%
|
|
|
R
|
B
|
Y
|
|
15
|
5%
|
|
|
R
|
B
|
Y
|
|
28, 30, 32
|
10%
|
| Surfing
|
|
|
R
|
B
|
Y
|
|
5, 10, 15, 20, 30, 35, 40
|
100%
|
| Fishing
|
|
|
R
|
B
|
Y
|
|
5
|
100%
|
|
|
R
|
B
|
Y
|
|
10
|
50%
|
|
|
R
|
B
|
Y
|
|
10
|
50%
|
|
|
R
|
B
|
Y
|
|
15, 30
|
60%
|
|
|
R
|
B
|
Y
|
|
30
|
10%
|
|
|
R
|
B
|
Y
|
|
15
|
25%
|
|
|
R
|
B
|
Y
|
|
15
|
25%
|
|
|
R
|
B
|
Y
|
|
15
|
25%
|
|
|
R
|
B
|
Y
|
|
15
|
25%
|
|
|
R
|
B
|
Y
|
|
20
|
30%
|
| A colored background means that the Pokémon can be found in this location in the specified game. A white background with a colored letter means that the Pokémon cannot be found here.
|
Generation II
| Pokémon
|
Games
|
Location
|
Levels
|
Rate
|

|

|

|
|
|
G
|
S
|
C
|
|
25
|
30%
|
|
|
G
|
S
|
C
|
|
20
|
10%
|
|
|
G
|
S
|
C
|
|
20-35
|
95%
|
90%
|
95%
|
|
|
G
|
S
|
C
|
|
30-35
|
50%
|
50%
|
0%
|
|
|
G
|
S
|
C
|
|
28-35
|
0%
|
0%
|
60%
|
|
|
G
|
S
|
C
|
|
28
|
5%
|
0%
|
5%
|
|
|
G
|
S
|
C
|
|
28-30
|
0%
|
10%
|
0%
|
|
|
G
|
S
|
C
|
|
28-30
|
10%
|
10%
|
0%
|
| Surfing
|
|
|
G
|
S
|
C
|
|
30-39
|
90%
|
|
|
G
|
S
|
C
|
|
35-39
|
10%
|
| Fishing
|
|
|
G
|
S
|
C
|
|
10
|
85%
|
|
|
G
|
S
|
C
|
|
10
|
15%
|
|
|
G
|
S
|
C
|
|
20
|
35%
|
|
|
G
|
S
|
C
|
|
20
|
35%
|
|
|
G
|
S
|
C
|
|
20
|
20%
|
|
|
G
|
S
|
C
|
|
20
|
10%
|
|
|
G
|
S
|
C
|
|
40
|
40%
|
|
|
G
|
S
|
C
|
|
40
|
30%
|
|
|
G
|
S
|
C
|
|
40
|
20%
|
|
|
G
|
S
|
C
|
|
40
|
10%
|
| A colored background means that the Pokémon can be found in this location in the specified game. A white background with a colored letter means that the Pokémon cannot be found here.
|
Generation III
| Pokémon
|
Games
|
Location
|
Levels
|
Rate
|
|
|
FR
|
LG
|
|
17-28
|
100%
|
| Surfing
|
|
|
FR
|
LG
|
|
5-40
|
100%
|
| Fishing
|
|
|
FR
|
LG
|
|
5
|
100%
|
|
|
FR
|
LG
|
|
5-15
|
60%
|
|
|
FR
|
LG
|
|
5-15
|
20%
|
|
|
FR
|
LG
|
|
5-15
|
20%
|
|
|
FR
|
LG
|
|
5-15
|
60%
|
|
|
FR
|
LG
|
|
5-15
|
20%
|
|
|
FR
|
LG
|
|
15-25
|
80%
|
|
|
FR
|
LG
|
|
25-35
|
4%
|
|
|
FR
|
LG
|
|
15-25
|
80%
|
|
|
FR
|
LG
|
|
25-35
|
4%
|
|
|
FR
|
LG
|
|
15-25
|
15%
|
|
|
FR
|
LG
|
|
25-35
|
1%
|
|
|
FR
|
LG
|
|
25-35
|
1%
|
| A colored background means that the Pokémon can be found in this location in the specified game. A white background with a colored letter means that the Pokémon cannot be found here.
|
Generation IV
| Pokémon
|
Games
|
Location
|
Levels
|
Rate
|

|

|

|
|
|
HG
|
SS
|
|
20-35
|
95%
|
90%
|
95%
|
|
|
HG
|
SS
|
|
28
|
5%
|
0%
|
5%
|
|
|
HG
|
SS
|
|
28-30
|
0%
|
10%
|
0%
|
| Surfing
|
|
|
HG
|
SS
|
|
30-35
|
90%
|
|
|
HG
|
SS
|
|
35
|
10%
|
| Fishing
|
|
|
HG
|
SS
|
|
10
|
5%
|
|
|
HG
|
SS
|
|
10
|
95%
|
|
|
HG
|
SS
|
|
20
|
30%
|
|
|
HG
|
SS
|
|
20
|
3%
|
|
|
HG
|
SS
|
|
20
|
60%
|
|
|
HG
|
SS
|
|
20
|
7%
|
|
|
HG
|
SS
|
|
40
|
7%
|
|
|
HG
|
SS
|
|
40
|
30%
|
|
|
HG
|
SS
|
|
40
|
60%
|
|
|
HG
|
SS
|
|
40
|
3%
|
| Headbutt
|
|
|
HG
|
SS
|
|
27-30
|
15%
|
|
|
HG
|
SS
|
|
24-26
|
50%
|
|
|
HG
|
SS
|
|
27-30
|
80%
|
|
|
HG
|
SS
|
|
24-26
|
30%
|
|
|
HG
|
SS
|
|
24-26
|
30%
|
|
|
HG
|
SS
|
|
24-30
|
20%
|
| Special Pokémon
|
|
|
HG
|
SS
|
|
35
|
20%
|
|
|
HG
|
SS
|
|
25-30
|
20%
|
|
|
HG
|
SS
|
|
35
|
20%
|
|
|
HG
|
SS
|
|
25-30
|
20%
|
| A colored background means that the Pokémon can be found in this location in the specified game. A white background with a colored letter means that the Pokémon cannot be found here.
|
Trainers
Generation I
Generation II
| Trainer
|
Pokémon
|
|
|
|
|
|
|
|
|
|
|
|
|
|
|
|
|
|
|
|
|
|
|
|
| Trainers with a telephone symbol by their names will give their Pokégear number to the player, and may call or be called for a rematch with higher-level Pokémon.
|
Generation III
| Trainer
|
Pokémon
|
|
|
|
|
|
|
|
|
|
|
|
|
|
|
|
|
|
|
|
|
|
|
|
|
|
|
|
|
|
|
|
|
|
|
|
|
|
|
|
|
|
|
|
|
|
|
|
|
|
|
|
|
|
|
|
|
|
|
|
|
|
|
|
|
|
|
|
|
|
|
|
|
|
| Rematch
|
|
|
|
|
|
|
|
|
|
|
|
|
|
|
|
|
|
|
|
|
|
|
|
|
|
| Trainers with a Vs. Seeker by their names, when alerted for a rematch using the item, may use higher-level Pokémon.
|
Generation IV
| Trainer
|
Pokémon
|
|
|
|
|
|
|
|
|
|
|
|
|
|
|
|
|
|
|
|
|
|
|
|
|
|
|
|
|
|
|
|
|
|
|
|
|
|
|
|
|
|
|
|
|
|
|
|
|
|
|
|
|
|
|
|
|

|
|
|
Swimmer Esteban
ヨシノブ Yoshinobu
Reward: $608
|
|
|
|
|
|
|
|
|
|
|
|
|
|
|
|
|
|
|
|
|
|
|
|
|
|
|
|
|
| Trainers with a telephone symbol by their names will give their Pokégear number to the player, and may call or be called for a rematch with higher-level Pokémon.
|
Differences among generations
Generation I and III
Between Generations I and III, the route is the same with the exception of a few minor cosmetic changes. In Generation III, the bridges are replaced with sandy islands and five additional islands are added as well. Trainers can be found on four of the islands, as well as in five in the water, making a total of nine Trainers.
Generation II
The route was shortened considerably in Generation II. The basic design of the route, however, was almost identical to that of Generation I.
Generation IV
The route is nearly identical to Generation III.
In the manga

Route 21 in Pokémon Adventures
In the Pokémon Adventures manga
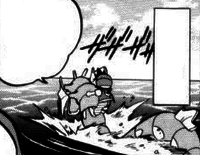
Route 21 made a brief appearance in Kalling Kadabra, where Red was seen surfing through it with his Gyarados on his way from Cinnabar Island back to Pallet Town to meet Professor Oak.
Trivia


