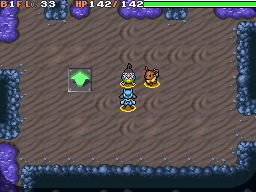
Brine Cave: Difference between revisions
m (Text replacement - "Mystery Dungeon 2 locations" to "Mystery Dungeon: Explorers of Time and Explorers of Darkness locations") |
mNo edit summary |
||
| Line 15: | Line 15: | ||
|items=48 | |items=48 | ||
|money=Allowed | |money=Allowed | ||
|teamsize=4{{tt|*| | |teamsize=4{{tt|*|Only 3 the first time: hero, partner, and Chatot. After the rest stop, hero and partner only.}} | ||
|startlevel=Current | |startlevel=Current | ||
|maintype={{t|Water}} | |maintype={{t|Water}} | ||
| Line 21: | Line 21: | ||
}} | }} | ||
'''Brine Cave''' (Japanese: '''いそのどうくつ''' ''Beach Cave'') is a dungeon in [[Pokémon Mystery Dungeon: Explorers of Time and Explorers of Darkness]] and [[Pokémon Mystery Dungeon: Explorers of Sky]]. It is unlocked after the player talks to {{mdc|Torkoal|2}} when he visits the guild, the player's partner shows him the [[Relic Fragment]]'s pattern, and {{mdc|Wigglytuff|2}} and {{mdc|Chatot|2}} reveal the location of the pattern. On the first visit, Chatot will accompany the player. It has 15 floors total, with a rest stop between the ninth floor and the first floor of Lower Brine Cave. At that point, Chatot will chase after {{mdc|Team Skull}}, leaving the player and partner behind. The boss Pokémon are two {{p|Omastar}} and a {{p|Kabutops}}, who terrorized Wigglytuff and Chatot in the past. Earlier in the game {{mdc|Wigglytuff|2}} is seen talking to {{mdc|Lapras|2}} about letting the player travel to the [[Hidden Land]]. | '''Brine Cave''' (Japanese: '''いそのどうくつ''' ''Beach Cave'') is a dungeon in [[Pokémon Mystery Dungeon: Explorers of Time and Explorers of Darkness]] and [[Pokémon Mystery Dungeon: Explorers of Sky]]. It is unlocked after the player talks to {{mdc|Torkoal|2}} when he visits the guild, the player's partner shows him the [[Relic Fragment]]'s pattern, and {{mdc|Wigglytuff|2}} and {{mdc|Chatot|2}} reveal the location of the pattern. On the first visit, Chatot will accompany the player. It has 15 floors total, with a rest stop between the ninth floor and the first floor of Lower Brine Cave. At that point, Chatot will chase after {{mdc|Team Skull}}, leaving the player and partner behind. The boss Pokémon are two {{p|Omastar}} and a {{p|Kabutops}}, who terrorized Wigglytuff and Chatot in the past. Earlier in the game {{mdc|Wigglytuff|2}} is seen talking to {{mdc|Lapras|2}} about letting the player travel to the [[Hidden Land]]. | ||
==Gameplay== | ==Gameplay== | ||
The jobs here are ranked E and ★2 by default, depending on the floor. Lower Brine Cave is ranked ★2 for purpose of [[Treasure Box]]es. | The jobs here are ranked E and ★2 by default, depending on the floor. Lower Brine Cave is ranked ★2 for purpose of [[Treasure Box]]es. | ||
Latest revision as of 09:31, 14 March 2024
|
|
|
| ||||||||||||||||||||||||||||||||||||||||||
| ||||||||||||||||||||||||||||||||||||||||||
| ||||||||||||||||||||||||||||||||||||||||||
| ||||||||||||||||||||||||||||||||||||||||||
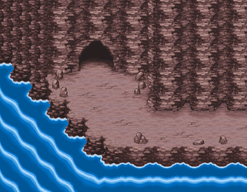
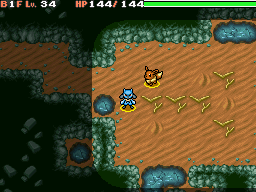
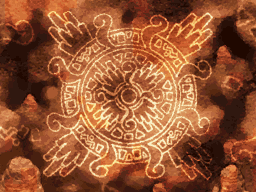
Brine Cave (Japanese: いそのどうくつ Beach Cave) is a dungeon in Pokémon Mystery Dungeon: Explorers of Time and Explorers of Darkness and Pokémon Mystery Dungeon: Explorers of Sky. It is unlocked after the player talks to Torkoal when he visits the guild, the player's partner shows him the Relic Fragment's pattern, and Wigglytuff and Chatot reveal the location of the pattern. On the first visit, Chatot will accompany the player. It has 15 floors total, with a rest stop between the ninth floor and the first floor of Lower Brine Cave. At that point, Chatot will chase after Team Skull, leaving the player and partner behind. The boss Pokémon are two Omastar and a Kabutops, who terrorized Wigglytuff and Chatot in the past. Earlier in the game Wigglytuff is seen talking to Lapras about letting the player travel to the Hidden Land.
Gameplay
The jobs here are ranked E and ★2 by default, depending on the floor. Lower Brine Cave is ranked ★2 for purpose of Treasure Boxes.
Floors 1 through 7 of Brine Cave are medium-sized with 3-9 rooms on odd floors and 3-8 rooms on even floors, while later floors are large-sized, with 4-14 rooms on floors 8 and 9 of Brine Cave, 4-8 rooms on floor 1 of Lower Brine Cave and 4-10 rooms on later floors of Lower Brine Cave. There is 1-4 items on floors 1 through of Brine Cave, and 2-5 items on later floors. There's 2-3 starting enemies on floors 1 through 6 of Brine Cave, and 2-4 on later floors. There is a 10% chance each for a room on floors 2 and 6 of Brine Cave and floors 1 and 5 of Lower Brine Cave to be filled with water.
The IQ Booster activates on every even floor (counting Lower Brine Cave as continuation of Brine Cave). The player cannot be rescued if knocked out in Lower Brine Cave. The enemies in this dungeon have 26IQ, granting them Status Checker IQ skill. There is light darkness and water in the dungeon. Gastrodon and Walrein in the dungeon can create rain and hail with Rain Dance and Hail, respectively.
Pokémon encountered
Brine Cave
| Pokémon | Floors | Levels | Recruit Rate | |
|---|---|---|---|---|
| Seel | 1-5 | 34 | 3.9% | |
| Omanyte | 1-7 | 36-37 | 6.4% | |
| Kingler | 1-8 | 35-36 | -4.5% | |
| Pelipper | 1-8 | 36-37 | -12% | |
| Gastrodon West Sea |
1-9 | 22-23 | 8.2% | |
| Tentacool | 6-9 | 35 | 8.2% | |
| Dewgong | 6-9 | 38 | -4.5% | |
| Staryu | 8-9 | 38 | 8.2% | |
| Dragonair | 8-9 | 36 | -4.5% | |
| Pokémon cannot be recruited during the first visit. | ||||
Lower Brine Cave
| Pokémon | Floors | Levels | Recruit Rate | |
|---|---|---|---|---|
| Gastrodon West Sea |
1 | 24 | 8.2% | |
| Dewgong | 1 | 39 | -4.5% | |
| Tentacool | 1-5 | 36 | 8.2% | |
| Staryu | 1-5 | 39 | 8.2% | |
| Dragonair | 1-5 | 37 | -4.5% | |
| Walrein | 2-5 | 36 | 0.5% | |
| Pokémon cannot be recruited during the first visit. | ||||
Brine Cave Pit
| Pokémon | Floors | Levels | Recruit Rate | |
|---|---|---|---|---|
| Omastar | Pit | 35 | Unrecruitable Boss | |
| Kabutops | Pit | 42 | Unrecruitable Boss | |
| Can only be fought the first time | ||||
Items
| Item | Floors | |
|---|---|---|
| 2-120TD/150S Poké | B1-9, LB1-L5F | |
| S Gaggle Specs | B1-9, LB1-L5F | |
| S Y-Ray Specs | B1-9, LB1-L5F | |
| TS Def. Scarf | B1-9, LB1-L5F | |
| TS Heal Ribbon | B1-9, LB1-L5F | |
| TS Joy Ribbon | B1-9, LB1-L5F | |
| S No-Slip Cap | B1-9, LB1-L5F | |
| TS Pecha Scarf | B1-9, LB1-L5F | |
| TS Persim Band | B1-9, LB1-L5F | |
| TS Power Band | B1-9, LB1-L5F | |
| Sneak Scarf | B1-4FD/B1-9, LB1-L5SF | |
| TS Special Band | B1-9, LB1-L5F | |
| TS Stamina Band | B1-9, LB1-L5F | |
| DS Twist Band | B1-9, LB1-L5F | |
| TS Zinc Band | B1-9, LB1-L5F | |
| 4-5 Geo Pebble | B1-9, LB1-L5F | |
| S Gravelyrock | B1-9, LB1-L5F | |
| Apple | B1-9, LB1-L5F | |
| TS Blue Gummi | B1-9, LB1-L5F | |
| TS Brown Gummi | B1-9, LB1-L5F | |
| TS Grass Gummi | B1-9, LB1-L5F | |
| TS Green Gummi | B1-9, LB1-L5F | |
| TS Orange Gummi | B1-9, LB1-L5F | |
| TS Silver Gummi | B1-9, LB1-L5F | |
| TS Sky Gummi | B1-9, LB1-L5F | |
| TS White Gummi | B1-9, LB1-L5F | |
| DS Black Gummi | B1-9, LB1-L5F | |
| DS Clear Gummi | B1-9, LB1-L5F | |
| DS Gold Gummi | B1-9, LB1-L5F | |
| DS Gray Gummi | B1-9, LB1-L5F | |
| DS Pink Gummi | B1-9, LB1-L5F | |
| DS Purple Gummi | B1-9, LB1-L5F | |
| DS Red Gummi | B1-9, LB1-L5F | |
| DS Royal Gummi | B1-9, LB1-L5F | |
| DS Yellow Gummi | B1-9, LB1-L5F | |
| Cheri Berry | B1-9, LB1-L5F | |
| Oran Berry | B1-9, LB1-L5F | |
| S Oren Berry | B1-9, LB1-L5F | |
| Pecha Berry | B1-9, LB1-L5F | |
| Blast Seed | B1-9, LB1-L5F | |
| S Dough Seed | B1-9, LB1-L5F | |
| S Dropeye Seed | B1-9, LB1-L5F | |
| Heal Seed | B1-9, LB1-L5F | |
| S Hunger Seed | B1-9, LB1-L5F | |
| Pure Seed | B1-9, LB1-L5F | |
| S Reviser Seed | B1-9, LB1-L5F | |
| Reviver Seed | B1-9, LB1-L5F | |
| S Slip Seed | B1-9, LB1-L5F | |
| Sleep Seed | B1-9, LB1-L5F | |
| TS Stun Seed | B1-9, LB1-L5F | |
| S Via Seed | B1-9, LB1-L5F | |
| DS Violent Seed | B1-9, LB1-L5F | |
| TS Warp Seed | B1-9, LB1-L5F | |
| DS X-Eye Seed | B1-9, LB1-L5F | |
| Max Elixir | B1-9, LB1-L5F | |
| S Mix Elixir | B1-9, LB1-L5F | |
| DS Aerial Ace | B1-9, LB1-L5F | |
| TS Attract | B1-9, LB1-L5F | |
| DS Brick Break | B1-9, LB1-L5F | |
| Brine | B1-9, LB1-L5F | |
| TS Bullet Seed | B1-9, LB1-L5F | |
| TS Calm Mind | B1-9, LB1-L5F | |
| Dig | B1-9, LB1-L5F | |
| DS Dive | B1-9, LB1-L5F | |
| S Dragon Claw | B1-9, LB1-L5F | |
| Embargo | B1-9, LB1-L5F | |
| DS Energy Ball | B1-9, LB1-L5F | |
| DS Explosion | B1-9, LB1-L5F | |
| TS False Swipe | B1-9, LB1-L5F | |
| TS Flash | B1-9, LB1-L5F | |
| DS Focus Blast | B1-9, LB1-L5F | |
| DS Focus Punch | B1-9, LB1-L5F | |
| TS Giga Drain | B1-9, LB1-L5F | |
| Giga Impact | B1-9, LB1-L5F | |
| Hidden Power | B1-9, LB1-L5F | |
| Hyper Beam | B1-9, LB1-L5F | |
| TS Iron Tail | B1-9, LB1-L5F | |
| TS Light Screen | B1-9, LB1-L5F | |
| DS Natural Gift | B1-9, LB1-L5F | |
| Payback | B1-9, LB1-L5F | |
| Poison Jab | B1-9, LB1-L5F | |
| DS Protect | B1-9, LB1-L5F | |
| TS Recycle | B1-9, LB1-L5F | |
| TS Reflect | B1-9, LB1-L5F | |
| TS Rest | B1-9, LB1-L5F | |
| TS Roar | B1-9, LB1-L5F | |
| TS Rock Slide | B1-9, LB1-L5F | |
| Roost | B1-9, LB1-L5F | |
| Safeguard | B1-9, LB1-L5F | |
| TS Shadow Claw | B1-9, LB1-L5F | |
| Shock Wave | B1-9, LB1-L5F | |
| TS SolarBeam | B1-9, LB1-L5F | |
| Stealth Rock | B1-9, LB1-L5F | |
| TS Steel Wing | B1-9, LB1-L5F | |
| Swords Dance | B1-9, LB1-L5F | |
| DS Taunt | B1-9, LB1-L5F | |
| DS Thunder Wave | B1-9, LB1-L5F | |
| Thunderbolt | B1-9, LB1-L5F | |
| DS Torment | B1-9, LB1-L5F | |
| Vacuum-Cut | B1-9, LB1-L5F | |
| DS Water Pulse | B1-9, LB1-L5F | |
| TS Wide Slash | B1-9, LB1-L5F | |
| DS All-Hit Orb | B1-9, LB1-L5F | |
| TS All-Mach Orb | B1-9, LB1-L5F | |
| TS Blowback Orb | B1-9, LB1-L5F | |
| DS Decoy Orb | B1-9, LB1-L5F | |
| Escape Orb | B1-9, LB1-L5F | |
| TS Evasion Orb | B1-9, LB1-L5F | |
| DS Foe-Fear Orb | B1-9, LB1-L5F | |
| TS Foe-Hold Orb | B1-9, LB1-L5F | |
| DS Foe-Seal Orb | B1-9, LB1-L5F | |
| Hurl Orb | B1-9, LB1-L5F | |
| TS Itemizer Orb | B1-9, LB1-L5F | |
| DS Luminous Orb | B1-9, LB1-L5F | |
| DS Mug Orb | B1-9, LB1-L5F | |
| TS Petrify Orb | B1-9, LB1-L5F | |
| TS Quick Orb | B1-9, LB1-L5F | |
| TS Radar Orb | B1-9, LB1-L5F | |
| DS Rebound Orb | B1-9, LB1-L5F | |
| Rollcall Orb | B1-9, LB1-L5F | |
| TS Scanner Orb | B1-9, LB1-L5F | |
| DS Silence Orb | B1-9, LB1-L5F | |
| TS Slow Orb | B1-9, LB1-L5F | |
| DS Slumber Orb | B1-9, LB1-L5F | |
| TS Spurn Orb | B1-9, LB1-L5F | |
| TS Stayaway Orb | B1-9, LB1-L5F | |
| TS Switcher Orb | B1-9, LB1-L5F | |
| DS Totter Orb | B1-9, LB1-L5F | |
| DS Transfer Orb | B1-9, LB1-L5F | |
| TS Warp Orb | B1-9, LB1-L5F | |
Traps encountered
The game will spawn 1 to 3 of the following tiles.
| Image | Trap | Appearance % |
|---|---|---|
| Chestnut Trap | 9.10%T/5.26%S | |
| Grimy Trap | 9.09%T/5.26%S | |
| Gust Trap | 10%D/5.26%S | |
| Poison Trap | 10%D/5%S | |
| Pokémon Trap | 10%D/5.27%S | |
| Selfdestruct Trap | 9.09%T/5.26%S | |
| Slow Trap | 9.09%T/5.26%S | |
| Slumber Trap | 10%D/5.26%S | |
| Spin Trap | 10%D/5.27%S | |
| Summon Trap | 9.09%T/5.27%S | |
| Trip Trap | 9.09%T/10%D/5.26%S | |
| Warp Trap | 9.09%T/5.26%S | |
| Wonder Tile | 36.36%T/40%D/36.84%S |
Layout
| Entrance | Rest stopTD | Rest stopS | Lower Brine Cave |
|---|---|---|---|
|

|

|
|
| Brine Cave Pit | Pattern | ||

|

|

|
|
In the anime
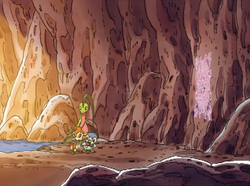
Brine Cave made a brief appearance in Pokémon Mystery Dungeon: Explorers of Sky - Beyond Time & Darkness, where Team Poképals and Grovyle were shown finding the pattern at the end of the dungeon, which reacted with Chimchar's Relic Fragment and summoned Lapras, ready to take them to the Hidden Land.
In other languages
|
Brine Cave
|
Lower Brine Cave
|
Brine Cave Pit
| |||||||||||||||||||||||||||||||||||||||||||||||||||||||||||||||

|
This article is part of both Project Locations and Project Sidegames, Bulbapedia projects that, together, aim to write comprehensive articles on the Pokémon Locations and Sidegames, respectively. | 
|
