Appendix:Emerald walkthrough/Section 17: Difference between revisions
(Undo revision 3804982 by SnorlaxMonster (talk)) Tag: Undo |
|||
| (105 intermediate revisions by 37 users not shown) | |||
| Line 1: | Line 1: | ||
== | ==Routes 132, 133, and 134 (optional)== | ||
[[File:Hoenn Route 132 RSE.png|thumb|Route 132]] | |||
[[File:Hoenn Route 133 RSE.png|thumb|Route 133]] | |||
[[File:Hoenn Route 134 RS.png|thumb|Route 134]] | |||
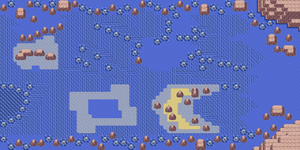
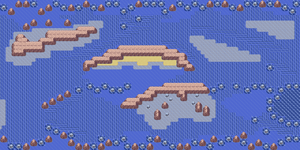
The waters of Routes {{rtn|132|Hoenn}}, {{rtn|133|Hoenn}}, and {{rtn|134|Hoenn}} hold strong ocean currents that make travel difficult. While moving primarily westbound, these currents can send you sailing in almost any direction. This makes it necessary to revisit the area in order to explore every island. | |||
{{ | {| class="expandable" style="margin: auto; background: #{{locationcolor/med|ocean}}; {{roundy}}; border: 5px solid #{{locationcolor/light|ocean}};" | ||
| | |- align="center" | ||
| | ! Trainers | ||
| | |- | ||
| | | | ||
| | {| class="expandable" style="margin: auto; background: #{{locationcolor/med|ocean}}; {{roundy}}; border: 5px solid #{{locationcolor/light|ocean}};" | ||
| | |- align="center" | ||
| | ! Route 132 | ||
| | |- | ||
| | | | ||
| | {{trainerheader|ocean}} | ||
| | {{trainerentry|Spr RS Swimmer M.png|Swimmer|Gilbert|272|1|319|Sharpedo|♂|34|}} | ||
| | {{trainerdiv|ocean}} | ||
| | {{trainerentry|Spr RS Swimmer F.png|Swimmer|Dana|272|1|184|Azumarill|♀|34|}} | ||
| | {{trainerdiv|ocean}} | ||
| | {{trainerentry|Spr RS Fisherman.png|Fisherman|Ronald|1400|6|129|Magikarp|♂|19||130|Gyarados|♂|21||130|Gyarados|♂|23||130|Gyarados|♂|26||130|Gyarados|♂|30||130|Gyarados|♂|35|}} | ||
| | {{trainerdiv|ocean}} | ||
| | {{trainerentry|Spr RS Black Belt.png|Black Belt|Kiyo|1088|1|297|Hariyama|♂|34|}} | ||
| | {{trainerdiv|ocean}} | ||
| | {{trainerentry|Spr RS Expert M.png|Expert|Paxton|1320<br><small>Potential [[Double Battle]] with Darcy</small>|2|277|Swellow|♂|33||286|Breloom|♂|33|}} | ||
| | {{trainerdiv|ocean}} | ||
{{trainerentry|Spr RS Cooltrainer F.png|Cooltrainer|Darcy|1584<br><small>Potential [[Double Battle]] with Paxton</small>|2|279|Pelipper|♀|33||323|Camerupt|♀|33|}} | |||
{{trainerdiv|ocean}} | |||
{{trainerentry|Spr RS Expert F.png|Expert|Makayla|1320<br><small>Potential [[Double Battle]] with Jonathan</small>|2|315|Roselia|♀|33||308|Medicham|♀|33|}} | |||
{{trainerdiv|ocean}} | |||
{{trainerentry|Spr RS Cooltrainer M.png|Cooltrainer|Jonathan|1584<br><small>Potential [[Double Battle]] with Makayla</small>|2|352|Kecleon|♂|33||294|Loudred|♂|33|}} | |||
{{trainerfooter|ocean|3}} | |||
|} | |||
{| class="expandable" style="margin: auto; background: #{{locationcolor/med|ocean}}; {{roundy}}; border: 5px solid #{{locationcolor/light|ocean}};" | |||
|- align="center" | |||
! Route 133 | |||
|- | |||
| | |||
{{trainerheader|ocean}} | |||
{{trainerentry|Spr RS Swimmer F.png|Swimmer|Linda|264|2|116|Horsea|♀|33||117|Seadra|♀|33|}} | |||
{{trainerdiv|ocean}} | |||
{{trainerentry|Spr RS Bird Keeper.png|Bird Keeper|Beck|1088|1|357|Tropius|♂|34|}} | |||
{{trainerdiv|ocean}} | |||
{{trainerentry|Spr RS Expert M.png|Expert|Conor|1320<br><small>Potential [[Double Battle]] with Mollie</small>|2|170|Chinchou|♂|33||297|Hariyama|♂|33|}} | |||
{{trainerdiv|ocean}} | |||
{{trainerentry|Spr RS Expert F.png|Expert|Mollie|1320<br><small>Potential [[Double Battle]] with Conor</small>|2|340|Whiscash|♀|33||307|Meditite|♀|33|}} | |||
{{trainerdiv|ocean}} | |||
{{trainerentry|Spr RS Cooltrainer M.png|Cool Trainer|Warren|1584|2|075|Graveler|♂|33||272|Ludicolo|♂|33|}} | |||
{{trainerdiv|ocean}} | |||
{{trainerentry|Spr RS Swimmer F.png|Swimmer|Debra|272<br><small>Potential [[Double Battle]] with Franklin</small>|1|119|Seaking|♀|34|}} | |||
{{trainerdiv|ocean}} | |||
{{trainerentry|Spr RS Swimmer M.png|Swimmer|Franklin|272<br><small>Potential [[Double Battle]] with Debra</small>|1|364|Sealeo|♂|34|}} | |||
{{trainerfooter|ocean|3}} | |||
|} | |||
{| class="expandable" style="margin: auto; background: #{{locationcolor/med|ocean}}; {{roundy}}; border: 5px solid #{{locationcolor/light|ocean}};" | |||
|- align="center" | |||
! Route 134 | |||
|- | |||
| | |||
{{trainerheader|ocean}} | |||
{{trainerentry|Spr RS Swimmer F.png|Swimmer|Laurel|264|2|370|Luvdisc|♀|33||370|Luvdisc|♀|33|}} | |||
{{trainerdiv|ocean}} | |||
{{trainerentry|Spr RS Swimmer M.png|Swimmer|Jack|272|1|130|Gyarados|♂|34|}} | |||
{{trainerdiv|ocean}} | |||
{{trainerentry|Spr RS Black Belt.png|Black Belt|Hitoshi|1024<br><small>Potential [[Double Battle]] with Reyna</small>|2|066|Machop|♂|32||067|Machoke|♂|32|}} | |||
{{trainerdiv|ocean}} | |||
{{trainerentry|Spr RS Battle Girl.png|Battle Girl|Reyna|792<br><small>Potential [[Double Battle]] with Hitoshi</small>|2|307|Meditite|♀|33||297|Hariyama|♂|33|}} | |||
{{trainerdiv|ocean}} | |||
{{trainerentry|Spr RS Sailor.png|Sailor|Hudson|1088|1|320|Wailmer|♂|34|}} | |||
{{trainerdiv|ocean}} | |||
{{trainerentry|Spr RS Dragon Tamer.png|Dragon Tamer|Aaron|1632<br><small>[[Double Battle]] with Marley</small>|1|371|Bagon|♂|34|}} | |||
{{trainerdiv|ocean}} | |||
{{trainerentry|Spr RS Cooltrainer F.png|Cooltrainer|Marley|1632<br><small>[[Double Battle]] with Aaron</small>|1|310|Manectric|♀|34|}} | |||
{{trainerdiv|ocean}} | |||
{{trainerentry|Spr RS Bird Keeper.png|Bird Keeper|Alex|1056<br><small>Potential [[Double Battle]] with Kelvin</small>|2|177|Natu|♂|33||277|Swellow|♂|33|}} | |||
{{trainerdiv|ocean}} | |||
{{trainerentry|Spr RS Sailor.png|Sailor|Kelvin|1056<br><small>Potential [[Double Battle]] with Alex</small>|2|067|Machoke|♂|33||363|Spheal|♂|33|}} | |||
{{trainerfooter|ocean|3}} | |||
|} | |||
|} | |||
{| class="expandable" style="margin: auto; background: #{{locationcolor/med|ocean}}; {{roundy}}; border: 5px solid #{{locationcolor/light|ocean}};" | |||
|- align="center" | |||
! Available Pokémon | |||
|- | |||
| | |||
{{Catch/header|ocean|no}} | |||
{{Catch/div|ocean|Surfing}} | |||
{{Catch/entry3|072|Tentacool|no|no|yes|Surf|5-35|60%|type1=Water|type2=Poison}} | |||
{{Catch/entry3|278|Wingull|no|no|yes|Surf|10-30|35%|type1=Water|type2=Flying}} | |||
{{Catch/entry3|279|Pelipper|no|no|yes|Surf|25-30|5%|type1=Water|type2=Flying}} | |||
{{Catch/div|ocean|Fishing}} | |||
{{Catch/entry3|129|Magikarp|no|no|yes|Fish Old|5-10|70%|type1=Water}} | |||
{{Catch/entry3|072|Tentacool|no|no|yes|Fish Old|5-10|30%|type1=Water|type2=Poison}} | |||
{{Catch/entry3|129|Magikarp|no|no|yes|Fish Good|10-30|60%|type1=Water}} | |||
{{Catch/entry3|072|Tentacool|no|no|yes|Fish Good|10-30|20%|type1=Water|type2=Poison}} | |||
{{Catch/entry3|320|Wailmer|no|no|yes|Fish Good|10-30|20%|type1=Water}} | |||
{{Catch/entry3|320|Wailmer|no|no|yes|Fish Super|30-45|45%|type1=Water}} | |||
{{Catch/entry3|319|Sharpedo|no|no|yes|Fish Super|30-35|40%|type1=Water|type2=Dark}} | |||
{{Catch/entry3|116|Horsea|no|no|yes|Fish Super|25-30|15%|type1=Water}} | |||
{{Catch/footer|ocean}} | |||
|} | |||
{{ | {| class="expandable" style="margin: auto; background: #{{locationcolor/med|ocean}}; {{roundy}}; border: 5px solid #{{locationcolor/light|ocean}};" | ||
| | |- align="center" | ||
| | ! Items | ||
| | |- | ||
| | | | ||
| | {{itlisth|ocean}} | ||
| | {{catch/div|ocean|Route 132}} | ||
| | {{itemlist|Rare Candy|North side of the northwest island|E=yes}} | ||
| | {{itemlist|Protein|On the ring-shaped patch of shallow water in the southwest|E=yes}} | ||
| | {{catch/div|ocean|Route 133}} | ||
| | {{itemlist|Star Piece|North side of the northwest island|E=yes}} | ||
| | {{itemlist|Max Revive|Among the rocks in the large shallow water patch in the southeast|E=yes}} | ||
| | {{itemlist|Big Pearl|Southern of the two shallows in the northeast|E=yes}} | ||
| | {{catch/div|ocean|Route 134}} | ||
| | {{itemlist|Carbos|South side of the sandy part of the largest island|E=yes}} | ||
| | {{itemlist|Star Piece|Shallows in the southwest|E=yes}} | ||
| | {{itlistfoot|ocean}} | ||
| | |} | ||
| | |||
| | |||
| | |||
===Northern path=== | |||
Ride the central currents to Swimmer Gilbert, then sail westward to reach a [[Rare Candy]] opposite Black Belt Kiyo on the northwest island. From here, Surf westward through the northern shallows of Route 133 to reach the north side of the route's northwest island. Collect the [[Star Piece]] here, then sail west to the calm waters on Route 134's north side. Take the current south of here to reach the large, thin island. Fight Black Belt Hitoshi and Battle Girl Reyna, collect the nearby [[Carbos]], then Surf west to reach the shallows outside [[Slateport City]]. | |||
===Central path=== | |||
Ride the southern currents to the southeast island to fight Fisherman Ronald. Wade into the waters off the north end of the shallows to follow the current to Black Belt Kiyo on the northwest island. Sail westward to ride the current to the southern of two shallows on Route 133, where you'll need to fight Experts Conor and Mollie before collecting the [[Big Pearl]] there. Continue westward to reach the south side of Route 133's northwest island, and battle Bird Keeper Beck. Sail west again to battle Sailor Hudson in the shallows of the large island. Head back into the water to follow the current to Slateport City. | |||
===To the Depths=== | |||
Ride the southern currents to fight Fisherman Ronald on the crescent-shaped island, then sail westward to a calm patch of water surrounded by shallows. Grab the [[Protein]], then follow the currents westward to be funneled through a bottleneck; this leads to calm waters with two Swimmers, Debra and Franklin. Pass through the rocky southern islet, collecting the [[Max Revive]] along the way, to reach a rectangular patch of shallow water situated between Routes 133 and 134. Step into the water from the west-central side to reach a deep, dark pit of water surrounded by a ring of rocks. {{m|Dive}} beneath the waves and follow the underwater path southward. The markings on the nearby wall are an ancient form of writing, and translate to ''<sc>Go up here</sc>.'' Surface from this point to emerge in an ancient ruin known as the [[Sealed Chamber]]. Once you're done exploring the Sealed Chamber, surface on Route 134 where you left off and continue west and then south to a small maze of rocks. Leave the maze through its westernmost exit to Sailor Hudson's island, then Surf further west to reach the shallows outside Slateport City. | |||
[[File:Sealed Chamber 1R E.png|thumb|left|Sealed Chamber, Entrance]] | |||
[[File:Sealed Chamber 2R E.png|thumb|Sealed Chamber, Back Room]] | |||
===Sealed Chamber=== | |||
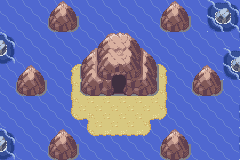
The [[Sealed Chamber]] is a mysterious ruin located in the depths of {{rt|134|Hoenn}}. The many stone tablets positioned around the chamber feature the same mysterious writing that was found near the underwater entrance. Solving some of [[Hoenn]]'s oldest mysteries hinges on deciphering this age-old system. | |||
== | ====Entrance==== | ||
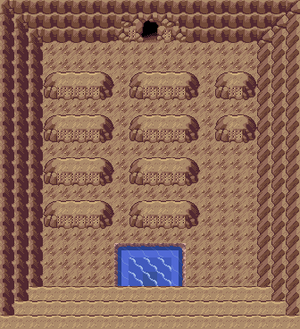
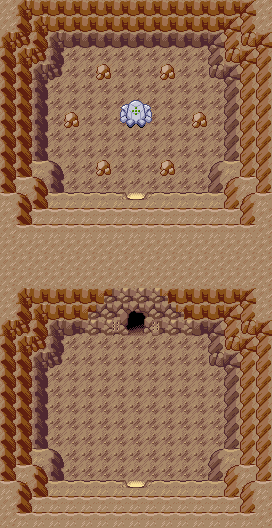
The first chamber holds ten stone tablets that act as a key to decoding this ancient writing system, known as [[Braille]]. These 28 characters correspond to the 26 letters of the alphabet, as well as the comma and period. Inspect the markings on the cavern's north wall to reveal a phrase, which translates to ''<sc>Dig here</sc>''. Using {{m|Dig|the field move}} causes the wall to fall away, granting you access to a second cavern. | |||
====Back Room==== | |||
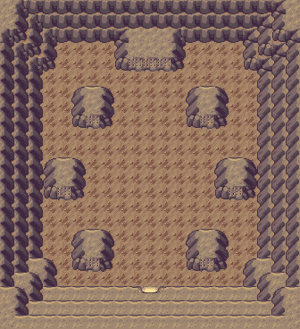
The central ruins are encircled by {{DL|Sealed Chamber|Mounds 2|six more stone tablets}} which tell of a powerful Pokémon that was sealed away. The message on the north wall reads, ''<sc>First comes {{p|Wailord}}. Last comes {{p|Relicanth}}.</sc>'' Relicanth can be found only in a few underwater areas, while Wailord's pre-evolved form, {{p|Wailmer}}, can be found in many areas with the [[Good Rod]] or [[Super Rod]]. Position these Pokémon in their respective places in your party and examine the wall again. This causes a mighty earthquake to rock the Sealed Chamber, while the sound of doors opening echoes from somewhere far away. Three separate ruins have now been opened, and each one holds a legendary Pokémon! | |||
{{-}} | |||
==Desert Ruins (optional)== | |||
[[File:Desert Ruins E.png|thumb|left|Desert Ruins, exterior]] | |||
[[File:Desert Ruins interior RSE.png|thumb|Desert Ruins, interior]] | |||
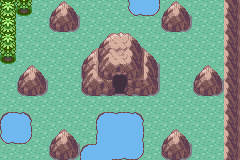
The [[Desert Ruins]] lie among the dunes of {{rt|111|Hoenn}}. Another coded message can be found on the north wall. | |||
===Entrance=== | |||
Examine the north wall to view the message, which reads, ''<sc>Left, left, down, down. Then, use Rock Smash.</sc>'' Close the message box and move exactly as instructed, two steps west and two steps south. Have a Pokémon use {{m|Rock Smash}} from this location, and a secret passage opens in the north wall! | |||
===Back Room=== | |||
Follow the passage to the back cavern, where the legendary Pokémon {{p|Regirock}} awaits. | |||
{| style="margin: auto;" | |||
| | |||
{{Pokémon/3|game=Emerald | |||
|ndex=377|pokemon=Regirock | |||
|type1=Rock | |||
|level=40 | |||
|ability=Clear Body | |||
|move1=Rock Throw|move1type=Rock | |||
|move2=Curse|move2type=??? | |||
|move3=Superpower|move3type=Fighting | |||
|move4=AncientPower|move4type=Rock | |||
}} | |||
|} | |||
==Island Cave (optional)== | |||
[[File:Island Cave E.png|thumb|left|Island Cave, exterior]] | |||
[[File:Island Cave interior RSE.png|thumb|Island Cave, interior]] | |||
The [[Island Cave]] sits on a small isle in the northwest part of {{rt|105|Hoenn}}. Another coded message can be found on the north wall. | |||
===Entrance=== | |||
Examine the north wall to view the message, which reads, ''<sc>Stay close to the wall. Run around one lap.</sc>'' Close the message box and make a lap of the chamber, staying near the walls. After doing so, a secret passage appears out of nowhere! | |||
===Back Room=== | |||
Follow the passage to the back cavern, where the legendary Pokémon {{p|Regice}} awaits. | |||
{| style="margin: auto;" | |||
| | |||
{{Pokémon/3|game=Emerald | |||
|ndex=378|pokemon=Regice | |||
|type1=Ice | |||
|level=40 | |||
|ability=Clear Body | |||
|move1=Icy Wind|move1type=Ice | |||
|move2=Curse|move2type=??? | |||
|move3=Superpower|move3type=Fighting | |||
|move4=AncientPower|move4type=Rock | |||
}} | |||
|} | |||
==Ancient Tomb (optional)== | |||
[[File:Ancient Tomb E.png|thumb|left|Ancient Tomb, exterior]] | |||
[[File:Ancient Tomb interior E.png|thumb|Ancient Tomb, interior]] | |||
The [[Ancient Tomb]] stands on the southwest plateau of {{rt|120|Hoenn}}. Another coded message can be found on the north wall. | |||
===Entrance=== | |||
Examine the north wall to view the message, which reads, ''<sc>Those who inherit our will, shine in the middle.</sc>'' Close the message box and move to the center of the cave. Have a Pokémon use {{m|Flash}} from this location, and a secret passage appears out of nowhere! | |||
===Back Room=== | |||
Follow the passage to the back cavern, where the legendary Pokémon {{p|Registeel}} awaits. | |||
{| style="margin: auto;" | |||
| | |||
{{Pokémon/3|game=Emerald | |||
|ndex=379|pokemon=Registeel | |||
|type1=Steel | |||
|level=40 | |||
|ability=Clear Body | |||
|move1=Metal Claw|move1type=Steel | |||
|move2=Curse|move2type=??? | |||
|move3=Superpower|move3type=Fighting | |||
|move4=AncientPower|move4type=Rock | |||
}} | |||
|} | |||
' | ==Sky Pillar== | ||
[[File:Sky Pillar after E.png|thumb|left|Sky Pillar, Exterior]] | |||
[[File:Sky Pillar 6F before E.png|thumb|Sky Pillar, 6F]] | |||
On the northern side of {{rt|131|Hoenn}}, [[Sky Pillar]] is an ancient, towering altar built for the ascension of Hoenn's ageless protector, the legendary dragon {{p|Rayquaza}}. | |||
{{ | {| class="expandable" style="margin: auto; background: #{{locationcolor/med|ruins}}; {{roundy}}; border: 5px solid #{{locationcolor/light|ruins}};" | ||
{{ | |- align="center" | ||
{{ | ! Available Pokémon | ||
{{ | |- | ||
{{ | | | ||
{{Catch/header|ruins|no}} | |||
{{Catch/div|ruins|1F}} | |||
{{Catch/entry3|042|Golbat|no|no|yes|1F|34-35|30%|type1=Poison|type2=Flying}} | |||
{{Catch/entry3|302|Sableye|no|no|yes|1F|33-34|30%|type1=Dark|type2=Ghost}} | |||
{{Catch/entry3|344|Claydol|no|no|yes|1F|36-38|25%|type1=Ground|type2=Psychic}} | |||
{{Catch/entry3|354|Banette|no|no|yes|1F|37-38|15%|type1=Ghost}} | |||
{{Catch/div|ruins|3F}} | |||
{{Catch/entry3|042|Golbat|no|no|yes|3F|34-35|30%|type1=Poison|type2=Flying}} | |||
{{Catch/entry3|302|Sableye|no|no|yes|3F|33-34|30%|type1=Dark|type2=Ghost}} | |||
{{Catch/entry3|344|Claydol|no|no|yes|3F|36-38|25%|type1=Ground|type2=Psychic}} | |||
{{Catch/entry3|354|Banette|no|no|yes|3F|37-38|15%|type1=Ghost}} | |||
{{Catch/div|ruins|5F}} | |||
{{Catch/entry3|042|Golbat|no|no|yes|5F|34-35|30%|type1=Poison|type2=Flying}} | |||
{{Catch/entry3|302|Sableye|no|no|yes|5F|33-34|30%|type1=Dark|type2=Ghost}} | |||
{{Catch/entry3|344|Claydol|no|no|yes|5F|36-38|19%|type1=Ground|type2=Psychic}} | |||
{{Catch/entry3|354|Banette|no|no|yes|5F|37-38|15%|type1=Ghost}} | |||
{{Catch/entry3|334|Altaria|no|no|yes|5F|38-39|6%|type1=Dragon|type2=Flying}} | |||
{{Catch/footer|ruins}} | |||
|} | |||
===Exterior=== | |||
After climbing through the tunnel from the sea, you emerge on the island's upper level. [[Wallace]] approaches you from the tower, having just unlocked the door. Sudden earthquakes rock the island as the weather distortions continue to spread from {{ci|Sootopolis}}. He's worried about the city and heads back, leaving you to scale the tower on your own. | |||
== | ===1F-5F=== | ||
Enter the tower and climb the stairs to 4F. Step onto the cracked tiles on the north side of the floor; this causes you to fall back down to a previously-inaccessible part of 3F. Climb to 5F and take the stairs in the northeast to reach the apex. | |||
===Apex=== | |||
Upon reaching the rooftop, you find the legendary creature beyond one final flight of stairs. Approach the dragon and it awakens, before flying off with a cry loud enough to shake the tower. Follow it back to Sootopolis! | |||
==Sootopolis City (second visit)== | |||
===Rayquaza to the Rescue=== | |||
[[File:Super-ancient Pokémon cutscene.png|thumb|240px|Rayquaza quelling the battle.]] | |||
When you return to {{ci|Sootopolis}}, you find the two super-ancient Pokémon still locked in battle. {{p|Rayquaza}} suddenly appears in a beam of green light shining through the storm clouds, and quickly descends to the city. It hovers above the two combatants, and ends the fighting with a single, intimidating roar. {{p|Groudon}} and {{p|Kyogre}} flee, Rayquaza flies off back to [[Sky Pillar]] with another loud cry, and the weather returns to normal. With the super-ancient Pokémon gone, you can now find wild Pokémon while surfing in Sootopolis City. | |||
{| class="expandable" style="margin: auto; background: #AFAFAF; {{roundy}}; border: 5px solid #C0C0C0;" | |||
|- align="center" | |||
! Available Pokémon | |||
|- | |||
| | |||
{{Catch/header|water|no}} | |||
{{Catch/div|water|Surfing}} | |||
{{Catch/entry3|129|Magikarp|no|no|yes|Surf|5-35|100%|type1=Water}} | |||
{{Catch/div|water|Fishing}} | |||
{{Catch/entry3|129|Magikarp|no|no|yes|Fish Old|5-10|70%|type1=Water}} | |||
{{Catch/entry3|072|Tentacool|no|no|yes|Fish Old|5-10|30%|type1=Water|type2=Poison}} | |||
{{Catch/entry3|129|Magikarp|no|no|yes|Fish Good|10-30|100%|type1=Water}} | |||
{{Catch/entry3|129|Magikarp|no|no|yes|Fish Super|30-35|80%|type1=Water}} | |||
{{Catch/entry3|130|Gyarados|no|no|yes|Fish Super|5-45|20%|type1=Water|type2=Flying}} | |||
{{Catch/footer|water}} | |||
|} | |||
{| class="expandable" style="margin: auto; background: #AFAFAF; {{roundy}}; border: 5px solid #C0C0C0;" | |||
|- align="center" | |||
! Items | |||
|- | |||
| | |||
{{itlisth|water}} | {{itlisth|water}} | ||
{{ | {{catch/div|water|After calming Groudon and Kyogre and talk to Maxie and Archie}} | ||
{{ | {{itemlist|HM Water|From Wallace in front of the Gym|E=yes|display={{HM|07|Waterfall}}}} | ||
{{itemlist|TM Fighting|From the Black Belt in the northwestern-most house|E=yes|display={{TM|31|Brick Break}}}} | |||
{{catch/div|water|Before awakening Kyogre or after defeating the Sootopolis Gym}} | |||
{{itemlist|TM Water|From Juan upon his defeat|E=yes|display={{TM|03|Water Pulse}}}} | |||
{{itemlist|None|From the girl in the house east of the Pokémon Center|E=yes|display={{DL|Decoration|Pokémon dolls 2|Wailmer Doll}}|sprite=Doll Wailmer III}} | |||
{{itemlist|Elixir| | |||
* House northeast of the Pokémon Center, from the Fisherman if shown a large {{p|Seedot}} | |||
* House northeast of the Pokémon Center, from the Hiker if shown a large {{p|Lotad}}|E=yes|display=[[Elixir]] ×2}} | |||
{{itlistfoot|water}} | {{itlistfoot|water}} | ||
|} | |||
Note: If you were to return to the Sky Pillar, Rayquaza would be there, waiting to battle. | |||
[[Kiri]] still will not give out Berries after Rayquaza appears here in the city, you should first defeat the Gym Leader of Sootopolis City. | |||
[[Maxie]], [[Archie]], {{Steven}}, and [[Wallace]] all witness these events from the Gym island. [[Kiri]] still will not give out Berries after Rayquaza appears here in the city, you should first defeat the Gym Leader of Sootopolis City. The team leaders realize and accept their mistakes, then leave for [[Mt. Pyre]] to return the [[Red Orb|Red]] and [[Blue Orb]]s. Wallace thanks you on behalf of the people of [[Hoenn]], and gives you {{HM|07|Waterfall}} as a gift. With this, a Pokémon can force its way up a waterfall, but using it requires defeating the Sootopolis Gym first! | |||
===Move Tutor=== | |||
Visit the Pokémon Center to prepare for the upcoming Gym. Inside, you find a girl near the bookcase on the left side of the counter. Speak to her, and she offers to teach the move {{m|Double-Edge}} to a Pokémon, one time only. | |||
{{ | |||
===Sootopolis Gym=== | |||
[[File:Sootopolis Gym 1F E.png|thumb|Sootopolis Gym, 1F]] | |||
[[File:Sootopolis Gym B1F E.png|thumb|Sootopolis Gym, B1F]] | |||
{{sign|E|header}} | |||
{{sign|E|title|Sootopolis City Pokémon Gym<br>Leader: Juan}} | |||
{{sign|E|The Gym Leader with the beauty of pure water!}} | |||
{{sign|E|footer}} | |||
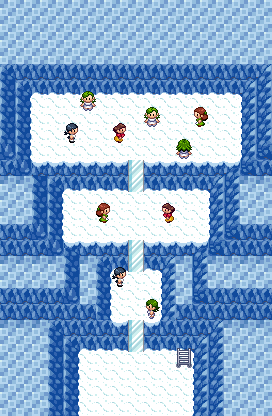
The [[Sootopolis Gym]] Specializes in {{type|Water}} Pokémon. {{t|Grass}}- and {{type|Electric}} moves are best here, while {{t|Fire}}, {{t|Ground}}, and {{t|Rock}} Pokémon may struggle. The Gym features three platforms where each icy tile must be traversed once in order to defrost the next stairway. Walking over an ice tile once cracks it; passing by a second time shatters it, leaving you to fall to the Gym's snowy underbelly where plenty of Trainers await. | |||
The first puzzle is a 3×3 grid of ice, with two icy rocks as obstacles. Starting on the south-central tile, move ←1, ↑1, →2, ↑1 and ←1. This reveals the first stairway. | |||
The second puzzle is a 7×3 grid, with two icy rocks as obstacles. From the south-central tile, move ←3, ↑2, →2, ↓1, →2, ↓1, →2, ↑2, and ←3. This reveals the second stairway. | |||
The final puzzle is an 11×4 grid, with six icy rocks as obstacles. Starting on the south-central tile, move ←5, ↑3, →1, ↓1, →1, ↓1, →1, ↑2, →1, ↓1, →1, ↓1, →2, ↑1, →1, ↓1, →1, ↓1, →1, ↑3, and ←5. This reveals the stairway to the Gym Leader. | |||
| | [[Juan]] leads with his {{p|Luvdisc}}; not much of a threat, but it may still confuse its target with {{m|Sweet Kiss}}, and further hinder male targets with {{m|Attract}}. As a {{2t|Water|Ground}} Pokémon, his {{p|Whiscash}} is only vulnerable to Grass moves; its {{m|Rain Dance}} temporarily strengthens Water moves, while {{m|Earthquake}} can deter {{type|Electric}} opponents. {{p|Sealeo}}'s {{2t|Ice|Water}} typing gives it additional weaknesses to {{t|Fighting}} and {{t|Rock}} moves; {{m|Water Pulse}} and {{m|Body Slam}} deal damage while {{m|Encore}} forces the target to repeat its previous move. His {{p|Crawdaunt}} is not a major threat, as all Water moves are [[Special move]]s and its {{stat|Special Attack}} is lower than its {{stat|Attack}}, but it can still deal damage. Finally, his {{p|Kingdra}} can inflict serious damage with Water Pulse, and use {{m|Ice Beam}} to deal with Grass types; use powerful moves to defeat it quickly, before it can regain health with {{m|Rest}}. | ||
| | |||
| | |||
| | |||
| | |||
| | |||
| | {| align="center" | ||
| | |- align="center" valign="top" | ||
| | | | ||
| | {| align="center" style="background: #{{water color}}; {{roundy}}; border: 5px solid #{{water color light}};" | ||
| | |- align="center" | ||
| | ! Sootopolis Gym<br>[[File:Rain Badge.png|35px|The Rain Badge]]<br><br> | ||
}} | |- | ||
| | |||
{| align="center" class="expandable" style="background: #{{water color}}; {{roundy}}; border: 5px solid #{{water color light}};" | |||
|- align="center" | |||
! Trainers | |||
|- | |||
| | |||
{{Trainerheader|Water}} | |||
{{Trainerentry|Spr RS Beauty.png|Beauty|Connie|3200|1|118|Goldeen|♀|40|}} | |||
{{Trainerdiv|Water}} | |||
{{Trainerentry|Spr RS Lass.png|Lass|Andrea|640|1|370|Luvdisc|♀|40|}} | |||
{{Trainerdiv|Water}} | |||
{{Trainerentry|Spr RS Lady.png|Lady|Daphne|7800<br><small>Potential [[Double Battle]] with Annika</small>|2|370|Luvdisc|♀|39|Nugget|370|Luvdisc|♀|39|Nugget}} | |||
{{Trainerdiv|Water}} | |||
{{Trainerentry|Spr RS Pokéfan F.png|Pokéfan|Annika|3120<br><small>Potential [[Double Battle]] with Daphne</small>|2|349|Feebas|♀|39|Oran Berry|349|Feebas|♀|39|Oran Berry}} | |||
{{Trainerdiv|Water}} | |||
{{Trainerentry|Spr RS Beauty.png|Beauty|Tiffany|3120<br><small>Potential [[Double Battle]] with Crissy</small>|2|318|Carvanha|♀|39|None|319|Sharpedo|♀|39|}} | |||
{{Trainerdiv|Water}} | |||
{{Trainerentry|Spr RS Lass.png|Lass|Crissy|624<br><small>Potential [[Double Battle]] with Tiffany</small>|2|118|Goldeen|♀|39|None|320|Wailmer|♀|39|}} | |||
{{Trainerdiv|Water}} | |||
{{Trainerentry|Spr RS Pokéfan F.png|Pokéfan|Bethany|3120<br><small>Potential [[Double Battle]] with Olivia</small>|3|298|Azurill|♀|35|Oran Berry|183|Marill|♀|37|Oran Berry|184|Azumarill|♀|39|Oran Berry}} | |||
{{Trainerdiv|Water}} | |||
{{Trainerentry|Spr RS Beauty.png|Beauty|Olivia|3120<br><small>Potential [[Double Battle]] with Bethany</small>|3|366|Clamperl|♀|35|None|341|Corphish|♀|37|None|271|Lombre|♀|39|}} | |||
{{Trainerdiv|Water}} | |||
{{Trainerentry|Spr RS Lady.png|Lady|Brianna|8000<br><small>Potential [[Double Battle]] with Bridget</small>|1|119|Seaking|♀|40|Nugget}} | |||
{{Trainerdiv|Water}} | |||
{{Trainerentry|Spr RS Beauty.png|Beauty|Bridget|3200<br><small>Potential [[Double Battle]] with Brianna</small>|1|184|Azumarill|♀|40|}} | |||
{{Trainerfooter|Water|3|inside}} | |||
|} | |||
= | {| style="margin: auto;" | ||
{{Party|color={{ | | | ||
|sprite= | {{Party/Single | ||
|prize= | |color={{water color}}|headcolor={{water color light}}|bordercolor={{water color dark}} | ||
|class= | |sprite=Spr E Juan.png | ||
|name= | |prize={{PDollar}}4600 | ||
|game=E | |class=Leader|classlink=Gym Leader|name={{color2|000|Juan}} | ||
|location= | |game=E|location=Sootopolis Gym | ||
|pokemon=5}} | |||
|pokemon= | |||
| | |{{Pokémon/3|game=Emerald | ||
|ndex=370|pokemon=Luvdisc | |||
|type1=Water | |||
|level=41|gender=female | |||
|ability=Swift Swim | |||
|move1=Water Pulse|move1type=Water | |||
|move2=Attract|move2type=Normal | |||
|move3=Sweet Kiss|move3type=Normal | |||
|move4=Flail|move4type=Normal}} | |||
|ability= | |||
|move1= | |||
|move2= | |||
|move3= | |||
|move4= | |||
}} | |||
|{{Pokémon/3|game=Emerald | |||
|ndex=340|pokemon=Whiscash | |||
|type1=Water|type2=Ground | |||
|level=41|gender=male | |||
|ability=Oblivious | |||
|move1=Rain Dance|move1type=Water | |||
|game=Emerald | |||
|ndex= | |||
|pokemon= | |||
| | |||
| | |||
|level= | |||
| | |||
|move1= | |||
|move2=Water Pulse|move2type=Water | |move2=Water Pulse|move2type=Water | ||
|move3= | |move3=Amnesia|move3type=Psychic | ||
|move4=Earthquake|move4type=Ground}} | |move4=Earthquake|move4type=Ground}} | ||
| | |{{Pokémon/3|game=Emerald | ||
|ndex=364|pokemon=Sealeo | |||
|type1=Ice|type2=Water | |||
|level=43|gender=male | |||
|ability=Thick Fat | |||
|move1=Encore|move1type=Normal | |||
|ability= | |||
|move1= | |||
|move2=Body Slam|move2type=Normal | |move2=Body Slam|move2type=Normal | ||
|move3= | |move3=Aurora Beam|move3type=Ice | ||
|move4= | |move4=Water Pulse|move4type=Water}} | ||
| | {{Party/Div|color={{water color}}}} | ||
|game=Emerald | | style="margin:auto" |{{Pokémon/3|game=Emerald | ||
|ndex= | |ndex=342|pokemon=Crawdaunt | ||
|pokemon= | |type1=Water|type2=Dark | ||
|type1= | |level=43|gender=male | ||
| | |ability=Hyper Cutter | ||
| | |move1=Water Pulse|move1type=Water | ||
| | |move2=Crabhammer|move2type=Water | ||
|move1= | |move3=Taunt|move3type=Dark | ||
|move2= | |move4=Leer|move4type=Normal}} | ||
|move3= | | style="margin:auto" |{{Pokémon/3|game=Emerald | ||
|move4= | |ndex=230|pokemon=Kingdra | ||
|type1=Water|type2=Dragon | |||
|level=46|gender=male | |||
|ability=Swift Swim | |||
|game= | |||
| | |||
|pokemon= | |||
| | |||
| | |||
| | |||
| | |||
|ability= | |||
|held=Chesto Berry | |held=Chesto Berry | ||
|move1=Water Pulse|move1type=Water | |||
|move1= | |move2=Double Team|move2type=Normal | ||
|move2= | |move3=Ice Beam|move3type=Ice | ||
|move3= | |||
|move4=Rest|move4type=Psychic}} | |move4=Rest|move4type=Psychic}} | ||
{{Party/Footer}} | |||
|} | |||
|} | |||
|} | |||
Defeated, Juan awards you the {{badge|Rain}}, which ensures obedience from all Pokémon and enables the use of {{m|Waterfall}} in the field. He also gives you {{TM|03|Water Pulse}} as a prize, and registers himself in your PokéNav. With all eight Badges, your next destination is the [[Pokémon League]] in [[Ever Grande City]] to the southeast. To get there, sail southward from [[Mossdeep City]], then eastward through {{rt|128|Hoenn}}'s narrow channel. However, you may want to pick up a few more items before leaving Sootopolis. | |||
| | |||
| | |||
}} | |||
=== | ===Competitive brothers=== | ||
In the house northeast of the Pokémon Center, there are two brothers who are arguing over two different species of Pokémon. The younger brother is a Fisherman, while the older brother is a Hiker. The younger brother prefers Seedot and the older brother prefers Lotad. | |||
The brothers are arguing over the sizes of their favorite Pokémon. If a brother is shown a Pokémon of the species he prefers, he will calculate its size and give the player an Elixir if it is larger than any he has seen before. The initial record size is the average height of the species being argued over, which is 0.5 meters. | |||
===A Berry A Day=== | |||
| | Kiri will give you two Berries each day. She gives one Berry from among the {{b|Pomeg}}, {{b|Kelpsy}}, {{b|Qualot}}, {{b|Hondew}}, {{b|Grepa}}, {{b|Tamato}}, {{b|Cornn}}, {{b|Magost}}, {{b|Rabuta}}, or {{b|Nomel}} Berries; and the other from the {{b|Figy}} or {{b|Iapapa}} specimens. | ||
| | |||
| | |||
| | |||
| | |||
{| style="margin: auto; background: #{{berries color}}; {{roundy}}; border: 3px solid #{{berries color dark}};" cellspacing="2" cellpadding="6" | |||
|- | |||
! colspan="6" style="background: #{{berries color light}}; {{roundytop|5px}};" | After defeating the Sootopolis Gym | |||
|- | |- | ||
! style="background:#{{ | ! colspan="4" style="background: #{{berries color light}}; {{roundytop|5px}};" | Berry 1 | ||
! | ! colspan="2" style="background: #{{berries color light}}; {{roundytop|5px}};" | Berry 2 | ||
|- | |- | ||
| | |- style="background: #FFF;" | ||
| {{bag|Pomeg Berry}} || [[Pomeg Berry]] || {{bag|Kelpsy Berry}} || [[Kelpsy Berry]] || {{bag|Figy Berry}} || [[Figy Berry]] | |||
|- style="background: #FFF;" | |||
| {{bag|Qualot Berry}} || [[Qualot Berry]] || {{bag|Hondew Berry}} || [[Hondew Berry]] || {{bag|Iapapa Berry}} || [[Iapapa Berry]] | |||
|- style="background: #FFF;" | |||
| {{bag|Grepa Berry}} || [[Grepa Berry]] || {{bag|Tamato Berry}} || [[Tamato Berry]] | |||
|- style="background: #FFF;" | |||
| {{bag|Cornn Berry}} || [[Cornn Berry]] || {{bag|Magost Berry}} || [[Magost Berry]] | |||
|- style="background: #FFF;" | |||
| {{bag|Rabuta Berry}} || [[Rabuta Berry]] || {{bag|Nomel Berry}} || [[Nomel Berry]] | |||
|} | |} | ||
{{-}} | {{-}} | ||
{{ | {{WalkthroughPrevNext | ||
|game=Emerald | |game=Emerald | ||
| | |gamename=Emerald | ||
| | |prevsection=16 | ||
| | |prevname=Route 126, Sootopolis City, Cave of Origin, Route 129, Route 130, Route 131, Pacifidlog Town | ||
|nextsection=18 | |||
|nextname=Sky Pillar, Ever Grande City, Victory Road | |||
}} | }} | ||
<br> | |||
{{Project Walkthroughs notice}} | {{Project Walkthroughs notice}} | ||
[[Category:Emerald walkthrough]] | [[Category:Emerald walkthrough]] | ||
Latest revision as of 09:55, 16 September 2023
Routes 132, 133, and 134 (optional)
The waters of Routes 132, 133, and 134 hold strong ocean currents that make travel difficult. While moving primarily westbound, these currents can send you sailing in almost any direction. This makes it necessary to revisit the area in order to explore every island.
| Trainers | ||||||||||||||||||||||||||||||||||||||||||||||||||||||||||||||||||||||||||||||||||||||||||||||||||||||||||||||||||||||||||||||||||||||||||||||||||||||||||||||||||||||||||||||||||||||||||||||||||||||||||||||||||||||||||||||||||||||||||||||||||||||||||||||||||||||||||||||||||||||||||||||||||||||||||||||||||||||||||||||||||||||||||||||||||||||||||||||||||||||||||||||||||||||||||||||||||||||||||||||||||||||||||||||||||||||||||||||||||||||||||||||||||||||||||||||||||||||||||||||||
|---|---|---|---|---|---|---|---|---|---|---|---|---|---|---|---|---|---|---|---|---|---|---|---|---|---|---|---|---|---|---|---|---|---|---|---|---|---|---|---|---|---|---|---|---|---|---|---|---|---|---|---|---|---|---|---|---|---|---|---|---|---|---|---|---|---|---|---|---|---|---|---|---|---|---|---|---|---|---|---|---|---|---|---|---|---|---|---|---|---|---|---|---|---|---|---|---|---|---|---|---|---|---|---|---|---|---|---|---|---|---|---|---|---|---|---|---|---|---|---|---|---|---|---|---|---|---|---|---|---|---|---|---|---|---|---|---|---|---|---|---|---|---|---|---|---|---|---|---|---|---|---|---|---|---|---|---|---|---|---|---|---|---|---|---|---|---|---|---|---|---|---|---|---|---|---|---|---|---|---|---|---|---|---|---|---|---|---|---|---|---|---|---|---|---|---|---|---|---|---|---|---|---|---|---|---|---|---|---|---|---|---|---|---|---|---|---|---|---|---|---|---|---|---|---|---|---|---|---|---|---|---|---|---|---|---|---|---|---|---|---|---|---|---|---|---|---|---|---|---|---|---|---|---|---|---|---|---|---|---|---|---|---|---|---|---|---|---|---|---|---|---|---|---|---|---|---|---|---|---|---|---|---|---|---|---|---|---|---|---|---|---|---|---|---|---|---|---|---|---|---|---|---|---|---|---|---|---|---|---|---|---|---|---|---|---|---|---|---|---|---|---|---|---|---|---|---|---|---|---|---|---|---|---|---|---|---|---|---|---|---|---|---|---|---|---|---|---|---|---|---|---|---|---|---|---|---|---|---|---|---|---|---|---|---|---|---|---|---|---|---|---|---|---|---|---|---|---|---|---|---|---|---|---|---|---|---|---|---|---|---|---|---|---|---|---|---|---|---|---|---|---|---|---|---|---|---|---|---|---|---|---|---|---|---|---|---|---|---|---|---|---|---|---|---|---|---|---|---|---|---|---|---|---|---|---|---|---|---|---|---|---|---|---|---|---|---|---|---|---|---|---|---|---|---|---|---|---|---|---|---|---|---|---|---|---|---|---|---|---|---|---|---|---|---|---|---|---|---|---|---|
| ||||||||||||||||||||||||||||||||||||||||||||||||||||||||||||||||||||||||||||||||||||||||||||||||||||||||||||||||||||||||||||||||||||||||||||||||||||||||||||||||||||||||||||||||||||||||||||||||||||||||||||||||||||||||||||||||||||||||||||||||||||||||||||||||||||||||||||||||||||||||||||||||||||||||||||||||||||||||||||||||||||||||||||||||||||||||||||||||||||||||||||||||||||||||||||||||||||||||||||||||||||||||||||||||||||||||||||||||||||||||||||||||||||||||||||||||||||||||||||||||
| Available Pokémon | ||||||||||||||||||||||||||||||||||||||||||||||||||||||||||||||||||||||||||||||||||||||||||||||||||||||||||||||||||||||||||||||||||||||||||||||||||||||||||||||||||||||||||||||||||||||||||||||||||||||||||||||||||||||||||||||||||||||||
|---|---|---|---|---|---|---|---|---|---|---|---|---|---|---|---|---|---|---|---|---|---|---|---|---|---|---|---|---|---|---|---|---|---|---|---|---|---|---|---|---|---|---|---|---|---|---|---|---|---|---|---|---|---|---|---|---|---|---|---|---|---|---|---|---|---|---|---|---|---|---|---|---|---|---|---|---|---|---|---|---|---|---|---|---|---|---|---|---|---|---|---|---|---|---|---|---|---|---|---|---|---|---|---|---|---|---|---|---|---|---|---|---|---|---|---|---|---|---|---|---|---|---|---|---|---|---|---|---|---|---|---|---|---|---|---|---|---|---|---|---|---|---|---|---|---|---|---|---|---|---|---|---|---|---|---|---|---|---|---|---|---|---|---|---|---|---|---|---|---|---|---|---|---|---|---|---|---|---|---|---|---|---|---|---|---|---|---|---|---|---|---|---|---|---|---|---|---|---|---|---|---|---|---|---|---|---|---|---|---|---|---|---|---|---|---|---|---|---|---|---|---|---|---|---|---|---|---|---|---|---|---|---|
| ||||||||||||||||||||||||||||||||||||||||||||||||||||||||||||||||||||||||||||||||||||||||||||||||||||||||||||||||||||||||||||||||||||||||||||||||||||||||||||||||||||||||||||||||||||||||||||||||||||||||||||||||||||||||||||||||||||||||
| Items | |||||||||||||||||||||||||||||||||||||||||||||||||||||||||||||||||||||||||||||||||
|---|---|---|---|---|---|---|---|---|---|---|---|---|---|---|---|---|---|---|---|---|---|---|---|---|---|---|---|---|---|---|---|---|---|---|---|---|---|---|---|---|---|---|---|---|---|---|---|---|---|---|---|---|---|---|---|---|---|---|---|---|---|---|---|---|---|---|---|---|---|---|---|---|---|---|---|---|---|---|---|---|---|
| |||||||||||||||||||||||||||||||||||||||||||||||||||||||||||||||||||||||||||||||||
Northern path
Ride the central currents to Swimmer Gilbert, then sail westward to reach a Rare Candy opposite Black Belt Kiyo on the northwest island. From here, Surf westward through the northern shallows of Route 133 to reach the north side of the route's northwest island. Collect the Star Piece here, then sail west to the calm waters on Route 134's north side. Take the current south of here to reach the large, thin island. Fight Black Belt Hitoshi and Battle Girl Reyna, collect the nearby Carbos, then Surf west to reach the shallows outside Slateport City.
Central path
Ride the southern currents to the southeast island to fight Fisherman Ronald. Wade into the waters off the north end of the shallows to follow the current to Black Belt Kiyo on the northwest island. Sail westward to ride the current to the southern of two shallows on Route 133, where you'll need to fight Experts Conor and Mollie before collecting the Big Pearl there. Continue westward to reach the south side of Route 133's northwest island, and battle Bird Keeper Beck. Sail west again to battle Sailor Hudson in the shallows of the large island. Head back into the water to follow the current to Slateport City.
To the Depths
Ride the southern currents to fight Fisherman Ronald on the crescent-shaped island, then sail westward to a calm patch of water surrounded by shallows. Grab the Protein, then follow the currents westward to be funneled through a bottleneck; this leads to calm waters with two Swimmers, Debra and Franklin. Pass through the rocky southern islet, collecting the Max Revive along the way, to reach a rectangular patch of shallow water situated between Routes 133 and 134. Step into the water from the west-central side to reach a deep, dark pit of water surrounded by a ring of rocks. Dive beneath the waves and follow the underwater path southward. The markings on the nearby wall are an ancient form of writing, and translate to Go up here. Surface from this point to emerge in an ancient ruin known as the Sealed Chamber. Once you're done exploring the Sealed Chamber, surface on Route 134 where you left off and continue west and then south to a small maze of rocks. Leave the maze through its westernmost exit to Sailor Hudson's island, then Surf further west to reach the shallows outside Slateport City.
Sealed Chamber
The Sealed Chamber is a mysterious ruin located in the depths of Route 134. The many stone tablets positioned around the chamber feature the same mysterious writing that was found near the underwater entrance. Solving some of Hoenn's oldest mysteries hinges on deciphering this age-old system.
Entrance
The first chamber holds ten stone tablets that act as a key to decoding this ancient writing system, known as Braille. These 28 characters correspond to the 26 letters of the alphabet, as well as the comma and period. Inspect the markings on the cavern's north wall to reveal a phrase, which translates to Dig here. Using the field move causes the wall to fall away, granting you access to a second cavern.
Back Room
The central ruins are encircled by six more stone tablets which tell of a powerful Pokémon that was sealed away. The message on the north wall reads, First comes Wailord. Last comes Relicanth. Relicanth can be found only in a few underwater areas, while Wailord's pre-evolved form, Wailmer, can be found in many areas with the Good Rod or Super Rod. Position these Pokémon in their respective places in your party and examine the wall again. This causes a mighty earthquake to rock the Sealed Chamber, while the sound of doors opening echoes from somewhere far away. Three separate ruins have now been opened, and each one holds a legendary Pokémon!
Desert Ruins (optional)
The Desert Ruins lie among the dunes of Route 111. Another coded message can be found on the north wall.
Entrance
Examine the north wall to view the message, which reads, Left, left, down, down. Then, use Rock Smash. Close the message box and move exactly as instructed, two steps west and two steps south. Have a Pokémon use Rock Smash from this location, and a secret passage opens in the north wall!
Back Room
Follow the passage to the back cavern, where the legendary Pokémon Regirock awaits.
| ||||||||||||||||||||||||
Island Cave (optional)
The Island Cave sits on a small isle in the northwest part of Route 105. Another coded message can be found on the north wall.
Entrance
Examine the north wall to view the message, which reads, Stay close to the wall. Run around one lap. Close the message box and make a lap of the chamber, staying near the walls. After doing so, a secret passage appears out of nowhere!
Back Room
Follow the passage to the back cavern, where the legendary Pokémon Regice awaits.
| ||||||||||||||||||||||||
Ancient Tomb (optional)
The Ancient Tomb stands on the southwest plateau of Route 120. Another coded message can be found on the north wall.
Entrance
Examine the north wall to view the message, which reads, Those who inherit our will, shine in the middle. Close the message box and move to the center of the cave. Have a Pokémon use Flash from this location, and a secret passage appears out of nowhere!
Back Room
Follow the passage to the back cavern, where the legendary Pokémon Registeel awaits.
| ||||||||||||||||||||||||
Sky Pillar
On the northern side of Route 131, Sky Pillar is an ancient, towering altar built for the ascension of Hoenn's ageless protector, the legendary dragon Rayquaza.
| Available Pokémon | |||||||||||||||||||||||||||||||||||||||||||||||||||||||||||||||||||||||||||||||||||||||||||||||||||||||||||||||||||||||||||||||||||||||||||||||||||||||||||||||||||||||||||||||||||||||||||||||||||||||||||||||||||||||||||||||||||||||||||||||||||||||||||||||||||||||||||||||||||||||
|---|---|---|---|---|---|---|---|---|---|---|---|---|---|---|---|---|---|---|---|---|---|---|---|---|---|---|---|---|---|---|---|---|---|---|---|---|---|---|---|---|---|---|---|---|---|---|---|---|---|---|---|---|---|---|---|---|---|---|---|---|---|---|---|---|---|---|---|---|---|---|---|---|---|---|---|---|---|---|---|---|---|---|---|---|---|---|---|---|---|---|---|---|---|---|---|---|---|---|---|---|---|---|---|---|---|---|---|---|---|---|---|---|---|---|---|---|---|---|---|---|---|---|---|---|---|---|---|---|---|---|---|---|---|---|---|---|---|---|---|---|---|---|---|---|---|---|---|---|---|---|---|---|---|---|---|---|---|---|---|---|---|---|---|---|---|---|---|---|---|---|---|---|---|---|---|---|---|---|---|---|---|---|---|---|---|---|---|---|---|---|---|---|---|---|---|---|---|---|---|---|---|---|---|---|---|---|---|---|---|---|---|---|---|---|---|---|---|---|---|---|---|---|---|---|---|---|---|---|---|---|---|---|---|---|---|---|---|---|---|---|---|---|---|---|---|---|---|---|---|---|---|---|---|---|---|---|---|---|---|---|---|---|---|---|---|---|---|---|---|---|---|---|---|---|---|---|---|---|---|
| |||||||||||||||||||||||||||||||||||||||||||||||||||||||||||||||||||||||||||||||||||||||||||||||||||||||||||||||||||||||||||||||||||||||||||||||||||||||||||||||||||||||||||||||||||||||||||||||||||||||||||||||||||||||||||||||||||||||||||||||||||||||||||||||||||||||||||||||||||||||
Exterior
After climbing through the tunnel from the sea, you emerge on the island's upper level. Wallace approaches you from the tower, having just unlocked the door. Sudden earthquakes rock the island as the weather distortions continue to spread from Sootopolis. He's worried about the city and heads back, leaving you to scale the tower on your own.
1F-5F
Enter the tower and climb the stairs to 4F. Step onto the cracked tiles on the north side of the floor; this causes you to fall back down to a previously-inaccessible part of 3F. Climb to 5F and take the stairs in the northeast to reach the apex.
Apex
Upon reaching the rooftop, you find the legendary creature beyond one final flight of stairs. Approach the dragon and it awakens, before flying off with a cry loud enough to shake the tower. Follow it back to Sootopolis!
Sootopolis City (second visit)
Rayquaza to the Rescue
When you return to Sootopolis, you find the two super-ancient Pokémon still locked in battle. Rayquaza suddenly appears in a beam of green light shining through the storm clouds, and quickly descends to the city. It hovers above the two combatants, and ends the fighting with a single, intimidating roar. Groudon and Kyogre flee, Rayquaza flies off back to Sky Pillar with another loud cry, and the weather returns to normal. With the super-ancient Pokémon gone, you can now find wild Pokémon while surfing in Sootopolis City.
| Available Pokémon | ||||||||||||||||||||||||||||||||||||||||||||||||||||||||||||||||||||||||||||||||||||||||||||||||||||||||||||||||||||||||||||||||||||||||||||||||||||||||
|---|---|---|---|---|---|---|---|---|---|---|---|---|---|---|---|---|---|---|---|---|---|---|---|---|---|---|---|---|---|---|---|---|---|---|---|---|---|---|---|---|---|---|---|---|---|---|---|---|---|---|---|---|---|---|---|---|---|---|---|---|---|---|---|---|---|---|---|---|---|---|---|---|---|---|---|---|---|---|---|---|---|---|---|---|---|---|---|---|---|---|---|---|---|---|---|---|---|---|---|---|---|---|---|---|---|---|---|---|---|---|---|---|---|---|---|---|---|---|---|---|---|---|---|---|---|---|---|---|---|---|---|---|---|---|---|---|---|---|---|---|---|---|---|---|---|---|---|---|---|---|---|---|
| ||||||||||||||||||||||||||||||||||||||||||||||||||||||||||||||||||||||||||||||||||||||||||||||||||||||||||||||||||||||||||||||||||||||||||||||||||||||||
| Items | ||||||||||||||||||||||||||||||||||||||||||||||||||||||||||
|---|---|---|---|---|---|---|---|---|---|---|---|---|---|---|---|---|---|---|---|---|---|---|---|---|---|---|---|---|---|---|---|---|---|---|---|---|---|---|---|---|---|---|---|---|---|---|---|---|---|---|---|---|---|---|---|---|---|---|
| ||||||||||||||||||||||||||||||||||||||||||||||||||||||||||
Note: If you were to return to the Sky Pillar, Rayquaza would be there, waiting to battle.
Kiri still will not give out Berries after Rayquaza appears here in the city, you should first defeat the Gym Leader of Sootopolis City.
Maxie, Archie, Steven, and Wallace all witness these events from the Gym island. Kiri still will not give out Berries after Rayquaza appears here in the city, you should first defeat the Gym Leader of Sootopolis City. The team leaders realize and accept their mistakes, then leave for Mt. Pyre to return the Red and Blue Orbs. Wallace thanks you on behalf of the people of Hoenn, and gives you HM07 (Waterfall) as a gift. With this, a Pokémon can force its way up a waterfall, but using it requires defeating the Sootopolis Gym first!
Move Tutor
Visit the Pokémon Center to prepare for the upcoming Gym. Inside, you find a girl near the bookcase on the left side of the counter. Speak to her, and she offers to teach the move Double-Edge to a Pokémon, one time only.
Sootopolis Gym
The Sootopolis Gym Specializes in Water-type Pokémon. Grass- and Electric-type moves are best here, while Fire, Ground, and Rock Pokémon may struggle. The Gym features three platforms where each icy tile must be traversed once in order to defrost the next stairway. Walking over an ice tile once cracks it; passing by a second time shatters it, leaving you to fall to the Gym's snowy underbelly where plenty of Trainers await.
The first puzzle is a 3×3 grid of ice, with two icy rocks as obstacles. Starting on the south-central tile, move ←1, ↑1, →2, ↑1 and ←1. This reveals the first stairway.
The second puzzle is a 7×3 grid, with two icy rocks as obstacles. From the south-central tile, move ←3, ↑2, →2, ↓1, →2, ↓1, →2, ↑2, and ←3. This reveals the second stairway.
The final puzzle is an 11×4 grid, with six icy rocks as obstacles. Starting on the south-central tile, move ←5, ↑3, →1, ↓1, →1, ↓1, →1, ↑2, →1, ↓1, →1, ↓1, →2, ↑1, →1, ↓1, →1, ↓1, →1, ↑3, and ←5. This reveals the stairway to the Gym Leader.
Juan leads with his Luvdisc; not much of a threat, but it may still confuse its target with Sweet Kiss, and further hinder male targets with Attract. As a Water/Ground Pokémon, his Whiscash is only vulnerable to Grass moves; its Rain Dance temporarily strengthens Water moves, while Earthquake can deter Electric-type opponents. Sealeo's Ice/Water typing gives it additional weaknesses to Fighting and Rock moves; Water Pulse and Body Slam deal damage while Encore forces the target to repeat its previous move. His Crawdaunt is not a major threat, as all Water moves are Special moves and its Special Attack is lower than its Attack, but it can still deal damage. Finally, his Kingdra can inflict serious damage with Water Pulse, and use Ice Beam to deal with Grass types; use powerful moves to defeat it quickly, before it can regain health with Rest.
| ||||||||||||||||||||||||||||||||||||||||||||||||||||||||||||||||||||||||||||||||||||||||||||||||||||||||||||||||||||||||||||||||||||||||||||||||||||||||||||||||||||||||||||||||||||||||||||||||||||||||||||||||||||||||||||||||||||||||||||||||||||||||||||||||||||||||||||||||||||||||||||||||||||||||||||||||||||||||||||||||||||||||||||||||||||||||||||||
Defeated, Juan awards you the Rain Badge, which ensures obedience from all Pokémon and enables the use of Waterfall in the field. He also gives you TM03 (Water Pulse) as a prize, and registers himself in your PokéNav. With all eight Badges, your next destination is the Pokémon League in Ever Grande City to the southeast. To get there, sail southward from Mossdeep City, then eastward through Route 128's narrow channel. However, you may want to pick up a few more items before leaving Sootopolis.
Competitive brothers
In the house northeast of the Pokémon Center, there are two brothers who are arguing over two different species of Pokémon. The younger brother is a Fisherman, while the older brother is a Hiker. The younger brother prefers Seedot and the older brother prefers Lotad.
The brothers are arguing over the sizes of their favorite Pokémon. If a brother is shown a Pokémon of the species he prefers, he will calculate its size and give the player an Elixir if it is larger than any he has seen before. The initial record size is the average height of the species being argued over, which is 0.5 meters.
A Berry A Day
Kiri will give you two Berries each day. She gives one Berry from among the Pomeg, Kelpsy, Qualot, Hondew, Grepa, Tamato, Cornn, Magost, Rabuta, or Nomel Berries; and the other from the Figy or Iapapa specimens.
| After defeating the Sootopolis Gym | |||||
|---|---|---|---|---|---|
| Berry 1 | Berry 2 | ||||
| Pomeg Berry | Kelpsy Berry | Figy Berry | |||
| Qualot Berry | Hondew Berry | Iapapa Berry | |||
| Grepa Berry | Tamato Berry | ||||
| Cornn Berry | Magost Berry | ||||
| Rabuta Berry | Nomel Berry | ||||
|
Emerald walkthrough |
|

|
This article is part of Project Walkthroughs, a Bulbapedia project that aims to write comprehensive step-by-step guides on each Pokémon game. |
