Pokémon Ga-Olé: Difference between revisions
mNo edit summary |
m (Text replacement - "{{-}}↵{{Spin-off series}}" to "{{Spin-off series}}") |
||
| (33 intermediate revisions by 13 users not shown) | |||
| Line 2: | Line 2: | ||
|colorscheme=red | |colorscheme=red | ||
|bordercolorscheme=white | |bordercolorscheme=white | ||
|name=Pokémon Ga-Olé | |name=<span style="color:#FFF">Pokémon Ga-Olé</span> | ||
|jname=ポケモンガオーレ | |jname=<span style="color:#FFF">ポケモンガオーレ</span> | ||
|boxart=Pokémon Ga-Olé | |boxart=Pokémon Ga-Olé logo English.png | ||
| | |caption=Logo of Pokémon Ga-Olé | ||
| | |jbox=Pokémon Ga-Olé logo.png | ||
|jcaption=Japanese logo of Pokémon Ga-Olé | |||
|platform=Arcade | |platform=Arcade | ||
|category=Battle simulation | |category=Battle simulation | ||
|players=1 | |players=1 | ||
|gen_series=[[Generation VI]] and {{gen| | |gen_series=[[Generation VI]], {{gen|VII}}, and {{gen|VIII}} miscellaneous | ||
|cero=A | |cero=A | ||
|release_date_ja=July 7, 2016 | |release_date_ja=July 7, 2016 | ||
|publisher=[ | |release_date_kr=August 2, 2021 | ||
|release_date_hk=October 13, 2021 | |||
|release_date_tw=December 5, 2020 | |||
|release_date_cn=December 12, 2020 | |||
|publisher=Takara Tomy A.R.T.S.<ref>[https://www.takaratomy-arts.co.jp/company/pdf/R_Pokemongaole.pdf Press release]</ref> | |||
|developer=[[Takara Tomy|Takara Tomy A.R.T.S.]]/<br>{{wp|Marvelous (company)|Marvelous}} | |developer=[[Takara Tomy|Takara Tomy A.R.T.S.]]/<br>{{wp|Marvelous (company)|Marvelous}} | ||
|website_ja=[http://www.pokemongaole.com | |website_ja=[http://www.pokemongaole.com Official website] | ||
|website_en=[https://world.pokemongaole.com/ Official website] | |||
}} | }} | ||
'''Pokémon Ga-Olé''' (Japanese: '''ポケモンガオーレ''') is an arcade game developed by [[Takara Tomy|Takara Tomy A.R.T.S.]] and {{wp|Marvelous (company)|Marvelous}}, which also developed the [[Pokémon Battrio]] and [[Pokémon Tretta]] arcade games. Pokémon Ga-Olé was officially announced on April 13, 2016 at the Takara Tomy A.R.T.S. 2016 Summer Business Meeting in Tokyo by Takara Tomy A.R.T.S. president & CEO Hiroyuki Usami and Marvelous vice chairman Shuichi Kyoda. It was launched nationwide in Japan on July 7, 2016. | '''Pokémon Ga-Olé''' (Japanese: '''ポケモンガオーレ''') is an arcade game developed by [[Takara Tomy|Takara Tomy A.R.T.S.]] and {{wp|Marvelous (company)|Marvelous}}, which also developed the [[Pokémon Battrio]] and [[Pokémon Tretta]] arcade games. Pokémon Ga-Olé was officially announced on April 13, 2016 at the Takara Tomy A.R.T.S. 2016 Summer Business Meeting in Tokyo by Takara Tomy A.R.T.S. president & CEO Hiroyuki Usami and Marvelous vice chairman Shuichi Kyoda. It was launched nationwide in Japan on July 7, 2016. The machines were later launched in {{pmin|Greater China|Taiwan}} in Traditional Chinese beginning on December 5, 2020, {{pmin|Greater China|Mainland China}} in Simplified Chinese beginning on December 12, 2020, {{pmin|South Korea}} in Korean beginning on August 2, 2021, {{pmin|Greater China|Hong Kong}} in English beginning on October 13, 2021, {{pmin|Singapore}} in English beginning on November 17, 2021, and {{pmin|Malaysia}} in English beginning on January 27, 2022. | ||
Like its predecessors, Pokémon Ga-Olé focuses on Pokémon battles that require the input of physical peripherals, in this case disks, which depict one of the various Pokémon species in order to play. Players can engage in 2-on-2 battles in a variety of environments, and have the ability to purchase disks by either capturing Pokémon in-game or "[[Evolution|evolving]]" Pokémon they use in battle. | Like its predecessors, Pokémon Ga-Olé focuses on Pokémon battles that require the input of physical peripherals, in this case disks, which depict one of the various Pokémon species in order to play. Players can engage in 2-on-2 battles in a variety of environments, and have the ability to purchase disks by either capturing Pokémon in-game or "[[Evolution|evolving]]" Pokémon they use in battle. | ||
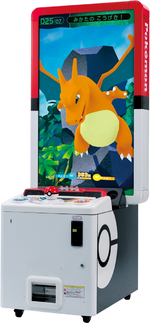
Each Pokémon Ga-Olé machine costs ¥100 to operate. The main feature of the console is the large 50-inch vertical monitor, which displays the user interface and all in-game graphics. The control panel is situated below the monitor, the primary focus of which are a pair of main input buttons on the left and right, respectively colored blue and orange, and a pair of like-colored slots in the center used to insert Pokémon disks during gameplay. A [[Poké Ball]] lever, principally used to capture Pokémon, is located at the front. The control panel also contains an IC card scanner to the right, used to scan Ga-Olé Passes, and a Multi-Scanner to the left, used to read QR Codes and interact with other peripherals. | Each Pokémon Ga-Olé machine costs ¥100 to operate. The main feature of the console is the large 50-inch vertical monitor, which displays the user interface and all in-game graphics. The control panel is situated below the monitor, the primary focus of which are a pair of main input buttons on the left and right, respectively colored blue and orange, and a pair of like-colored slots in the center used to insert Pokémon disks during gameplay. A [[Poké Ball]] lever, principally used to capture Pokémon, is located at the front. The control panel also contains an IC card scanner to the right, used to scan Ga-Olé Passes, and a Multi-Scanner to the left, used to read QR Codes and interact with other peripherals. | ||
== | ==Release history== | ||
*{{ga-ole|Set 1}} | Throughout its operational lifespan, Pokémon Ga-Olé went through four different series, each with five associated sets. Each new series incorporated new gameplay mechanics and cosmetic changes to the interface as well as the design used on disk images. Unlike previous titles, the sets in Pokémon Ga-Olé do not have individual names and are simply referred to by their number within each series. | ||
*{{ga-ole|Set 2}} | {| align="left" style="margin:auto; background:transparent" | ||
*{{ga-ole|Set 3}} | |- | ||
*{{ga-ole|Set 4}} | | style="vertical-align:top" | | ||
*{{ga-ole|Promotional disks}} | {| width="140px" style="margin:auto; background:#00ACEC; {{roundy|10px}}" | ||
|- | |||
! style="color: #fff" | Original series | |||
|- | |||
| | |||
{| width="100%" style="margin:auto; background:#FFF; {{roundybottom|7px}}; font-size:90%; height:112px" | |||
|- | |||
| style="vertical-align:top" | | |||
*'''{{ga-ole|Set 1}}''' | |||
*'''{{ga-ole|Set 2}}''' | |||
*'''{{ga-ole|Set 3}}''' | |||
*'''{{ga-ole|Set 4}}''' | |||
*'''{{ga-ole|Set 5}}''' | |||
|} | |||
|} | |||
| style="vertical-align:top" | | |||
{| width="140px" style="margin:auto; background:#F8B200; {{roundy|10px}}" | |||
|- | |||
! Dash series | |||
|- | |||
| | |||
{| width="100%" style="margin:auto; background:#FFF; {{roundybottom|7px}}; font-size:90%; height:112px" | |||
|- | |||
| style="vertical-align:top" | | |||
*'''{{ga-ole|Dash set 1}}''' | |||
*'''{{ga-ole|Dash set 2}}''' | |||
*'''{{ga-ole|Dash set 3}}''' | |||
*'''{{ga-ole|Dash set 4}}''' | |||
*'''{{ga-ole|Dash set 5}}''' | |||
|} | |||
|} | |||
| style="vertical-align:top" | | |||
{| width="150px" style="margin:auto; background:#851DDE; {{roundy|10px}}" | |||
|- | |||
! style="color: #fff" | Ultra Legend series | |||
|- | |||
| | |||
{| width="100%" style="margin:auto; background:#FFF; {{roundybottom|7px}}; font-size:90%; height:112px" | |||
|- | |||
| style="vertical-align:top" | | |||
*'''{{ga-ole|Ultra Legend set 1}}''' | |||
*'''{{ga-ole|Ultra Legend set 2}}''' | |||
*'''{{ga-ole|Ultra Legend set 3}}''' | |||
*'''{{ga-ole|Ultra Legend set 4}}''' | |||
*'''{{ga-ole|Ultra Legend set 5}}''' | |||
|} | |||
|} | |||
| style="vertical-align:top" | | |||
{| width="140px" style="margin:auto; background:#E14147; {{roundy|10px}}" | |||
|- | |||
! style="color: #fff" | Grand Rush series | |||
|- | |||
| | |||
{| width="100%" style="margin:auto; background:#FFF; {{roundybottom|7px}}; font-size:90%; height:112px" | |||
|- | |||
| style="vertical-align:top" | | |||
*'''{{ga-ole|Grand Rush set 1}}''' | |||
*'''{{ga-ole|Grand Rush set 2}}''' | |||
*'''{{ga-ole|Grand Rush set 3}}''' | |||
*'''{{ga-ole|Grand Rush set 4}}''' | |||
*'''{{ga-ole|Grand Rush set 5}}''' | |||
|} | |||
|} | |||
|- | |||
| colspan="4" | | |||
{| width="100%" style="margin:auto; background:#1CBBB6; {{roundy|10px}}" | |||
|- | |||
! style="text-align:center; color: #fff" | Promotional | |||
|- | |||
| | |||
{| width="100%" style="margin:auto; background:#FFF; {{roundybottom|7px}}; font-size:90%" | |||
|- | |||
! style="text-align:center" | {{ga-ole|Promotional disks}} | |||
|} | |||
|} | |||
|} | |||
[[File:Pokémon Ga-Olé machine.png|thumb|150px|Pokémon Ga-Olé arcade machine]] | |||
{{-}} | {{-}} | ||
==Disks== | ==Disks== | ||
[[File:Bulbasaur 01-001.png|thumb|200px|right|A typical disk in Pokémon Ga-Olé | [[File:Bulbasaur 01-001.png|thumb|200px|right|A typical disk in Pokémon Ga-Olé]] | ||
The disks used in Pokémon Ga-Olé are rounded plastic tiles measuring 45×73×3.6mm. | The disks used in Pokémon Ga-Olé are rounded plastic tiles measuring 45×73×3.6mm. The obverse of each disk has a sticker portraying one of the Pokémon species along with a set of individual [[statistic]]s such as Hit Points, Attack, Defense, and Speed, as well as [[type]]s and [[move]]s, just as they feature in the [[core series]] of Pokémon games. Each disk also features a Poké Ball symbol that denotes what type of Poké Ball was used to capture it in-game. There are several types of Poké Ball that can be used when playing the game: a standard {{i|Poké Ball}}, a [[Great Ball]], an [[Ultra Ball]], a [[Master Ball]], a [[Quick Ball]], and a [[Beast Ball]]. A player can therefore collect numerous disk variants for the majority of Pokémon in each set. All of this data is present on the QR Code on each disk, which is read into the game when it is placed in one of the console slots. The QR Codes can also be used in conjunction with [[Pokémon Sun and Moon|Pokémon Sun, Moon]], [[Pokémon Ultra Sun and Ultra Moon|Ultra Sun, and Ultra Moon]] with the [[QR Scanner]] function, allowing players to register Pokémon from Ga-Olé disks in their [[Pokédex]]. QR Codes from Pokémon from Ga-Olé disks also provide 20 points per scan as opposed to the normal 10. | ||
Unlike Battrio pucks and Tretta tiles, which have the data of a specific Pokémon stored in embedded microdots, Pokémon Ga-Olé disks are all generic. When a Pokémon is caught in-game, it is printed onto a blank sticker by an integrated laser printer and then dispensed, making the storage and production of peripherals more cost-effective compared to previous titles. This method of production occasionally results in unwanted errors, with some images not printing fully or with colors missing. Takara Tomy's customer service has the capacity to replace any disks produced in error via mail, though usable disks are often sought by collectors as misprints. | |||
===Statistics=== | ===Statistics=== | ||
Each Pokémon has five common statistics in Pokémon Ga-Olé: HP, Defense, Special Defense, Speed, and Energy. '''HP''', identified in solid yellow, determines how much damage a Pokémon can sustain before it can no longer partake in battle. '''Defense''' and '''Special Defense''' determine how susceptible Pokémon are to damage from physical and special moves, respectively. Defense is the solid blue stat, while Special Defense is transparent with a blue border. '''Speed''', identified in solid green, determines how quickly a Pokémon can prepare to attack and how easily they may dodge an incoming attack. '''Energy''' (Japanese: '''ポケエネ''' ''PokéEne'') gives a rough indication as to the overall strength of the Pokémon, much like [[level]]s in other Pokémon games. The only statistics not common to all Pokémon are '''Attack''' and '''Special Attack''', identified in solid red and transparent with a red border, respectively. The presence of Attack or Special Attack depends on the category of the Pokémon's move, which is derived from the core series. A Pokémon with {{m|Quick Attack}} for example, a physical move, will display an Attack stat, whereas a Pokémon with {{m|Thunderbolt}}, a special move, will display a Special Attack stat. | Each Pokémon has five common statistics in Pokémon Ga-Olé: HP, Defense, Special Defense, Speed, and Energy. '''HP''', identified in solid yellow, determines how much damage a Pokémon can sustain before it can no longer partake in battle. '''Defense''' and '''Special Defense''' determine how susceptible Pokémon are to damage from [[Physical move|physical]] and [[Special move|special]] moves, respectively. Defense is the solid blue stat, while Special Defense is transparent with a blue border. '''Speed''', identified in solid green, determines how quickly a Pokémon can prepare to attack and how easily they may dodge an incoming attack. '''Energy''' (Japanese: '''ポケエネ''' ''PokéEne'') gives a rough indication as to the overall strength of the Pokémon, much like [[level]]s in other Pokémon games. The only statistics not common to all Pokémon are '''Attack''' and '''Special Attack''', identified in solid red and transparent with a red border, respectively. The presence of Attack or Special Attack depends on the category of the Pokémon's move, which is derived from the core series. A Pokémon with {{m|Quick Attack}} for example, a physical move, will display an Attack stat, whereas a Pokémon with {{m|Thunderbolt}}, a special move, will display a Special Attack stat. | ||
===Types and moves=== | ===Types and moves=== | ||
The types attributed to Pokémon are indicated by symbols to the right of their name. A Pokémon may have either 1 or 2 types, and determine what types of move it will be weak against or resistant to in battle. The types featured in Pokémon Ga-Olé are the same as those found in the core series, sharing their individual strengths and weaknesses. | The types attributed to Pokémon are indicated by symbols to the right of their name. A Pokémon may have either 1 or 2 types, and determine what types of move it will be weak against or resistant to in battle. The types featured in Pokémon Ga-Olé are the same as those found in the core series, sharing their individual strengths and weaknesses. Most Pokémon can use only 1 move, as opposed to 4 in the core series. Some Pokémon introduced in the Grand Rush series have access to 2 moves. The move name and its type are present below the Pokémon's name. All type symbols used in Pokémon Ga-Olé are based on those featured in previous arcade titles [[Pokémon Battrio]] and [[Pokémon Tretta]]. | ||
{| class="roundy" style="text-align:center; margin:auto; background: #{{white color}}; border: 3px solid #{{white color dark}}" | {| class="roundy" style="text-align:center; margin:auto; background:#{{white color}}; border:3px solid #{{white color dark}}" | ||
|- | |- | ||
! colspan="9" | Pokémon Ga-Olé [[Type|{{color|000|types}}]] | ! colspan="9" | Pokémon Ga-Olé [[Type|{{color|000|types}}]] | ||
|- | |- | ||
| width="65px" style="font-size:90%; background: #{{normal color}}; {{roundytl|7px}}" | [[File:Tretta Normal type.png|29px]]<br>[[Normal (type)|{{color|000|Normal}}]] | | width="65px" style="font-size:90%; background:#{{normal color}}; {{roundytl|7px}}" | [[File:Tretta Normal type.png|29px]]<br>[[Normal (type)|{{color|000|Normal}}]] | ||
| width="65px" style="font-size:90%; background: #{{fire color}}" | [[File:Tretta Fire type.png|29px]]<br>[[Fire (type)|{{color| | | width="65px" style="font-size:90%; background:#{{fire color}}" | [[File:Tretta Fire type.png|29px]]<br>[[Fire (type)|{{color|fff|Fire}}]] | ||
| width="65px" style="font-size:90%; background: #{{water color}}" | [[File:Tretta Water type.png|29px]]<br>[[Water (type)|{{color|000|Water}}]] | | width="65px" style="font-size:90%; background:#{{water color}}" | [[File:Tretta Water type.png|29px]]<br>[[Water (type)|{{color|000|Water}}]] | ||
| width="65px" style="font-size:90%; background: #{{grass color}}" | [[File:Tretta Grass type.png|29px]]<br>[[Grass (type)|{{color|000|Grass}}]] | | width="65px" style="font-size:90%; background:#{{grass color}}" | [[File:Tretta Grass type.png|29px]]<br>[[Grass (type)|{{color|000|Grass}}]] | ||
| width="65px" style="font-size:90%; background: #{{electric color}}" | [[File:Tretta Electric type.png|29px]]<br>[[Electric (type)|{{color|000|Electric}}]] | | width="65px" style="font-size:90%; background:#{{electric color}}" | [[File:Tretta Electric type.png|29px]]<br>[[Electric (type)|{{color|000|Electric}}]] | ||
| width="65px" style="font-size:90%; background: #{{ice color}}" | [[File:Tretta Ice type.png|29px]]<br>[[Ice (type)|{{color|000|Ice}}]] | | width="65px" style="font-size:90%; background:#{{ice color}}" | [[File:Tretta Ice type.png|29px]]<br>[[Ice (type)|{{color|000|Ice}}]] | ||
| width="65px" style="font-size:90%; background: #{{fighting color}}" | [[File:Tretta Fighting type.png|29px]]<br>[[Fighting (type)|{{color|000|Fighting}}]] | | width="65px" style="font-size:90%; background:#{{fighting color}}" | [[File:Tretta Fighting type.png|29px]]<br>[[Fighting (type)|{{color|000|Fighting}}]] | ||
| width="65px" style="font-size:90%; background: #{{poison color}}" | [[File:Tretta Poison type.png|29px]]<br>[[Poison (type)|{{color| | | width="65px" style="font-size:90%; background:#{{poison color}}" | [[File:Tretta Poison type.png|29px]]<br>[[Poison (type)|{{color|fff|Poison}}]] | ||
| width="65px" style="font-size:90%; background: #{{ground color}}; {{roundytr|7px}}" | [[File:Tretta Ground type.png|29px]]<br>[[Ground (type)|{{color| | | width="65px" style="font-size:90%; background:#{{ground color}}; {{roundytr|7px}}" | [[File:Tretta Ground type.png|29px]]<br>[[Ground (type)|{{color|fff|Ground}}]] | ||
|- | |- | ||
| width="65px" style="font-size:90%; background: #{{flying color}}; {{roundybl|7px}}" | [[File:Tretta Flying type.png|29px]]<br>[[Flying (type)|{{color|000|Flying}}]] | | width="65px" style="font-size:90%; background:#{{flying color}}; {{roundybl|7px}}" | [[File:Tretta Flying type.png|29px]]<br>[[Flying (type)|{{color|000|Flying}}]] | ||
| width="65px" style="font-size:90%; background: #{{psychic color}}" | [[File:Tretta Psychic type.png|29px]]<br>[[Psychic (type)|{{color|000|Psychic}}]] | | width="65px" style="font-size:90%; background:#{{psychic color}}" | [[File:Tretta Psychic type.png|29px]]<br>[[Psychic (type)|{{color|000|Psychic}}]] | ||
| width="65px" style="font-size:90%; background: #{{bug color}}" | [[File:Tretta Bug type.png|29px]]<br>[[Bug (type)|{{color|000|Bug}}]] | | width="65px" style="font-size:90%; background:#{{bug color}}" | [[File:Tretta Bug type.png|29px]]<br>[[Bug (type)|{{color|000|Bug}}]] | ||
| width="65px" style="font-size:90%; background: #{{rock color}}" | [[File:Tretta Rock type.png|29px]]<br>[[Rock (type)|{{color|000|Rock}}]] | | width="65px" style="font-size:90%; background:#{{rock color}}" | [[File:Tretta Rock type.png|29px]]<br>[[Rock (type)|{{color|000|Rock}}]] | ||
| width="65px" style="font-size:90%; background: #{{ghost color}}" | [[File:Tretta Ghost type.png|29px]]<br>[[Ghost (type)|{{color| | | width="65px" style="font-size:90%; background:#{{ghost color}}" | [[File:Tretta Ghost type.png|29px]]<br>[[Ghost (type)|{{color|fff|Ghost}}]] | ||
| width="65px" style="font-size:90%; background: #{{dragon color}}" | [[File:Tretta Dragon type.png|29px]]<br>[[Dragon (type)|{{color| | | width="65px" style="font-size:90%; background:#{{dragon color}}" | [[File:Tretta Dragon type.png|29px]]<br>[[Dragon (type)|{{color|fff|Dragon}}]] | ||
| width="65px" style="font-size:90%; background: #{{dark color}}" | [[File:Tretta Dark type.png|29px]]<br>[[Dark (type)|{{color| | | width="65px" style="font-size:90%; background:#{{dark color}}" | [[File:Tretta Dark type.png|29px]]<br>[[Dark (type)|{{color|fff|Dark}}]] | ||
| width="65px" style="font-size:90%; background: #{{steel color}}" | [[File:Tretta Steel type.png|29px]]<br>[[Steel (type)|{{color|000|Steel}}]] | | width="65px" style="font-size:90%; background:#{{steel color}}" | [[File:Tretta Steel type.png|29px]]<br>[[Steel (type)|{{color|000|Steel}}]] | ||
| width="65px" style="font-size:90%; background: #{{fairy color}}; {{roundybr|7px}}" | [[File:Tretta Fairy type.png|29px]]<br>[[Fairy (type)|{{color|000|Fairy}}]] | | width="65px" style="font-size:90%; background:#{{fairy color}}; {{roundybr|7px}}" | [[File:Tretta Fairy type.png|29px]]<br>[[Fairy (type)|{{color|000|Fairy}}]] | ||
|} | |} | ||
| Line 70: | Line 154: | ||
Pokémon in Pokémon Ga-Olé are divided into Grades, as indicated by a star rating system on disks. Grade 1 Pokémon have 1 red-colored star, Grade 2 Pokémon have 2 blue-colored stars, Grade 3 Pokémon have 3 yellow-colored stars, Grade 4 Pokémon have 4 purple-colored stars, and Grade 5 Pokémon have 5 multi-colored stars. Some Pokémon may also have hollow stars as part of their Grade, indicating they have the potential to become stronger either by [[Evolution|evolving]] or by increasing their Grade. The {{p|Lucario}} line from the first set is a good example of this: {{p|Riolu}} is a Grade 1 Pokémon with a maximum potential Grade of 4, and can evolve into a Grade 2 Lucario. A player can then increase Lucario's Grade to 3, and again to 4 with the further ability to [[Mega Evolution|Mega Evolve]] into Mega Lucario. | Pokémon in Pokémon Ga-Olé are divided into Grades, as indicated by a star rating system on disks. Grade 1 Pokémon have 1 red-colored star, Grade 2 Pokémon have 2 blue-colored stars, Grade 3 Pokémon have 3 yellow-colored stars, Grade 4 Pokémon have 4 purple-colored stars, and Grade 5 Pokémon have 5 multi-colored stars. Some Pokémon may also have hollow stars as part of their Grade, indicating they have the potential to become stronger either by [[Evolution|evolving]] or by increasing their Grade. The {{p|Lucario}} line from the first set is a good example of this: {{p|Riolu}} is a Grade 1 Pokémon with a maximum potential Grade of 4, and can evolve into a Grade 2 Lucario. A player can then increase Lucario's Grade to 3, and again to 4 with the further ability to [[Mega Evolution|Mega Evolve]] into Mega Lucario. | ||
{| class="roundy" style="text-align:center; margin:auto; background: #{{white color}}; border: 3px solid #{{white color dark}}" | {| class="roundy" style="text-align:center; margin:auto; background:#{{white color}}; border:3px solid #{{white color dark}}" | ||
|- align="center" | |- align="center" | ||
| width="124px" style="{{roundy|7px}}; border: 2px solid #{{fighting color dark}}; background: #{{fighting color light}}" | [[File:Riolu 01-045.png|120px]] | | width="124px" style="{{roundy|7px}}; border:2px solid #{{fighting color dark}}; background:#{{fighting color light}}" | [[File:Riolu 01-045.png|120px]] | ||
| width="20px" | ► | | width="20px" | ► | ||
| width="124px" style="{{roundy|7px}}; border: 2px solid #{{steel color dark}}; background: #{{fighting color light}}" | [[File:Lucario 01-046.png|120px]] | | width="124px" style="{{roundy|7px}}; border:2px solid #{{steel color dark}}; background:#{{fighting color light}}" | [[File:Lucario 01-046.png|120px]] | ||
| width="20px" | ► | | width="20px" | ► | ||
| width="124px" style="{{roundy|7px}}; border: 2px solid #{{steel color dark}}; background: #{{fighting color light}}" | [[File:Lucario 01-047.png|120px]] | | width="124px" style="{{roundy|7px}}; border:2px solid #{{steel color dark}}; background:#{{fighting color light}}" | [[File:Lucario 01-047.png|120px]] | ||
| width="20px" | ► | | width="20px" | ► | ||
| width="124px" style="{{roundy|7px}}; border: 2px solid #{{steel color dark}}; background: #{{fighting color light}}" | [[File:Lucario 01-048.png|120px]] | | width="124px" style="{{roundy|7px}}; border:2px solid #{{steel color dark}}; background:#{{fighting color light}}" | [[File:Lucario 01-048.png|120px]] | ||
|- | |- | ||
| style="text-align:center; {{roundy|6px}}; background: #{{fighting color light}}" | [[File:Ga-Olé Grade 1-4.png|60px]]<br>{{pcolor|Riolu|000}}<div style="float:right">[[File:Tretta Fighting type.png|20px]]</div> | | style="text-align:center; {{roundy|6px}}; background:#{{fighting color light}}" | [[File:Ga-Olé Grade 1-4.png|60px]]<br>{{pcolor|Riolu|000}}<div style="float:right">[[File:Tretta Fighting type.png|20px]]</div> | ||
| | | | ||
| style="text-align:center; {{roundy|6px}}; background: #{{fighting color light}}" | [[File:Ga-Olé Grade 2-4.png|60px]]<br>{{pcolor|Lucario|000}}<div style="float:right">[[File:Tretta Fighting type.png|20px]][[File:Tretta Steel type.png|20px]]</div> | | style="text-align:center; {{roundy|6px}}; background:#{{fighting color light}}" | [[File:Ga-Olé Grade 2-4.png|60px]]<br>{{pcolor|Lucario|000}}<div style="float:right">[[File:Tretta Fighting type.png|20px]][[File:Tretta Steel type.png|20px]]</div> | ||
| | | | ||
| style="text-align:center; {{roundy|6px}}; background: #{{fighting color light}}" | [[File:Ga-Olé Grade 3-4.png|60px]]<br>{{pcolor|Lucario|000}}<div style="float:right">[[File:Tretta Fighting type.png|20px]][[File:Tretta Steel type.png|20px]]</div> | | style="text-align:center; {{roundy|6px}}; background:#{{fighting color light}}" | [[File:Ga-Olé Grade 3-4.png|60px]]<br>{{pcolor|Lucario|000}}<div style="float:right">[[File:Tretta Fighting type.png|20px]][[File:Tretta Steel type.png|20px]]</div> | ||
| | | | ||
| style="text-align:center; {{roundy|6px}}; background: #{{fighting color light}}" | [[File:Ga-Olé Grade 4.png|60px]]<br>{{pcolor|Lucario|000}}<div style="float:right">[[File:Tretta Fighting type.png|20px]][[File:Tretta Steel type.png|20px]]</div> | | style="text-align:center; {{roundy|6px}}; background:#{{fighting color light}}" | [[File:Ga-Olé Grade 4.png|60px]]<br>{{pcolor|Lucario|000}}<div style="float:right">[[File:Tretta Fighting type.png|20px]][[File:Tretta Steel type.png|20px]]</div> | ||
|} | |} | ||
| Line 94: | Line 178: | ||
===Course selection=== | ===Course selection=== | ||
Upon selecting Get by Battle mode, the player will then be prompted to select a course they wish to challenge. Each course contains different Pokémon to encounter and battle, including powerful Legendary Pokémon that may appear should a player continue to battle beyond round 1. Each set typically has 2 or 3 initial courses, with more added following its release. | Upon selecting Get by Battle mode, the player will then be prompted to select a course they wish to challenge. Each course contains different Pokémon to encounter and battle, including powerful Legendary Pokémon that may appear should a player continue to battle beyond round 1. Each set typically has 2 or 3 initial courses, with more added following its release. Most courses are available to play for the duration of the current set. New courses replace the original selection upon the release of a new set. Sets may also feature special courses, playable only for a limited period. After the player has selected a course, the camera will pan over the battle area before initiating the first round. | ||
===Battle flow=== | ===Battle flow=== | ||
[[File:Ga-Olé battle.jpg|thumb|250px|right|Starting a battle | [[File:Ga-Olé battle.jpg|thumb|250px|right|Starting a battle]] | ||
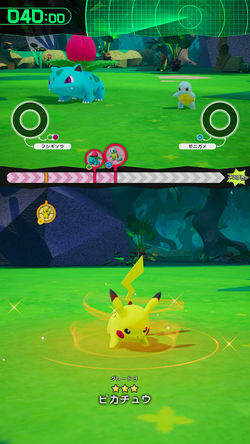
Each round consists of a 2-on-2 Pokémon battle with 20 seconds on the game timer. The opposing Pokémon are introduced first, displaying their individual Grades and Energy values, before the player is prompted to insert disks featuring their chosen Pokémon in each slot. If a player does not have enough disks, the game assigns rental Pokémon to make the deficit. | Each round consists of a 2-on-2 Pokémon battle with 20 seconds on the game timer. The opposing Pokémon are introduced first, displaying their individual Grades and Energy values, before the player is prompted to insert disks featuring their chosen Pokémon in each slot. If a player does not have enough disks, the game assigns rental Pokémon to make the deficit. | ||
The screen is divided into two during battles, separated by the '''Attack Gauge''' (Japanese: '''こうげきゲージ'''). The opposing Pokémon appear at the top and the player's Pokémon are present on the bottom. At the start of a battle, icons of the participating Pokémon are placed on the attack gauge at points based on their Grade. Pokémon with comparatively lower Grades are generally placed further along the gauge as to give them a head start. The opposing Pokémon are identified in red, while the player's Pokémon are identified in blue and orange, correlating with the slots and buttons on the console. | The screen is divided into two during battles, separated by the '''Attack Gauge''' (Japanese: '''こうげきゲージ'''). The opposing Pokémon appear at the top and the player's Pokémon are present on the bottom. At the start of a battle, icons of the participating Pokémon are placed on the attack gauge at points based on their Grade. Pokémon with comparatively lower Grades are generally placed further along the gauge as to give them a head start. The opposing Pokémon are identified in red, while the player's Pokémon are identified in blue and orange, correlating with the slots and buttons on the console. | ||
The objective at this stage of the round is to enable the player's Pokémon to attack, which can be done when a Pokémon icon reaches the extreme right of the Attack Gauge. | The objective at this stage of the round is to enable the player's Pokémon to attack, which can be done when a Pokémon icon reaches the extreme right of the Attack Gauge. Each icon on the gauge moves at a rate based on the respective Pokémon's speed stat, but players can boost their own using the game mechanic available to them. These have varied by series throughout Pokémon Ga-Olé's release history, and are detailed below. When a Pokémon icon reaches the end of the gauge, the game timer pauses and that Pokémon performs its move. | ||
{| width="60%" align="left" class="roundy" style="margin:auto; background:#00ACEC" | |||
|- | |||
| | |||
{| width="100%" style="margin:auto; background:transparent; border-collapse:collapse" | |||
| width="31px" | | |||
{| width="100%" class="roundy" style="background:transparent" | |||
! style="text-align:center; background:#9BD7EE; border:2px solid #01668C; {{roundy|30px}}" | <big><big>{{color|01668C|!}}</big></big> | |||
|} | |||
| | |||
! style="text-align:left; background:#9BD7EE; {{roundy|7px}}; padding-left:5px" | Preparing to attack (prior to Dash series) | |||
|} | |||
|- | |||
| | |||
{| width="100%" style="margin:auto; background:#FFF; {{roundy|7px}}" | |||
|- | |||
| Players can boost their Pokémon icons along the Attack Gauge by utilizing the '''Cheer Balloon''' (Japanese: '''おうえんのフキダシ'''). Pressing the corresponding buttons on the console when the balloon is at its largest will move an icon along the gauge a little. Conversely, continually pressing buttons before the balloon is large enough will momentarily stop an icon, hampering progress. Attaining a Perfect or a Miracle will boost the icon at a considerable pace. | |||
|} | |||
|} | |||
{{left clear}} | |||
{| width="60%" align="left" class="roundy" style="margin:auto; background:#F8B200" | |||
|- | |||
| | |||
{| width="100%" style="margin:auto; background:transparent; border-collapse:collapse" | |||
| width="31px" | | |||
{| width="100%" class="roundy" style="background:transparent" | |||
! style="text-align:center; background:#ECDAAC; border:2px solid #9B6F00; {{roundy|30px}}" | <big><big>{{color|9B6F00|!}}</big></big> | |||
|} | |||
| | |||
! style="text-align:left; background:#ECDAAC; {{roundy|7px}}; padding-left:5px" | Preparing to attack (from Dash series) | |||
|} | |||
|- | |||
| | |||
{| width="100%" style="margin:auto; background:#FFF; {{roundy|7px}}" | |||
|- | |||
| Players can boost their Pokémon icons along the Attack Gauge by utilizing the '''Dash System''' (Japanese: '''ダッシュシステム'''). After selecting one of their Pokémon to move using the Poké Ball lever, players can alternatively press the console buttons as fast as possible in effort to boost the icon along the gauge. Maintaining or increasing the rate at which the buttons are pressed will increase the movement rate of the icon. Failing to continue a rhythm will cause movement rate of the icon to slow. | |||
|} | |||
|} | |||
{{left clear}} | |||
{{left clear}} | |||
If an opposing Pokémon icon is near to or at the same position of an icon that has reached the end of the Attack Gauge, this triggers '''{{tt|Kaeri-Uchi|To turn the tables on someone}} Chance!''' (Japanese: '''かえりうちチャンス!'''). The player is required to use the Poké Ball lever in attempt to move the graphic that appears up towards the opponent's end, competing against the game AI, which will attempt to push the graphic down towards the player's end. The victor of this mini-game will then proceed to attack. | If an opposing Pokémon icon is near to or at the same position of an icon that has reached the end of the Attack Gauge, this triggers '''{{tt|Kaeri-Uchi|To turn the tables on someone}} Chance!''' (Japanese: '''かえりうちチャンス!'''). The player is required to use the Poké Ball lever in attempt to move the graphic that appears up towards the opponent's end, competing against the game AI, which will attempt to push the graphic down towards the player's end. The victor of this mini-game will then proceed to attack. | ||
| Line 116: | Line 239: | ||
A round concludes when one of the three conditions are met: the game timer reaches zero, the Get Gauge of both opposing Pokémon have been filled, or the player has no useable Pokémon remaining. A phase named '''Get Time!''' (Japanese: '''ゲットタイム!''') follows, in which the player is prompted to push the Poké Ball lever in order to throw Poké Balls at the opposing Pokémon. The game cycles between a standard Poké Ball, a Great Ball, an Ultra Ball, and a Master Ball until the lever is pushed. The chances of a successful capture depend on the Grade of each opposing Pokémon, how full their individual Get Gauges were, and the type of ball thrown in a similar manner to the [[core series]]. If a Pokémon is successfully captured, the player has the option to either insert ¥100 in order dispense the correlating Pokémon disk from the machine, or to end the round. If more than one Pokémon is captured, the player can only select 1 Pokémon to dispense. If a player does choose to dispense a disk, they will be rewarded with a '''Disk Get Bonus!''' (Japanese: '''ディスクゲットボーナス!'''), where the player will have a short time to repeatedly press the console buttons in effort to raise their Fighting Spirit again. | A round concludes when one of the three conditions are met: the game timer reaches zero, the Get Gauge of both opposing Pokémon have been filled, or the player has no useable Pokémon remaining. A phase named '''Get Time!''' (Japanese: '''ゲットタイム!''') follows, in which the player is prompted to push the Poké Ball lever in order to throw Poké Balls at the opposing Pokémon. The game cycles between a standard Poké Ball, a Great Ball, an Ultra Ball, and a Master Ball until the lever is pushed. The chances of a successful capture depend on the Grade of each opposing Pokémon, how full their individual Get Gauges were, and the type of ball thrown in a similar manner to the [[core series]]. If a Pokémon is successfully captured, the player has the option to either insert ¥100 in order dispense the correlating Pokémon disk from the machine, or to end the round. If more than one Pokémon is captured, the player can only select 1 Pokémon to dispense. If a player does choose to dispense a disk, they will be rewarded with a '''Disk Get Bonus!''' (Japanese: '''ディスクゲットボーナス!'''), where the player will have a short time to repeatedly press the console buttons in effort to raise their Fighting Spirit again. | ||
{{left clear}} | {{left clear}} | ||
{| class="roundy" align="left" style="text-align:center; margin:auto; background: #{{white color}}; border: 3px solid #{{white color dark}}" | {| class="roundy" align="left" style="text-align:center; margin:auto; background:#{{white color}}; border:3px solid #{{white color dark}}" | ||
|- | |- | ||
! colspan="9" | Fighting Spirit bands | ! colspan="9" | Fighting Spirit bands | ||
|- | |- | ||
| width="75px" style="font-size:90%; background: #FF8BA3; {{roundy|7px}}" | 50%-99% | | width="75px" style="font-size:90%; background:#FF8BA3; {{roundy|7px}}" | 50%-99% | ||
| ► | | ► | ||
| width="75px" style="font-size:90%; background: #40D0FF; {{roundy|7px}}" | 100%-199% | | width="75px" style="font-size:90%; background:#40D0FF; {{roundy|7px}}" | 100%-199% | ||
| ► | | ► | ||
| width="75px" style="font-size:90%; background: #FFC800; {{roundy|7px}}" | 200%-399% | | width="75px" style="font-size:90%; background:#FFC800; {{roundy|7px}}" | 200%-399% | ||
| ► | | ► | ||
| width="75px" style="font-size:90%; background: #C7A6E4; {{roundy|7px}}" | 400%-599% | | width="75px" style="font-size:90%; background:#C7A6E4; {{roundy|7px}}" | 400%-599% | ||
| ► | | ► | ||
| width="75px" style="font-size:90%; background: #FFF; {{roundy|7px}}" | 600%-999% | | width="75px" style="font-size:90%; background:#FFF; {{roundy|7px}}" | 600%-999% | ||
|} | |} | ||
{{left clear}} | {{left clear}} | ||
| Line 140: | Line 263: | ||
===Grade Up Chance!=== | ===Grade Up Chance!=== | ||
In a similar way to Evolution Chance!, if a player uses a Pokémon that cannot evolve any further, but has the potential to be stronger, '''Grade Up Chance!''' (Japanese: '''グレードアップチャンス!''') will begin following the conclusion of Get by Battle mode. The player will have the opportunity to upgrade and dispense a more powerful version of the Pokémon used by inserting ¥100 when prompted. Fully upgraded Pokémon, in addition to having comparatively superior stats, sometimes have the ability to [[Mega Evolve]]. As with Evolution Chance! from the third set | In a similar way to Evolution Chance!, if a player uses a Pokémon that cannot evolve any further, but has the potential to be stronger, '''Grade Up Chance!''' (Japanese: '''グレードアップチャンス!''') will begin following the conclusion of Get by Battle mode. The player will have the opportunity to upgrade and dispense a more powerful version of the Pokémon used by inserting ¥100 when prompted. Fully upgraded Pokémon, in addition to having comparatively superior stats, sometimes have the ability to [[Mega Evolution|Mega Evolve]] or have access to a [[Z-Move]]. As with Evolution Chance! from the third set onward, Grade Up Chance! may also occur after a successful capture, indicated by a red star icon on the "do not dispense" option. The player will then have the choice to dispense or not dispense the upgraded Pokémon. | ||
===Mega Evolution Chance!=== | ===Mega Evolution Chance!=== | ||
If a player uses a Pokémon that is able to Mega Evolve, '''Mega Evolution Chance!''' (Japanese: '''メガシンカチャンス!''') will activate before it attacks for the first time. Two Mega Evolution symbols will approach the center of the screen from opposing ends, and player is required to press both console buttons simultaneously when the symbols merge. If successful, the Pokémon will Mega Evolve. A Pokémon will remain in its Mega Evolved state for the remainder of Get by Battle mode. | If a player uses a Pokémon that is able to [[Mega Evolution|Mega Evolve]], '''Mega Evolution Chance!''' (Japanese: '''メガシンカチャンス!''') will activate before it attacks for the first time. Two Mega Evolution symbols will approach the center of the screen from opposing ends, and player is required to press both console buttons simultaneously when the symbols merge. If successful, the Pokémon will Mega Evolve. A Pokémon will remain in its Mega Evolved state for the remainder of Get by Battle mode. | ||
===Z-Moves=== | ===Z-Moves=== | ||
| Line 149: | Line 272: | ||
[[Z-Move]]s were introduced in the {{ga-ole|Set 3|third set}} and, like their core series counterparts, are powerful moves Pokémon can perform in addition to their standard move. They can only be used once per session, however. Pokémon able to use Z-Moves have a [[Z-Crystal]] icon above their energy value and the name of it above their regular move. | [[Z-Move]]s were introduced in the {{ga-ole|Set 3|third set}} and, like their core series counterparts, are powerful moves Pokémon can perform in addition to their standard move. They can only be used once per session, however. Pokémon able to use Z-Moves have a [[Z-Crystal]] icon above their energy value and the name of it above their regular move. | ||
Players with eligible Pokémon build up charges in stages as a battle progresses. Once this charge reaches the third stage (MAX), '''Z-Move Chance''' (Japanese: ''' Zワザチャンス''') will activate. If a player owns a [[Pokémon Z-Ring]], sold separately, they can insert and scan | Players with eligible Pokémon build up charges in stages as a battle progresses. Once this charge reaches the third stage (MAX), '''Z-Move Chance''' (Japanese: ''' Zワザチャンス''') will activate. If a player owns a [[Pokémon Z-Ring]] or Pokémon Z-Power Ring, each sold separately, they can insert and scan a Z-Crystal using the console Multi-Scanner to proceed. If a player does not own a Pokémon Z-Ring, a roulette will spin for a chance to use a Z-Move. | ||
Before a Z-Move is executed, players can increase its power by mimicking the poses displayed by Trainers using them. This can be done by moving the Poké Ball lever on the console in the appropriate direction while following the on-screen prompts. The Pokémon will then attack with its Z-Move. Players can also increase their Fighting Spirit during the animation that plays in the same manner as a regular move. | Before a Z-Move is executed, players can increase its power by mimicking the poses displayed by Trainers using them. This can be done by moving the Poké Ball lever on the console in the appropriate direction while following the on-screen prompts. The Pokémon will then attack with its Z-Move. Players can also increase their Fighting Spirit during the animation that plays in the same manner as a regular move. | ||
{{-}} | {{-}} | ||
===Ga-Olé Passes=== | ===Ga-Olé Passes=== | ||
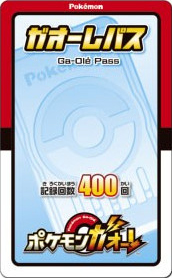
[[File:Ga-Olé Pass.jpg|thumb|250px|right|A Ga-Olé Pass that allows data to be recorded up to 400 times]] | [[File:Ga-Olé Pass.jpg|thumb|250px|right|A Ga-Olé Pass that allows data to be recorded up to 400 times]] | ||
| Line 169: | Line 291: | ||
===Item Chance!=== | ===Item Chance!=== | ||
For players with Ga-Olé Passes, '''Item Chance!''' (Japanese: '''どうぐチャンス!''') will activate at the start of Get by Battle, which allows them to exchange any accrued Ga-Olé Medals for items that can help them during battles. Item Chance! may also provide additional Support Pokémon for players to add to their roster instead of items. The table below displays the current items available to purchase. | For players with Ga-Olé Passes, '''Item Chance!''' (Japanese: '''どうぐチャンス!''') will activate at the start of Get by Battle, which allows them to exchange any accrued Ga-Olé Medals for items that can help them during battles. Item Chance! may also provide additional Support Pokémon for players to add to their roster instead of items. The table below displays the current items available to purchase. | ||
{| class="roundy" style="margin:auto; background: #{{white color}}; border: 3px solid #{{white color dark}}" | {| class="roundy" style="margin:auto; background:#{{white color}}; border:3px solid #{{white color dark}}" | ||
|- | |- | ||
| | | | ||
{| width="460px" class="roundy" style="background: transparent; border-collapse:collapse" | {| width="100%" style="background:transparent; border-collapse:collapse" | ||
| width=" | | width="60px" | | ||
| width="110px" style="text-align:center; float:right; {{roundy|7px}}; background: #{{white color light}}" | '''Cost:''' 30 Medals | {| width="100%" class="roundy" style="background:transparent" | ||
| style="{{roundy|60px}}; border:2px solid #{{white color dark}}; background:#{{white color light}}" | [[File:Ga-Olé Item Attack Capsule.png|60px]] | |||
|} | |||
| | |||
{| width="460px" class="roundy" style="background:transparent; border-collapse:collapse" | |||
| width="140px" style="padding-left: 5px; {{roundytop|7px}} background:#FFF" | '''Attack Capsule<br><small>こうげきカプセル</small>''' | |||
| width="110px" style="text-align:center; float:right; {{roundy|7px}}; background:#{{white color light}}" | '''Cost:''' 30 Medals | |||
| | | | ||
|- | |- | ||
| colspan="2" style="background:#FFF; {{roundytr|7px}}; {{roundybottom|7px}}; padding-left:5px" | Provides the player's Pokémon with an attack and special attack boost. | | colspan="2" style="background:#FFF; {{roundytr|7px}}; {{roundybottom|7px}}; padding-left:5px" | Provides the player's Pokémon with an attack and special attack boost. | ||
|} | |||
|} | |} | ||
|- | |- | ||
| | | | ||
{| width="460px" class="roundy" style="background: transparent; border-collapse:collapse" | {| width="100%" style="background:transparent; border-collapse:collapse" | ||
| width=" | | width="60px" | | ||
| width="110px" style="text-align:center; float:right; {{roundy|7px}}; background: #{{white color light}}" | '''Cost:''' 30 Medals | {| width="100%" class="roundy" style="background:transparent" | ||
| style="{{roundy|60px}}; border:2px solid #{{white color dark}}; background:#{{white color light}}" | [[File:Ga-Olé Item Defense Capsule.png|60px]] | |||
|} | |||
| | |||
{| width="460px" class="roundy" style="background:transparent; border-collapse:collapse" | |||
| width="140px" style="padding-left: 5px; {{roundytop|7px}} background:#FFF" | '''Defense Capsule<br><small>ぼうぎょカプセル</small>''' | |||
| width="110px" style="text-align:center; float:right; {{roundy|7px}}; background:#{{white color light}}" | '''Cost:''' 30 Medals | |||
| | | | ||
|- | |- | ||
| colspan="2" style="background:#FFF; {{roundytr|7px}}; {{roundybottom|7px}}; padding-left:5px" | Provides the player's Pokémon with a defense and special defense boost. | | colspan="2" style="background:#FFF; {{roundytr|7px}}; {{roundybottom|7px}}; padding-left:5px" | Provides the player's Pokémon with a defense and special defense boost. | ||
|} | |||
|} | |} | ||
|- | |- | ||
| | | | ||
{| width="460px" class="roundy" style="background: transparent; border-collapse:collapse" | {| width="100%" style="background:transparent; border-collapse:collapse" | ||
| width=" | | width="60px" | | ||
| width="110px" style="text-align:center; float:right; {{roundy|7px}}; background: #{{white color light}}" | '''Cost:''' 30 Medals | {| width="100%" class="roundy" style="background:transparent" | ||
| style="{{roundy|60px}}; border:2px solid #{{white color dark}}; background:#{{white color light}}" | [[File:Ga-Olé Item Quick Move Drink.png|60px]] | |||
|} | |||
| | |||
{| width="460px" class="roundy" style="background:transparent; border-collapse:collapse" | |||
| width="140px" style="padding-left: 5px; {{roundytop|7px}} background:#FFF" | '''Quick Move Drink<br><small>はやわざドリンク</small>''' | |||
| width="110px" style="text-align:center; float:right; {{roundy|7px}}; background:#{{white color light}}" | '''Cost:''' 30 Medals | |||
| | | | ||
|- | |- | ||
| colspan="2" style="background:#FFF; {{roundytr|7px}}; {{roundybottom|7px}}; padding-left:5px" | Allows the player's Pokémon to move more quickly along the Attack Gauge. | | colspan="2" style="background:#FFF; {{roundytr|7px}}; {{roundybottom|7px}}; padding-left:5px" | Allows the player's Pokémon to move more quickly along the Attack Gauge. | ||
|} | |||
|} | |} | ||
|- | |- | ||
| | | | ||
{| width="460px" class="roundy" style="background: transparent; border-collapse:collapse" | {| width="100%" style="background:transparent; border-collapse:collapse" | ||
| width=" | | width="60px" | | ||
| width="110px" style="text-align:center; float:right; {{roundy|7px}}; background: #{{white color light}}" | '''Cost:''' 30 Medals | {| width="100%" class="roundy" style="background:transparent" | ||
| style="{{roundy|60px}}; border:2px solid #{{white color dark}}; background:#{{white color light}}" | [[File:Ga-Olé Item Aim Scope.png|60px]] | |||
|} | |||
| | |||
{| width="460px" class="roundy" style="background:transparent; border-collapse:collapse" | |||
| width="140px" style="padding-left: 5px; {{roundytop|7px}} background:#FFF" | '''Aim Scope<br><small>ねらいスコープ</small>''' | |||
| width="110px" style="text-align:center; float:right; {{roundy|7px}}; background:#{{white color light}}" | '''Cost:''' 30 Medals | |||
| | | | ||
|- | |- | ||
| colspan="2" style="background:#FFF; {{roundytr|7px}}; {{roundybottom|7px}}; padding-left:5px" | Increases the chance of the player's Pokémon landing a critical hit. | | colspan="2" style="background:#FFF; {{roundytr|7px}}; {{roundybottom|7px}}; padding-left:5px" | Increases the chance of the player's Pokémon landing a critical hit. | ||
|} | |||
|} | |} | ||
|- | |- | ||
| | | | ||
{| width="460px" class="roundy" style="background: transparent; border-collapse:collapse" | {| width="100%" style="background:transparent; border-collapse:collapse" | ||
| width=" | | width="60px" | | ||
| width="110px" style="text-align:center; float:right; {{roundy|7px}}; background: #{{white color light}}" | '''Cost:''' 30 Medals | {| width="100%" class="roundy" style="background:transparent" | ||
| style="{{roundy|60px}}; border:2px solid #{{white color dark}}; background:#{{white color light}}" | [[File:Ga-Olé Item Support Pokémon.png|60px]] | |||
|} | |||
| | |||
{| width="460px" class="roundy" style="background:transparent; border-collapse:collapse" | |||
| width="140px" style="padding-left: 5px; {{roundytop|7px}} background:#FFF" | '''Support Pokémon<br><small>サポートポケモン</small>''' | |||
| width="110px" style="text-align:center; float:right; {{roundy|7px}}; background:#{{white color light}}" | '''Cost:''' 30 Medals | |||
| | | | ||
|- | |- | ||
| colspan="2" style="background:#FFF; {{roundytr|7px}}; {{roundybottom|7px}}; padding-left:5px" | Unlocks a new Support Pokémon for the player to use in battle. | | colspan="2" style="background:#FFF; {{roundytr|7px}}; {{roundybottom|7px}}; padding-left:5px" | Unlocks a new Support Pokémon for the player to use in battle. | ||
|} | |||
|} | |||
|- | |||
| | |||
{| width="100%" style="background:transparent; border-collapse:collapse" | |||
| width="60px" | | |||
{| width="100%" class="roundy" style="background:transparent" | |||
| style="{{roundy|60px}}; border:2px solid #{{white color dark}}; background:#{{white color light}}" | [[File:Ga-Olé Item Fighting Spirit Drink.png|60px]] | |||
|} | |||
| | |||
{| width="460px" class="roundy" style="background:transparent; border-collapse:collapse" | |||
| width="140px" style="padding-left: 5px; {{roundytop|7px}} background:#FFF" | '''Fighting Spirit Drink{{tt|*|Introduced in Dash set 1}}<br><small>きあいドリンク</small>''' | |||
| width="110px" style="text-align:center; float:right; {{roundy|7px}}; background:#{{white color light}}" | '''Cost:''' 30 Medals | |||
| | |||
|- | |||
| colspan="2" style="background:#FFF; {{roundytr|7px}}; {{roundybottom|7px}}; padding-left:5px" | Increases the player's starting Fighting Spirit by 100%. | |||
|} | |||
|} | |||
|- | |||
| | |||
{| width="100%" style="background:transparent; border-collapse:collapse" | |||
| width="60px" | | |||
{| width="100%" class="roundy" style="background:transparent" | |||
| style="{{roundy|60px}}; border:2px solid #{{white color dark}}; background:#{{white color light}}" | [[File:Ga-Olé Item Gold Fragment.png|60px]] | |||
|} | |||
| | |||
{| width="460px" class="roundy" style="background:transparent; border-collapse:collapse" | |||
| width="140px" style="padding-left: 5px; {{roundytop|7px}} background:#FFF" | '''Gold Fragment{{tt|*|Introduced in Dash set 1}}<br><small>きんのかけら</small>''' | |||
| width="110px" style="text-align:center; float:right; {{roundy|7px}}; background:#{{white color light}}" | '''Cost:''' N/A | |||
| | |||
|- | |||
| colspan="2" style="background:#FFF; {{roundytr|7px}}; {{roundybottom|7px}}; padding-left:5px" | Randomly dropped by Pokémon players did not manage to catch during Get by Battle mode. Can be redeemed for 20 Medals. | |||
|} | |||
|} | |||
|- | |||
| | |||
{| width="100%" style="background:transparent; border-collapse:collapse" | |||
| width="60px" | | |||
{| width="100%" class="roundy" style="background:transparent" | |||
| style="{{roundy|60px}}; border:2px solid #{{white color dark}}; background:#{{white color light}}" | [[File:Ga-Olé Item Gold Sand.png|60px]] | |||
|} | |||
| | |||
{| width="460px" class="roundy" style="background:transparent; border-collapse:collapse" | |||
| width="140px" style="padding-left: 5px; {{roundytop|7px}} background:#FFF" | '''Gold Sand{{tt|*|Introduced in Dash set 1}}<br><small>きんのすな</small>''' | |||
| width="110px" style="text-align:center; float:right; {{roundy|7px}}; background:#{{white color light}}" | '''Cost:''' N/A | |||
| | |||
|- | |||
| colspan="2" style="background:#FFF; {{roundytr|7px}}; {{roundybottom|7px}}; padding-left:5px" | Randomly dropped by Pokémon players did not manage to catch during Get by Battle mode. Can be redeemed for 10 Medals. | |||
|} | |||
|} | |} | ||
|} | |} | ||
===Ga-Olé Tickets=== | ===Ga-Olé Tickets=== | ||
[[File:Ga-Olé Ticket Example.jpg|thumb|175px|right|A typical Ga-Olé Ticket]] | [[File:Ga-Olé Ticket Example.jpg|thumb|175px|right|A typical Ga-Olé Ticket]] | ||
'''Ga-Olé Tickets''' (Japanese: '''ガオーレチケット''') are promotional items available through targeted publications or Pokémon Ga-Olé events. Scanning the QR Code on a ticket using the console Multi-Scanner will unlock a special course otherwise unplayable through normal gameplay, giving players the opportunity to catch different Pokémon. | '''Ga-Olé Tickets''' (Japanese: '''ガオーレチケット''') are promotional items available through targeted publications or Pokémon Ga-Olé events. Typically, tickets available in publications are physical, while those available through the Ga-Olé Member service or third-party Ga-Olé events are digital. Scanning the QR Code on a ticket using the console Multi-Scanner will unlock a special course otherwise unplayable through normal gameplay, giving players the opportunity to catch different Pokémon. | ||
==Gallery== | ==Gallery== | ||
<gallery> | <gallery> | ||
Ga-Olé slogan logo.png|''Roar and War Cry! Summon the Legends!'', a slogan for the game | Ga-Olé slogan logo.png|''Roar and War Cry! Summon the Legends!'', a slogan for the game | ||
Ga-Olé Protagonist male.png|Male protagonist | |||
Ga-Olé Protagonist female.png|Female protagonist | |||
</gallery> | </gallery> | ||
==In other languages== | |||
{{langtable|color={{red color}}|bordercolor={{white color light}}|textcolor=fff | |||
|zh_cmn=Pokémon Ga-Olé (寶可夢加傲樂) ''Bǎokěmèng Jiā'àolè'' {{tt|*|Taiwan}}<br>宝可梦加傲乐 ''Bǎokěmèng Jiā'àolè'' {{tt|*|Mainland China}} | |||
|ko=포켓몬가오레 ''Pokémon Ga-Olé'' | |||
}} | |||
==See also== | ==See also== | ||
[[Get Chance! Pokémon Ga-Olé!]] | *[[Get Chance! Pokémon Ga-Olé!]] | ||
*[[Dash! Pokémon Ga-Olé!]] | |||
*[[Ultra Legend! Pokémon Ga-Olé!]] | |||
*[[Grand Rush! Pokémon Ga-Olé!]] | |||
==References== | |||
<references/> | |||
{{Spin-off series}} | {{Spin-off series}} | ||
{{-}} | {{-}} | ||
| Line 241: | Line 453: | ||
[[Category:Ga-Olé|*]] | [[Category:Ga-Olé|*]] | ||
[[es:Pokémon Ga-Olé]] | |||
[[fr:Pokémon Ga-Olé]] | |||
[[ja:ポケモンガオーレ]] | [[ja:ポケモンガオーレ]] | ||
[[zh: | [[zh:宝可梦加傲乐]] | ||
Latest revision as of 11:24, 5 September 2024
| Pokémon Ga-Olé ポケモンガオーレ | |
|---|---|
 Logo of Pokémon Ga-Olé | |
Basic info
| |
| Platform: | Arcade |
| Category: | Battle simulation |
| Players: | 1 |
| Connectivity: | None |
| Developer: | Takara Tomy A.R.T.S./ Marvelous |
| Publisher: | Takara Tomy A.R.T.S.[1] |
| Part of: | Generation VI, VII, and VIII miscellaneous |
Ratings
| |
| CERO: | A |
| ESRB: | N/A |
| ACB: | N/A |
| OFLC: | N/A |
| PEGI: | N/A |
| GRAC: | N/A |
| GSRR: | N/A |
Release dates
| |
| Japan: | July 7, 2016 |
| North America: | N/A |
| Australia: | N/A |
| Europe: | N/A |
| South Korea: | August 2, 2021 |
| Mainland China: | December 12, 2020 |
| Hong Kong: | October 13, 2021 |
| Taiwan: | December 5, 2020 |
Websites
| |
| Japanese: | Official website |
| English: | Official website |
|
Japanese boxart
| |
Pokémon Ga-Olé (Japanese: ポケモンガオーレ) is an arcade game developed by Takara Tomy A.R.T.S. and Marvelous, which also developed the Pokémon Battrio and Pokémon Tretta arcade games. Pokémon Ga-Olé was officially announced on April 13, 2016 at the Takara Tomy A.R.T.S. 2016 Summer Business Meeting in Tokyo by Takara Tomy A.R.T.S. president & CEO Hiroyuki Usami and Marvelous vice chairman Shuichi Kyoda. It was launched nationwide in Japan on July 7, 2016. The machines were later launched in Taiwan in Traditional Chinese beginning on December 5, 2020, Mainland China in Simplified Chinese beginning on December 12, 2020, South Korea in Korean beginning on August 2, 2021, Hong Kong in English beginning on October 13, 2021, Singapore in English beginning on November 17, 2021, and Malaysia in English beginning on January 27, 2022.
Like its predecessors, Pokémon Ga-Olé focuses on Pokémon battles that require the input of physical peripherals, in this case disks, which depict one of the various Pokémon species in order to play. Players can engage in 2-on-2 battles in a variety of environments, and have the ability to purchase disks by either capturing Pokémon in-game or "evolving" Pokémon they use in battle.
Each Pokémon Ga-Olé machine costs ¥100 to operate. The main feature of the console is the large 50-inch vertical monitor, which displays the user interface and all in-game graphics. The control panel is situated below the monitor, the primary focus of which are a pair of main input buttons on the left and right, respectively colored blue and orange, and a pair of like-colored slots in the center used to insert Pokémon disks during gameplay. A Poké Ball lever, principally used to capture Pokémon, is located at the front. The control panel also contains an IC card scanner to the right, used to scan Ga-Olé Passes, and a Multi-Scanner to the left, used to read QR Codes and interact with other peripherals.
Release history
Throughout its operational lifespan, Pokémon Ga-Olé went through four different series, each with five associated sets. Each new series incorporated new gameplay mechanics and cosmetic changes to the interface as well as the design used on disk images. Unlike previous titles, the sets in Pokémon Ga-Olé do not have individual names and are simply referred to by their number within each series.
|
|
|
| ||||||||||||
| |||||||||||||||
Disks
The disks used in Pokémon Ga-Olé are rounded plastic tiles measuring 45×73×3.6mm. The obverse of each disk has a sticker portraying one of the Pokémon species along with a set of individual statistics such as Hit Points, Attack, Defense, and Speed, as well as types and moves, just as they feature in the core series of Pokémon games. Each disk also features a Poké Ball symbol that denotes what type of Poké Ball was used to capture it in-game. There are several types of Poké Ball that can be used when playing the game: a standard Poké Ball, a Great Ball, an Ultra Ball, a Master Ball, a Quick Ball, and a Beast Ball. A player can therefore collect numerous disk variants for the majority of Pokémon in each set. All of this data is present on the QR Code on each disk, which is read into the game when it is placed in one of the console slots. The QR Codes can also be used in conjunction with Pokémon Sun, Moon, Ultra Sun, and Ultra Moon with the QR Scanner function, allowing players to register Pokémon from Ga-Olé disks in their Pokédex. QR Codes from Pokémon from Ga-Olé disks also provide 20 points per scan as opposed to the normal 10.
Unlike Battrio pucks and Tretta tiles, which have the data of a specific Pokémon stored in embedded microdots, Pokémon Ga-Olé disks are all generic. When a Pokémon is caught in-game, it is printed onto a blank sticker by an integrated laser printer and then dispensed, making the storage and production of peripherals more cost-effective compared to previous titles. This method of production occasionally results in unwanted errors, with some images not printing fully or with colors missing. Takara Tomy's customer service has the capacity to replace any disks produced in error via mail, though usable disks are often sought by collectors as misprints.
Statistics
Each Pokémon has five common statistics in Pokémon Ga-Olé: HP, Defense, Special Defense, Speed, and Energy. HP, identified in solid yellow, determines how much damage a Pokémon can sustain before it can no longer partake in battle. Defense and Special Defense determine how susceptible Pokémon are to damage from physical and special moves, respectively. Defense is the solid blue stat, while Special Defense is transparent with a blue border. Speed, identified in solid green, determines how quickly a Pokémon can prepare to attack and how easily they may dodge an incoming attack. Energy (Japanese: ポケエネ PokéEne) gives a rough indication as to the overall strength of the Pokémon, much like levels in other Pokémon games. The only statistics not common to all Pokémon are Attack and Special Attack, identified in solid red and transparent with a red border, respectively. The presence of Attack or Special Attack depends on the category of the Pokémon's move, which is derived from the core series. A Pokémon with Quick Attack for example, a physical move, will display an Attack stat, whereas a Pokémon with Thunderbolt, a special move, will display a Special Attack stat.
Types and moves
The types attributed to Pokémon are indicated by symbols to the right of their name. A Pokémon may have either 1 or 2 types, and determine what types of move it will be weak against or resistant to in battle. The types featured in Pokémon Ga-Olé are the same as those found in the core series, sharing their individual strengths and weaknesses. Most Pokémon can use only 1 move, as opposed to 4 in the core series. Some Pokémon introduced in the Grand Rush series have access to 2 moves. The move name and its type are present below the Pokémon's name. All type symbols used in Pokémon Ga-Olé are based on those featured in previous arcade titles Pokémon Battrio and Pokémon Tretta.
| Pokémon Ga-Olé types | ||||||||
|---|---|---|---|---|---|---|---|---|
Normal |
Fire |
Water |
Grass |
Electric |
Ice |
Fighting |
Poison |
Ground |
Flying |
Psychic |
Bug |
Rock |
Ghost |
Dragon |
Dark |
Steel |
Fairy |
Pokémon Grades
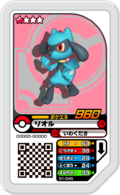
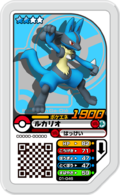
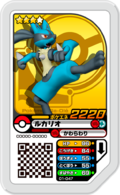
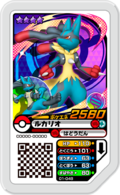
Pokémon in Pokémon Ga-Olé are divided into Grades, as indicated by a star rating system on disks. Grade 1 Pokémon have 1 red-colored star, Grade 2 Pokémon have 2 blue-colored stars, Grade 3 Pokémon have 3 yellow-colored stars, Grade 4 Pokémon have 4 purple-colored stars, and Grade 5 Pokémon have 5 multi-colored stars. Some Pokémon may also have hollow stars as part of their Grade, indicating they have the potential to become stronger either by evolving or by increasing their Grade. The Lucario line from the first set is a good example of this: Riolu is a Grade 1 Pokémon with a maximum potential Grade of 4, and can evolve into a Grade 2 Lucario. A player can then increase Lucario's Grade to 3, and again to 4 with the further ability to Mega Evolve into Mega Lucario.
|
► | 
|
► | 
|
► | 
|
Riolu |
Lucario |
Lucario |
Lucario |
Gameplay
Starting a game
The main hub in Pokémon Ga-Olé is the Pokémon Center. Upon inserting ¥100, players start from here and can cycle between the available game modes: Get by Battle (Japanese: バトルしてゲット), Get Now (Japanese: いますぐゲッ), and Trainer and Battle (Japanese: トレーナーとバトル). Get by Battle mode allows players to play the game in its entirety, and has a maximum of 3 rounds per session. Get Now mode is a short mini-game in which the player is given 2 Quick Balls to throw at grass patches in attempt to catch a random Pokémon. Get Now mode can be played consecutively up to 9 times per session, costing ¥100 for each subsequent round. A player can dispense only 1 of the 2 Pokémon caught per round, costing another ¥100 to do so, or continue without dispensing any. Trainer and Battle mode, introduced in the second set, provides an additional challenge and pits players against Trainers of varying strengths in a single round 4-Pokémon battle.
Course selection
Upon selecting Get by Battle mode, the player will then be prompted to select a course they wish to challenge. Each course contains different Pokémon to encounter and battle, including powerful Legendary Pokémon that may appear should a player continue to battle beyond round 1. Each set typically has 2 or 3 initial courses, with more added following its release. Most courses are available to play for the duration of the current set. New courses replace the original selection upon the release of a new set. Sets may also feature special courses, playable only for a limited period. After the player has selected a course, the camera will pan over the battle area before initiating the first round.
Battle flow
Each round consists of a 2-on-2 Pokémon battle with 20 seconds on the game timer. The opposing Pokémon are introduced first, displaying their individual Grades and Energy values, before the player is prompted to insert disks featuring their chosen Pokémon in each slot. If a player does not have enough disks, the game assigns rental Pokémon to make the deficit.
The screen is divided into two during battles, separated by the Attack Gauge (Japanese: こうげきゲージ). The opposing Pokémon appear at the top and the player's Pokémon are present on the bottom. At the start of a battle, icons of the participating Pokémon are placed on the attack gauge at points based on their Grade. Pokémon with comparatively lower Grades are generally placed further along the gauge as to give them a head start. The opposing Pokémon are identified in red, while the player's Pokémon are identified in blue and orange, correlating with the slots and buttons on the console.
The objective at this stage of the round is to enable the player's Pokémon to attack, which can be done when a Pokémon icon reaches the extreme right of the Attack Gauge. Each icon on the gauge moves at a rate based on the respective Pokémon's speed stat, but players can boost their own using the game mechanic available to them. These have varied by series throughout Pokémon Ga-Olé's release history, and are detailed below. When a Pokémon icon reaches the end of the gauge, the game timer pauses and that Pokémon performs its move.
| ||||
|
| ||||
|
If an opposing Pokémon icon is near to or at the same position of an icon that has reached the end of the Attack Gauge, this triggers Kaeri-Uchi Chance! (Japanese: かえりうちチャンス!). The player is required to use the Poké Ball lever in attempt to move the graphic that appears up towards the opponent's end, competing against the game AI, which will attempt to push the graphic down towards the player's end. The victor of this mini-game will then proceed to attack.
Before a Pokémon executes its move, the player will be presented with one of two roulette wheels depending on the phase of battle. If the player is about to attack with one of their Pokémon, the Attack Roulette (Japanese: こうげきルーレット) will appear, presenting the player with an opportunity to increase the power of their Pokémon's move. The roulette has values ranging from 5 to 50 and can be stopped by pressing the corresponding blue or orange button. If the player is about to be attacked by one of the opposing Pokémon, the Defense Roulette (Japanese: ぼうぎょルーレット) will appear. This roulette has 2 fail spaces, a Defense Up space, which raises the defense of the player's Pokémon if selected, and an Evade Up space, which increases the chances of the player's Pokémon completely evading an incoming attack if selected. If the HP of the player's Pokémon is low, these spaces may become more effective, changing from orange to pink. As with the Attack Roulette, the Defense Roulette can be stopped by pressing the corresponding blue or orange button. Whatever the phase of battle, the game AI will control the opposite roulette for the opposing Pokémon.
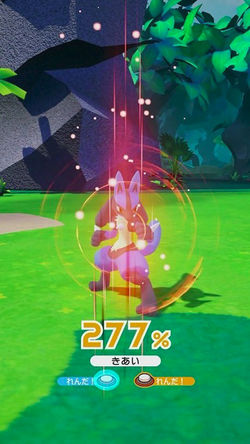
During the animation that plays when the player's Pokémon attacks, the player will be prompted to press the console buttons as fast as possible in effort to raise their Fighting Spirit (Japanese: きあい). This value starts at 50%, but can be raised significantly over the course of 3 rounds, should the player continue. Raising Fighting Spirit can increase the power of moves and bonuses from the Attack Roulette.
Both of the player's Pokémon have an HP bar. The opposing Pokémon have a similar HP gauge in the form of the Get Gauge, which is filled each time the opposing Pokémon take damage. When a Pokémon uses a move, the damage dealt to each opposing Pokémon is the difference between the base attack of the attacking Pokémon (plus/minus any attack bonuses or type advantages/disadvantages) and the base defense of the opposing Pokémon. Completely filling the Get Gauge of either of the opposing Pokémon will make them unable to battle, and thus easier to catch—a state called Get Chance (Japanese: ゲットチャンス) in-game. Conversely, if the HP bar of any of the player's Pokémon is completely drained, they will be unable to battle. If this occurs, the player can use another Pokémon by scanning a new disk from their collection or have the game assign a rental Pokémon. A player can have a maximum of 4 useable Pokémon in round 1, and can therefore only replace Pokémon on 2 occasions.
After a Pokémon has used its move, its corresponding icon will return to its starting position on the Attack Gauge. If any Pokémon took damage following an attack, each of their corresponding icons will move along the gauge a little.
A round concludes when one of the three conditions are met: the game timer reaches zero, the Get Gauge of both opposing Pokémon have been filled, or the player has no useable Pokémon remaining. A phase named Get Time! (Japanese: ゲットタイム!) follows, in which the player is prompted to push the Poké Ball lever in order to throw Poké Balls at the opposing Pokémon. The game cycles between a standard Poké Ball, a Great Ball, an Ultra Ball, and a Master Ball until the lever is pushed. The chances of a successful capture depend on the Grade of each opposing Pokémon, how full their individual Get Gauges were, and the type of ball thrown in a similar manner to the core series. If a Pokémon is successfully captured, the player has the option to either insert ¥100 in order dispense the correlating Pokémon disk from the machine, or to end the round. If more than one Pokémon is captured, the player can only select 1 Pokémon to dispense. If a player does choose to dispense a disk, they will be rewarded with a Disk Get Bonus! (Japanese: ディスクゲットボーナス!), where the player will have a short time to repeatedly press the console buttons in effort to raise their Fighting Spirit again.
| Fighting Spirit bands | ||||||||
|---|---|---|---|---|---|---|---|---|
| 50%-99% | ► | 100%-199% | ► | 200%-399% | ► | 400%-599% | ► | 600%-999% |
Following Get Time!, one of the player's Pokémon will unleash a War Cry (Japanese: オタケビ) to attract more Pokémon to battle. The strength of the Pokémon ultimately called depends on the percentage of the player's Fighting Spirit—a higher percentage will result in a louder War Cry and thus alert more powerful Pokémon, including Legendary Pokémon. Two more Pokémon are then introduced in the same manner as the first round, and player has the option to either continue onto round 2 by inserting another ¥100, or to end the game. If the player opts to continue, the maximum number of useable Pokémon will increase by 1 and the HP of their current Pokémon will recover a little. Rounds 2 and 3 follow the same pattern as round 1; the only differences being the positions of the player's Pokémon icons on the Attack Gauge and the their Fighting Spirit, both of which carry over from the previous round.
After Get by Battle is complete, a further phase named Last Chance! (Japanese: ラストチャンス!) follows. Last Chance! plays the same as Get Now mode with the exception that only 1 Quick Ball is thrown. The player can dispense the random Pokémon caught by inserting ¥100 or can choose to return to the Pokémon Center to see their results. If any disks were dispensed, the last Pokémon caught will be shown on-screen displaying its species, height, and weight while an announcer recites a brief description of it, mirroring Pokédex registration in the core series. The player can also zoom in and out and play the Pokémon's cry by pressing the console buttons. The player's score is then displayed, which takes into account a number of factors, including: the number of Pokémon still useable, how full the Get Gauge of each opposing Pokémon was, and the Grade of both the player's and opposing Pokémon. If a player has a Ga-Olé Pass, they will also earn Ga-Olé Medals for any Pokémon caught.
Evolution Chance!
If a player uses a Pokémon that can evolve during Get by Battle mode, Evolution Chance! (Japanese: しんかチャンス!) will begin following its conclusion. The player will have the option to either insert ¥100 in order to dispense a disk featuring the evolved Pokémon or to ignore it. If dispensed, the Pokémon will evolve on-screen in the same manner as the core series. The Poké Ball used to catch the Pokémon's previous evolution stage carries over to the evolved Pokémon. Evolution Chance! may occur straight after a Pokémon is successfully captured as of the third set, indicated by a green star icon on the "do not dispense" option. The player will then have the choice to dispense or not dispense the newly evolved Pokémon.
Grade Up Chance!
In a similar way to Evolution Chance!, if a player uses a Pokémon that cannot evolve any further, but has the potential to be stronger, Grade Up Chance! (Japanese: グレードアップチャンス!) will begin following the conclusion of Get by Battle mode. The player will have the opportunity to upgrade and dispense a more powerful version of the Pokémon used by inserting ¥100 when prompted. Fully upgraded Pokémon, in addition to having comparatively superior stats, sometimes have the ability to Mega Evolve or have access to a Z-Move. As with Evolution Chance! from the third set onward, Grade Up Chance! may also occur after a successful capture, indicated by a red star icon on the "do not dispense" option. The player will then have the choice to dispense or not dispense the upgraded Pokémon.
Mega Evolution Chance!
If a player uses a Pokémon that is able to Mega Evolve, Mega Evolution Chance! (Japanese: メガシンカチャンス!) will activate before it attacks for the first time. Two Mega Evolution symbols will approach the center of the screen from opposing ends, and player is required to press both console buttons simultaneously when the symbols merge. If successful, the Pokémon will Mega Evolve. A Pokémon will remain in its Mega Evolved state for the remainder of Get by Battle mode.
Z-Moves
Z-Moves were introduced in the third set and, like their core series counterparts, are powerful moves Pokémon can perform in addition to their standard move. They can only be used once per session, however. Pokémon able to use Z-Moves have a Z-Crystal icon above their energy value and the name of it above their regular move.
Players with eligible Pokémon build up charges in stages as a battle progresses. Once this charge reaches the third stage (MAX), Z-Move Chance (Japanese: Zワザチャンス) will activate. If a player owns a Pokémon Z-Ring or Pokémon Z-Power Ring, each sold separately, they can insert and scan a Z-Crystal using the console Multi-Scanner to proceed. If a player does not own a Pokémon Z-Ring, a roulette will spin for a chance to use a Z-Move.
Before a Z-Move is executed, players can increase its power by mimicking the poses displayed by Trainers using them. This can be done by moving the Poké Ball lever on the console in the appropriate direction while following the on-screen prompts. The Pokémon will then attack with its Z-Move. Players can also increase their Fighting Spirit during the animation that plays in the same manner as a regular move.
Ga-Olé Passes
A Ga-Olé Pass (Japanese: ガオーレパス) allows a player to record their activity in Pokémon Ga-Olé, and function much in the same way as Tretta Reports in Pokémon Tretta. Like Tretta Reports, Ga-Olé Passes are IC cards that have a limit as to how many times save data can be recorded on them. Promotional Ga-Olé Trial Version Passes have a limit of 50 saves, but most retail varieties have a limit of 400. Once the maximum allocation of data saves has been reached, players can transfer their data to a new Ga-Olé Pass. Ga-Olé Passes can be purchased separately for ¥500.
Ga-Olé Passes allow players to select a male or female avatar and input a nickname. They also allow a player to register as a Ga-Olé Member on the official website. In terms of gameplay advantages, Ga-Olé Passes keep track of the player's score after each session, allow players to use Support Pokémon, and also allow players to earn Ga-Olé Medals for any Pokémon caught. Players can access the Ga-Olé Member area using a computer or smartphone to review a number of things. These include: the player's highest score, the number of saves remaining on their current Ga-Olé Pass, the number of Pokémon that reached the Get Chance state during battle, the number of disks owned, as well as the Ga-Olé Encyclopedia (Japanese: ガオーレずかん). The Ga-Olé Encyclopedia updates as disks are earned in-game, much like the Pokédex, allowing players to keep track of their collection, and see what courses specific Pokémon can be encountered on. As of the second set, Ga-Olé Members can also earn Member Points while playing and earn Member Badges for in-game accolades. 50 Member Points are awarded for every ¥100 spent during a session, with additional Member Points awarded for numbers of disks owned. Member Points can be used to redeem exclusive items, such as Ga-Olé Tickets and promotional disks.
Support Pokémon
Players with Ga-Olé Passes can keep a roster of Support Pokémon to summon and deal additional damage to the opposing Pokémon during a battle. The way in which Support Pokémon can aid a player has varied over the lifespan of Pokémon Ga-Olé. Prior to the fourth set, achieving a Perfect or Miracle when using the Cheer Balloon increased the chances of being able to summon a Support Pokémon. Continuing to accumulate Perfects and Miracles would cause a "Support" icon to appear at various points to inform the player that a chance to summon a Support Pokémon was approaching. Support Attack Chance! (Japanese: サポートアタックチャンス!) could occur any time after this, which required the player to use the Poké Ball lever in attempt to summon a Support Pokémon from their current roster. The game would cycle between a fail space and a space containing the Support Pokémon. If successful, the Support Pokémon was summoned and performed its own move, during which the player could press the console buttons in effort to raise their Fighting Spirit a little more.
Debuting on machines used at the Full-Force Battle ~Solgaleo & Lunala Challenge!~ events in early 2017, followed by all upgraded machines from the fourth set, Support Pokémon will now randomly launch a Surprise Attack (Japanese: サプライズアタック) just after an opponent Pokémon has launched its own attack, nullifying any damage it may have inflicted, and instead dealing damage to the opponent Pokémon. If a player is not able to use any more Pokémon during a round, a Support Pokémon will be summoned for an Extra Attack (Japanese: エクストラアタック), potentially turning the battle in favor of the player. In both cases, the Support Pokémon summoned is randomly selected from the player's current roster. Players can still press the console buttons in effort to raise their Fighting Spirit while a Support Pokémon executes its move. Multiple Support Pokémon can be used in one session of Get by Battle mode, but once a particular Pokémon has been summoned, it becomes unavailable to use in the following round.
An opportunity for players of Pokémon Tretta to gain an early advantage starting their Pokémon Ga-Olé experience began upon its launch. Players that had at least 1 Partner Pokémon registered on their Tretta Report could earn Support Pokémon to use in Pokémon Ga-Olé by scanning it in place of a Ga-Olé Pass. Players that had registered between 1 and 5 Partner Pokémon would unlock Pikachu as a Support Pokémon. Players that had registered between 6 and 10 Partner Pokémon would unlock Lucario as a Support Pokémon. Players that had registered 11 or more Partner Pokémon would unlock both Pikachu and Lucario as Support Pokémon. After scanning their Tretta Report, players were then required to update their data using a Ga-Olé Pass.
Item Chance!
For players with Ga-Olé Passes, Item Chance! (Japanese: どうぐチャンス!) will activate at the start of Get by Battle, which allows them to exchange any accrued Ga-Olé Medals for items that can help them during battles. Item Chance! may also provide additional Support Pokémon for players to add to their roster instead of items. The table below displays the current items available to purchase.
| ||||||||
| ||||||||
| ||||||||
| ||||||||
| ||||||||
| ||||||||
| ||||||||
| ||||||||
Ga-Olé Tickets
Ga-Olé Tickets (Japanese: ガオーレチケット) are promotional items available through targeted publications or Pokémon Ga-Olé events. Typically, tickets available in publications are physical, while those available through the Ga-Olé Member service or third-party Ga-Olé events are digital. Scanning the QR Code on a ticket using the console Multi-Scanner will unlock a special course otherwise unplayable through normal gameplay, giving players the opportunity to catch different Pokémon.
Gallery
In other languages
| ||||||||||||
See also
- Get Chance! Pokémon Ga-Olé!
- Dash! Pokémon Ga-Olé!
- Ultra Legend! Pokémon Ga-Olé!
- Grand Rush! Pokémon Ga-Olé!
References
| |||||||||||||||||||||||||||||||||||||||||||||||||||||||||||||||||||||||||||||||||||||||||||||||||||||||||||||

|
This article is part of Project Arcade, a Bulbapedia project that covers all aspects of Pokémon arcade games. |

