Appendix:Sword and Shield walkthrough/Section 11: Difference between revisions
(Added in page links where appropriate) Tags: 2017 source edit Disambiguation links |
m (→Trainers: Correcting gym name) Tags: 2017 source edit bad formatting |
||
| (3 intermediate revisions by one other user not shown) | |||
| Line 1: | Line 1: | ||
==Glimwood Tangle== | ==Glimwood Tangle== | ||
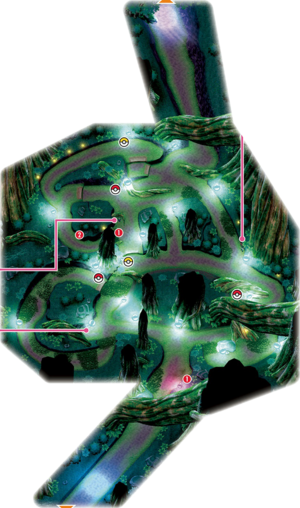
With [[Bea]]/[[Allister]] and [[Bede]] defeated, your | [[File:Glimwood Tangle SwSh.png|thumb|300px|Glimwood Tangle]] | ||
With [[Bea]]/[[Allister]] and [[Bede]] defeated, your Gym Challenge continues in [[Ballonlea]]. You’ll need to venture through the [[Glimwood Tangle]] to get there. Take the path heading east from [[Stow-on-Side]] stadium and you’ll reach an eerie, dimly lit forest filled with luminous mushrooms. There’s a new batch of {{OBP|Pokémon|species}} to catch here, although it can be difficult to navigate through. Don’t worry if you get lost - you can interact with the mushrooms to gain some extra light. Some of these will also cause encounters with {{p|Impidimp}} and {{p|Morgrem}}. There’s some useful items to pick up along the way, including a couple of [[TM]]s and a handy [[Bright Powder]]. Head right at the first T-junction, follow the path round, then stick to the right-hand wall for the quickest path through the woods to arrive in Ballonlea. | |||
===Items=== | ===Items=== | ||
| Line 96: | Line 97: | ||
{{trainerfooter|forest|8}} | {{trainerfooter|forest|8}} | ||
|} | |} | ||
{{-}} | |||
==Ballonlea== | ==Ballonlea== | ||
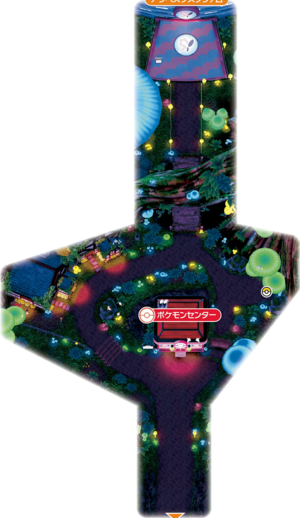
Ballonlea is one of [[Galar | [[File:Ballonlea SwSh.png|thumb|300px|Ballonlea]] | ||
Ballonlea is one of [[Galar]]'s smaller settlements, with [[Ballonlea Stadium]] as the main feature. It’s worth stopping to look around and chat, as you can easily miss things otherwise. The man who wants to be a Pokémon by the pile of wood gives you an {{m|Acrobatics}} TM if you wear the Fire-type uniform you received as a reward for defeating [[Kabu]]'s Gym and the Fire-type tracksuit jacket from the boutique found in the west of [[Hammerlocke]]. An elderly lady in one of the houses gives you the TM that Stow-on-Side's Gym Leader would have gifted in the other version to yours - this means you’ll receive {{m|Hex}} in Sword and {{m|Revenge}} in Shield. You can also obtain an [[Eviolite]], a held item that boosts the defense and special defense of Pokémon that can still evolve, after defeating Breeder Elena and her {{p|Dottler}}. | |||
===Items=== | ===Items=== | ||
| Line 116: | Line 120: | ||
{{Itlistfoot|forest}} | {{Itlistfoot|forest}} | ||
|} | |} | ||
===Trainers=== | ===Trainers=== | ||
{| class="expandable" align="center" style="background: #{{shield color}}; {{roundy|10px}} border: 5px solid #{{sword color}};" | {| class="expandable" align="center" style="background: #{{shield color}}; {{roundy|10px}} border: 5px solid #{{sword color}};" | ||
| Line 126: | Line 131: | ||
{{trainerfooter|forest|8}} | {{trainerfooter|forest|8}} | ||
|} | |} | ||
{{-}} | |||
==Baloonlea Stadium== | ==Baloonlea Stadium== | ||
Upon entering Ballonlea Stadium, you’ll be greeted by [[Marnie]] and her | Upon entering Ballonlea Stadium, you’ll be greeted by [[Marnie]] and her {{p|Morpeko}}, and she’ll give you a copy of her [[League Card]], noting that you two are essentially rivals now, before leaving. [[Ball Guy]] is back, and his prize this time is a [[Love Ball]], a ball that has a higher catch rate on Pokémon of the opposite gender to yours. There’s also a trade available with a young girl dressed as an {{p|Eevee}} in the lobby, who’s after a [[Galarian form|Galarian]] {{p|Yamask}}, and she’ll trade you the regular version in return. | ||
===Gym | ===Gym Mission=== | ||
The | The Gym Mission itself is relatively straightforward - you’ll face three trainers, and [[Opal]] will ask you a quiz question in each battle. Getting the question right boosts certain stats by one stage, but getting it wrong will lower them by one stage. The first question is impossible to get wrong, and the other two aren’t too difficult if you’ve been paying attention. After you’ve bested the Gym Trainers, it’s time to take on Opal herself. She’ll continue to question you periodically throughout the battle, although this time the stat changes from right or wrong answers are two stages rather than just one. These answers are less obvious and don’t rely on Pokémon knowledge, so thankfully we’ve done the hard bit for you. | ||
====Quiz 1==== | ====Quiz 1==== | ||
| Line 187: | Line 194: | ||
{| align="center" style="background: #{{fairy color}}; {{roundy}}; border: 5px solid #{{fairy color light}};" | {| align="center" style="background: #{{fairy color}}; {{roundy}}; border: 5px solid #{{fairy color light}};" | ||
|- align="center" | |- align="center" | ||
! | ! Ballonlea Stadium <br> [[File:Fairy Badge.png|35px|The Fairy Badge]] <br><br> | ||
|- | |- | ||
| | | | ||
| Line 269: | Line 276: | ||
|} | |} | ||
|} | |} | ||
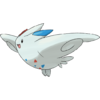
Opal’s team can be tricky, as she uses Galarian | Opal’s team can be tricky, as she uses Galarian {{p|Weezing}} and {{p|Mawile}}, dual-type Pokémon that help cover {{t|Fairy}}'s weaknesses. {{t|Poison}} types that usually have a good matchup are neutral into the Weezing and do no damage to her Mawile, whereas {{type|Steel}} moves hit everything for at least neutral damage. {{type|Fire}} Pokémon provide natural resistance to Fairy moves, but beware of {{m|Ancient Power}} on Togekiss. Both the Mawile and [[Alcremie (Pokémon)|Alcremie]] have moves that boost defense by two stages, and with Mawile's {{a|Intimidate}} they can make things tough on physical attackers. As the Alcremie [[Gigantamax]]es as soon as it hits the field, the chances of it using {{m|Acid Armor}} are low, as it would have to outlast the three turns of Gigantamaxing first. | ||
Upon your triumph, Opal will hand over the TM for | Upon your triumph, Opal will hand over the TM for {{m|Draining Kiss}}, the Fairy Uniform, and the Fairy Badge, and maybe mercifully, she will let you know that she doesn’t want you to take over from her as the Ballonlea Gym Leader and you’re free to continue your Gym Challenge. | ||
==Hammerlocke== | ==Hammerlocke== | ||
When you leave Ballonlea Stadium, Opal will generously offer you a free ride to Hammerlocke - you are under no obligation to take it, but it’s where you need to go anyway so it makes sense to take her up on it. Head east towards the main stadium and you’ll find Bede, who’s still determined to regain his challenger status and become Champion. Opal has other ideas, seizing the opportunity to train him as her protégé, and the two of them head back to Ballonlea to work on his training. Continue heading east towards the train station, where [[Sonia]] | When you leave Ballonlea Stadium, Opal will generously offer you a free ride to Hammerlocke - you are under no obligation to take it, but it’s where you need to go anyway so it makes sense to take her up on it. Head east towards the main stadium and you’ll find Bede, who’s still determined to regain his challenger status and become Champion. Opal has other ideas, seizing the opportunity to train him as her protégé, and the two of them head back to Ballonlea to work on his training. Continue heading east towards the train station, where [[Sonia]]'s waiting to talk to you about the significance of what you saw in Stow-on-Side. Before she can get fully into the swing of things, you're interrupted by an almighty explosion that shakes the stadium, and appears to trigger a new Power Spot all the way through Hammerlocke. [[Leon]] arrives to check things out and, for the first time ever in a Pokémon game, the adults take the initiative of investigating themselves, leaving you free to chat with the newly arrived [[Hop]] before heading out east into {{rt|7|Galar}}. | ||
{{WalkthroughPrevNext | |||
|game=Sword | |||
|game2=Shield | |||
|prev=yes | |||
|prevname=Isle of Armor, Gigantamax First Partner | |||
|prevsection=10.5 | |||
|gamename=Sword and Shield | |||
|next=yes | |||
|nextname=Route 7, Route 8, Circhester, Circhester Stadium | |||
|nextsection=12 | |||
}} | |||
<br> | |||
{{Project Walkthroughs notice}} | |||
[[Category:Sword and Shield walkthrough]] | |||
Latest revision as of 08:28, 18 September 2024
Glimwood Tangle
With Bea/Allister and Bede defeated, your Gym Challenge continues in Ballonlea. You’ll need to venture through the Glimwood Tangle to get there. Take the path heading east from Stow-on-Side stadium and you’ll reach an eerie, dimly lit forest filled with luminous mushrooms. There’s a new batch of Pokémon to catch here, although it can be difficult to navigate through. Don’t worry if you get lost - you can interact with the mushrooms to gain some extra light. Some of these will also cause encounters with Impidimp and Morgrem. There’s some useful items to pick up along the way, including a couple of TMs and a handy Bright Powder. Head right at the first T-junction, follow the path round, then stick to the right-hand wall for the quickest path through the woods to arrive in Ballonlea.
Items
| Items | ||||||||||||||||||||||||||||||||||||
|---|---|---|---|---|---|---|---|---|---|---|---|---|---|---|---|---|---|---|---|---|---|---|---|---|---|---|---|---|---|---|---|---|---|---|---|---|
| ||||||||||||||||||||||||||||||||||||
Pokémon
Hidden encounters
| Available Pokémon | ||||||||||||||||||||||||||||||||||||||||||||||||||||||||||||||||||||||||||||||||||||||||||||||||||||||||||||||||||||||||||||||||||||||||||||||||||||||||||||||||||||||||||||||||||||||||||||||||||||||||||||||||||||||||||||||||||||||||||||||
|---|---|---|---|---|---|---|---|---|---|---|---|---|---|---|---|---|---|---|---|---|---|---|---|---|---|---|---|---|---|---|---|---|---|---|---|---|---|---|---|---|---|---|---|---|---|---|---|---|---|---|---|---|---|---|---|---|---|---|---|---|---|---|---|---|---|---|---|---|---|---|---|---|---|---|---|---|---|---|---|---|---|---|---|---|---|---|---|---|---|---|---|---|---|---|---|---|---|---|---|---|---|---|---|---|---|---|---|---|---|---|---|---|---|---|---|---|---|---|---|---|---|---|---|---|---|---|---|---|---|---|---|---|---|---|---|---|---|---|---|---|---|---|---|---|---|---|---|---|---|---|---|---|---|---|---|---|---|---|---|---|---|---|---|---|---|---|---|---|---|---|---|---|---|---|---|---|---|---|---|---|---|---|---|---|---|---|---|---|---|---|---|---|---|---|---|---|---|---|---|---|---|---|---|---|---|---|---|---|---|---|---|---|---|---|---|---|---|---|---|---|---|---|---|---|---|---|---|---|---|---|---|---|---|---|---|---|---|---|
| ||||||||||||||||||||||||||||||||||||||||||||||||||||||||||||||||||||||||||||||||||||||||||||||||||||||||||||||||||||||||||||||||||||||||||||||||||||||||||||||||||||||||||||||||||||||||||||||||||||||||||||||||||||||||||||||||||||||||||||||
Curry encounters
| Available Pokémon | ||||||||||||||||||||||||||||||||||||||||||||||||||||||||||||||||||||||||||||||||||||||||||||||||||||||||||||||||||||||||||||||||||||||||||||||||||||||||||||||||||||||||||||||||||||||||||||||||||||||||||||||||||||||||||||||||||||||||||||||||||||||||||||||||||||||||||||||||||||||||||||||||||||||
|---|---|---|---|---|---|---|---|---|---|---|---|---|---|---|---|---|---|---|---|---|---|---|---|---|---|---|---|---|---|---|---|---|---|---|---|---|---|---|---|---|---|---|---|---|---|---|---|---|---|---|---|---|---|---|---|---|---|---|---|---|---|---|---|---|---|---|---|---|---|---|---|---|---|---|---|---|---|---|---|---|---|---|---|---|---|---|---|---|---|---|---|---|---|---|---|---|---|---|---|---|---|---|---|---|---|---|---|---|---|---|---|---|---|---|---|---|---|---|---|---|---|---|---|---|---|---|---|---|---|---|---|---|---|---|---|---|---|---|---|---|---|---|---|---|---|---|---|---|---|---|---|---|---|---|---|---|---|---|---|---|---|---|---|---|---|---|---|---|---|---|---|---|---|---|---|---|---|---|---|---|---|---|---|---|---|---|---|---|---|---|---|---|---|---|---|---|---|---|---|---|---|---|---|---|---|---|---|---|---|---|---|---|---|---|---|---|---|---|---|---|---|---|---|---|---|---|---|---|---|---|---|---|---|---|---|---|---|---|---|---|---|---|---|---|---|---|---|---|---|---|---|---|---|---|---|---|---|---|---|---|---|---|---|---|---|---|---|---|---|---|---|---|---|---|---|---|---|---|---|---|---|---|---|---|---|---|---|---|---|---|---|---|---|---|
| ||||||||||||||||||||||||||||||||||||||||||||||||||||||||||||||||||||||||||||||||||||||||||||||||||||||||||||||||||||||||||||||||||||||||||||||||||||||||||||||||||||||||||||||||||||||||||||||||||||||||||||||||||||||||||||||||||||||||||||||||||||||||||||||||||||||||||||||||||||||||||||||||||||||
Wanderers
- There are two Impidimp seen hiding behind luminescent mushrooms, and are encountered when interacting with them. One is near the entrance, the other is near a dead end to the east, just before Cook Derek. They respawn every time when exiting and re-entering the area.
- Morgrem is located to the left of Madame Judy, behind a large tree. It does not respawn.
| Available Pokémon | ||||||||||||||||||||||||||||||||||||||||||||||||||||||||
|---|---|---|---|---|---|---|---|---|---|---|---|---|---|---|---|---|---|---|---|---|---|---|---|---|---|---|---|---|---|---|---|---|---|---|---|---|---|---|---|---|---|---|---|---|---|---|---|---|---|---|---|---|---|---|---|---|
| ||||||||||||||||||||||||||||||||||||||||||||||||||||||||
Trainers
| Trainers | |||||||||||||||||||||||||||||||||||||||||||||||||||||||||||||||||||||||
|---|---|---|---|---|---|---|---|---|---|---|---|---|---|---|---|---|---|---|---|---|---|---|---|---|---|---|---|---|---|---|---|---|---|---|---|---|---|---|---|---|---|---|---|---|---|---|---|---|---|---|---|---|---|---|---|---|---|---|---|---|---|---|---|---|---|---|---|---|---|---|---|
| |||||||||||||||||||||||||||||||||||||||||||||||||||||||||||||||||||||||
Ballonlea
Ballonlea is one of Galar's smaller settlements, with Ballonlea Stadium as the main feature. It’s worth stopping to look around and chat, as you can easily miss things otherwise. The man who wants to be a Pokémon by the pile of wood gives you an Acrobatics TM if you wear the Fire-type uniform you received as a reward for defeating Kabu's Gym and the Fire-type tracksuit jacket from the boutique found in the west of Hammerlocke. An elderly lady in one of the houses gives you the TM that Stow-on-Side's Gym Leader would have gifted in the other version to yours - this means you’ll receive Hex in Sword and Revenge in Shield. You can also obtain an Eviolite, a held item that boosts the defense and special defense of Pokémon that can still evolve, after defeating Breeder Elena and her Dottler.
Items
| Items | ||||||||||||||||||||||||||||||||||||||||
|---|---|---|---|---|---|---|---|---|---|---|---|---|---|---|---|---|---|---|---|---|---|---|---|---|---|---|---|---|---|---|---|---|---|---|---|---|---|---|---|---|
| ||||||||||||||||||||||||||||||||||||||||
Trainers
| Trainers | |||||||||||||||||
|---|---|---|---|---|---|---|---|---|---|---|---|---|---|---|---|---|---|
| |||||||||||||||||
Baloonlea Stadium
Upon entering Ballonlea Stadium, you’ll be greeted by Marnie and her Morpeko, and she’ll give you a copy of her League Card, noting that you two are essentially rivals now, before leaving. Ball Guy is back, and his prize this time is a Love Ball, a ball that has a higher catch rate on Pokémon of the opposite gender to yours. There’s also a trade available with a young girl dressed as an Eevee in the lobby, who’s after a Galarian Yamask, and she’ll trade you the regular version in return.
Gym Mission
The Gym Mission itself is relatively straightforward - you’ll face three trainers, and Opal will ask you a quiz question in each battle. Getting the question right boosts certain stats by one stage, but getting it wrong will lower them by one stage. The first question is impossible to get wrong, and the other two aren’t too difficult if you’ve been paying attention. After you’ve bested the Gym Trainers, it’s time to take on Opal herself. She’ll continue to question you periodically throughout the battle, although this time the stat changes from right or wrong answers are two stages rather than just one. These answers are less obvious and don’t rely on Pokémon knowledge, so thankfully we’ve done the hard bit for you.
Quiz 1
| Question | Choices | Affected stat(s) | |
|---|---|---|---|
| Do you know about Fairy type's weaknesses? | Poison type | Steel type | Attack and Special Attack (1 stage each) |
| What was the previous Trainer's name? | Annetta | Annette | Speed (1 stage) |
| What do I eat for breakfast every morning? | Curry | Omelets | Defense and Special Defense (1 stage each) |
Quiz 2
| Turn | Question | Choices | Affected stat(s) | |
|---|---|---|---|---|
| 1 | You… Do you know my nickname? | The magic-user | The wizard | Speed (2 stages) |
| 4 | What is my favorite color? | Pink | Purple | Defense and Special Defense (2 stages each) |
| 8 | All righty then… How old am I? | 16 years old | 88 years old | Attack and Special Attack (2 stages each) |
Trainers
Opal’s team can be tricky, as she uses Galarian Weezing and Mawile, dual-type Pokémon that help cover Fairy's weaknesses. Poison types that usually have a good matchup are neutral into the Weezing and do no damage to her Mawile, whereas Steel-type moves hit everything for at least neutral damage. Fire-type Pokémon provide natural resistance to Fairy moves, but beware of Ancient Power on Togekiss. Both the Mawile and Alcremie have moves that boost defense by two stages, and with Mawile's Intimidate they can make things tough on physical attackers. As the Alcremie Gigantamaxes as soon as it hits the field, the chances of it using Acid Armor are low, as it would have to outlast the three turns of Gigantamaxing first.
Upon your triumph, Opal will hand over the TM for Draining Kiss, the Fairy Uniform, and the Fairy Badge, and maybe mercifully, she will let you know that she doesn’t want you to take over from her as the Ballonlea Gym Leader and you’re free to continue your Gym Challenge.
Hammerlocke
When you leave Ballonlea Stadium, Opal will generously offer you a free ride to Hammerlocke - you are under no obligation to take it, but it’s where you need to go anyway so it makes sense to take her up on it. Head east towards the main stadium and you’ll find Bede, who’s still determined to regain his challenger status and become Champion. Opal has other ideas, seizing the opportunity to train him as her protégé, and the two of them head back to Ballonlea to work on his training. Continue heading east towards the train station, where Sonia's waiting to talk to you about the significance of what you saw in Stow-on-Side. Before she can get fully into the swing of things, you're interrupted by an almighty explosion that shakes the stadium, and appears to trigger a new Power Spot all the way through Hammerlocke. Leon arrives to check things out and, for the first time ever in a Pokémon game, the adults take the initiative of investigating themselves, leaving you free to chat with the newly arrived Hop before heading out east into Route 7.
|
Sword and Shield walkthrough |
|

|
This article is part of Project Walkthroughs, a Bulbapedia project that aims to write comprehensive step-by-step guides on each Pokémon game. |


