Weather Institute: Difference between revisions
mNo edit summary |
|||
| (81 intermediate revisions by 40 users not shown) | |||
| Line 1: | Line 1: | ||
{{Infobox location | {{Infobox location | ||
|image=Weather Institute | |image=Weather Institute ORAS.png | ||
|image_size= | |image_size=300px | ||
|type=building | |type=building | ||
|location_name=Weather Institute | |location_name=Weather Institute | ||
|japanese_name= | |japanese_name=天気研究所 | ||
|translated_name=Weather | |translated_name=Weather Institute | ||
|location={{rt|119|Hoenn}}, West of [[Fortree City]] | |location={{rt|119|Hoenn}}, West of [[Fortree City]] | ||
|region=Hoenn | |region=Hoenn | ||
|generation={{gen|III}} | |generation={{gen|III}}, {{gen|VI}} | ||
}} | }} | ||
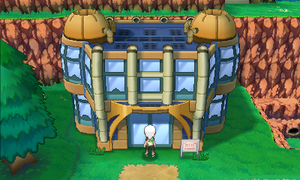
The '''Weather Institute''' (Japanese: '''{{tt|天気研究所|てんきけんきゅうじょ}}''' ''Weather Institute'') is a weather research building located on {{rt|119|Hoenn}} in the region of [[Hoenn]], in {{game2|Ruby|Sapphire|Emerald}}, and {{pkmn|Omega Ruby and Alpha Sapphire}}. | |||
The '''Weather Institute''' (Japanese: '''てんきけんきゅうじょ''' ''Weather | |||
The Weather Institute is like a bureau for the Hoenn region. It checks and keeps track of weather conditions throughout Hoenn. The Weather Institute has created | The Weather Institute is like a bureau for the Hoenn [[region]]. It checks and keeps track of weather conditions throughout Hoenn. The Weather Institute has created an [[artificial Pokémon]] named {{p|Castform}}, which has the ability to predict the weather and its conditions on a specific location. Its main project is the weather control machine which allows them to change the weather in certain areas. | ||
==Geography== | ==Geography== | ||
On the first trip through Route 119, the {{player}} will find that [[Team Aqua]]{{sup/3|Sa}}{{sup/3|Em}} or [[Team Magma]]{{sup/3|Ru}} have invaded the Institute, looking for information about {{p|Kyogre}} or {{p|Groudon}}, respectively, and the rare Pokémon, Castform. The team has also blockaded the bridge, preventing | On the first trip through Route 119, the {{player}} will find that [[Team Aqua]]{{sup/3|Sa}}{{sup/3|Em}}{{sup/6|AS}} or [[Team Magma]]{{sup/3|Ru}}{{sup/6|OR}} have invaded the Institute, looking for information about {{p|Kyogre}} or {{p|Groudon}}, respectively, and the rare Pokémon, Castform. The team has also blockaded the bridge just outside the Institute, preventing access to [[Fortree City]] until the team is defeated. | ||
This facility is used in {{game|Emerald}} to find Groudon and Kyogre after | This facility is used in {{game|Emerald}} to find Groudon and Kyogre after becoming {{pkmn|Champion}}. By speaking to the meteorologist inside, players will learn of unusual weather patterns in certain routes. If he says there is a drought, Groudon slumbers in the [[Terra Cave]]; if downpours are coming down, Kyogre awaits in the [[Marine Cave]]. If the {{player}} does not reach the cave fast enough, it will temporarily disappear and the other cave will appear. However, after defeating or catching one of the Pokémon, the other cave simply relocates if the player does not visit it fast enough. | ||
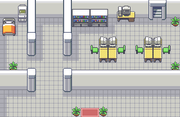
The Weather Institute has two accessible stories, both with many desks and computers. On the far left side of the bottom floor is a [[PC]] and bed which can heal the Pokémon in one's [[party]]. | The Weather Institute has two accessible stories, both with many desks and computers. On the far left side of the bottom floor is a [[PC]] and bed which can heal the Pokémon in one's [[party]]. | ||
===First floor=== | ===First floor=== | ||
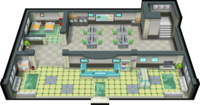
Upon entering, the first floor is accessible. By going west along the entrance hallway, there will be another opening to three rooms. The room on the western side is a rest area | Upon entering, the first floor is accessible. By going west along the entrance hallway, there will be another opening to three rooms. The room on the western side is a rest area that contains a [[PC]] and bed which can heal the Pokémon in a Trainer's [[party]]. | ||
The room on the eastern side is the research area where scientists work on projects and study weather patterns within the region. There are four workstations each containing a computer. There is also a computer positioned at the north side of the room, that will study and record all weather patterns within the [[Hoenn]] region. | The room on the eastern side is the research area where scientists work on projects and study weather patterns within the region. There are four workstations each containing a computer. There is also a computer positioned at the north side of the room, that will study and record all weather patterns within the [[Hoenn]] region. In the northwestern corner of the room, there are bookshelves crammed with books and there are plants scattered around the room. The stairs to the second floor is located in the northwestern corner of the room. | ||
====Vending Machine==== | |||
In [[Pokémon Omega Ruby and Alpha Sapphire]], there is a [[Vending machine|Vending Machine]] on the first floor of the institute. | |||
{{shop|}} | |||
{{shoprow|{{shopitem|Fresh Water|200}}|{{shopitem|Soda Pop|300}}}} | |||
{{shoprow|{{shopitem|Lemonade|350}}}} | |||
{{shopfooter}} | |||
===Second floor=== | ===Second floor=== | ||
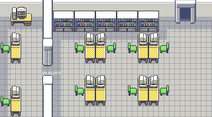
More workstations are located on this floor along with the head of the Weather Institute's office being up here. In total, there are ten | More workstations are located on this floor along with the head of the Weather Institute's office being up here. In total, there are ten workstations each containing a computer, one of them however is missing a chair. In the northwestern corner of the room, there are bookshelves crammed with books and there are plants scattered around the room. | ||
Right on the far western side of the room is the head of the Weather Institute's office. This is the location that [[Team Magma]]/[[Team Aqua]] rounded up the residents and scientists of the Weather Institute. | Right on the far western side of the room is the head of the Weather Institute's office. This is the location that [[Team Magma]]{{sup/3|R}}{{sup/6|OR}}/[[Team Aqua]]{{sup/3|S}}{{sup/3|E}}{{sup/6|AS}} rounded up the residents and scientists of the Weather Institute. | ||
Once the player defeats the villainous team and saves the Weather Institute, the professor of the institute will give the player a Castform, though in Ruby, Sapphire, Omega Ruby, and Alpha Sapphire, the player must have an empty slot in the party to obtain it. | |||
Once the player defeats the villainous team and saves the Weather Institute, the professor of the institute will give the player a Castform. | |||
==Items== | |||
{{itlisth|building}} | |||
{{Itemlist|Mystic Water|Held by {{p|Castform}}|Ru=yes|Sa=yes|E=yes|OR=yes|AS=yes}} | |||
{{Itemlist|Rocky Helmet|From a Scientist after defeating Team Magma{{sup/6|OR}}/Team Aqua{{sup/6|AS}}|OR=yes|AS=yes}} | |||
{{Itemlist|Icy Rock|From the receptionist after defeating Team Magma{{sup/6|OR}}/Team Aqua{{sup/6|AS}} or after receiving a Damp Rock ''(only one rock per day; remains available until received)''|OR=yes|AS=yes}} | |||
{{Itemlist|Smooth Rock|From the receptionist after receiving an Icy Rock ''(only one rock per day; remains available until received)''|OR=yes|AS=yes}} | |||
{{Itemlist|Heat Rock|From the receptionist after receiving a Smooth Rock ''(only one rock per day; remains available until received)''|OR=yes|AS=yes}} | |||
{{Itemlist|Damp Rock|From the receptionist after receiving a Heat Rock ''(only one rock per day; remains available until received)''|OR=yes|AS=yes}} | |||
{{itlistfoot|building}} | |||
==Pokémon== | ==Pokémon== | ||
===Generation III=== | |||
{{catch/header|building|no}} | {{catch/header|building|no}} | ||
{{catch/div|building|Gift Pokémon}} | {{catch/div|building|Gift Pokémon}} | ||
{{Catch/entry3|351|Castform|yes|yes|yes| | {{Catch/entry3|351|Castform|yes|yes|yes|Gift|25|One|type1=Normal}} | ||
{{catch/footer|building}} | |||
===Generation VI=== | |||
{{catch/header|building|no}} | |||
{{catch/div|building|Gift Pokémon}} | |||
{{Catch/entryoras|351|Castform|yes|yes|Gift|30|One|type1=Normal}} | |||
{{catch/footer|building}} | {{catch/footer|building}} | ||
| Line 44: | Line 66: | ||
===Pokémon Ruby=== | ===Pokémon Ruby=== | ||
{{trainerheader|building}} | {{trainerheader|building}} | ||
{{trainerdiv|building|1F}} | |||
{{trainerentry|Spr RS Team Magma Grunt F.png|Team Magma Grunt||560|1|322|Numel|♀|28|}} | {{trainerentry|Spr RS Team Magma Grunt F.png|Team Magma Grunt||560|1|322|Numel|♀|28|}} | ||
{{trainerdiv|building}} | {{trainerdiv|building}} | ||
{{trainerentry|Spr RS Team Magma Grunt M.png|Team Magma Grunt||540|2|041|Zubat|♂|27||261|Poochyena|♂|27}} | {{trainerentry|Spr RS Team Magma Grunt M.png|Team Magma Grunt||540|2|041|Zubat|♂|27||261|Poochyena|♂|27}} | ||
{{trainerdiv|building}} | {{trainerdiv|building|2F}} | ||
{{trainerentry|Spr RS Team Magma Grunt M.png|Team Magma Grunt||540|2|261|Poochyena|♂|27||322|Numel|♂|27}} | {{trainerentry|Spr RS Team Magma Grunt M.png|Team Magma Grunt||540|2|261|Poochyena|♂|27||322|Numel|♂|27}} | ||
{{trainerdiv|building}} | {{trainerdiv|building}} | ||
| Line 54: | Line 77: | ||
{{Party/Single | {{Party/Single | ||
|color={{ruby color | |color={{omega ruby color}} | ||
|bordercolor={{ruby color}} | |bordercolor={{omega ruby color dark}} | ||
|headcolor={{ | |headcolor={{omega ruby color light}} | ||
|sprite=Spr RS Courtney.png | |sprite=Spr RS Courtney.png | ||
|prize={{PDollar}}1120 | |prize={{PDollar}}1120 | ||
| Line 92: | Line 115: | ||
===Pokémon Sapphire=== | ===Pokémon Sapphire=== | ||
{{trainerheader|building}} | {{trainerheader|building}} | ||
{{trainerdiv|building|1F}} | |||
{{trainerentry|Spr RS Team Aqua Grunt F.png|Team Aqua Grunt||560|1|318|Carvanha|♀|28}} | {{trainerentry|Spr RS Team Aqua Grunt F.png|Team Aqua Grunt||560|1|318|Carvanha|♀|28}} | ||
{{trainerdiv|building}} | {{trainerdiv|building}} | ||
{{trainerentry|Spr RS Team Aqua Grunt M.png|Team Aqua Grunt||540|2|041|Zubat|♂|27||261|Poochyena|♂|27}} | {{trainerentry|Spr RS Team Aqua Grunt M.png|Team Aqua Grunt||540|2|041|Zubat|♂|27||261|Poochyena|♂|27}} | ||
{{trainerdiv|building}} | {{trainerdiv|building|2F}} | ||
{{trainerentry|Spr RS Team Aqua Grunt M.png|Team Aqua Grunt||540|2|261|Poochyena|♂|27||318|Carvanha|♂|27}} | {{trainerentry|Spr RS Team Aqua Grunt M.png|Team Aqua Grunt||540|2|261|Poochyena|♂|27||318|Carvanha|♂|27}} | ||
{{trainerdiv|building}} | {{trainerdiv|building}} | ||
| Line 102: | Line 126: | ||
{{Party/Single | {{Party/Single | ||
|color={{sapphire color | |color={{alpha sapphire color}} | ||
|headcolor={{ | |headcolor={{alpha sapphire color light}} | ||
|bordercolor={{sapphire color}} | |bordercolor={{alpha sapphire color dark}} | ||
|sprite=Spr RS Shelly.png | |sprite=Spr RS Shelly.png | ||
|prize={{PDollar}}1120 | |prize={{PDollar}}1120 | ||
| Line 140: | Line 164: | ||
===Pokémon Emerald=== | ===Pokémon Emerald=== | ||
{{trainerheader|building}} | {{trainerheader|building}} | ||
{{trainerdiv|building|1F}} | |||
{{trainerentry|Spr RS Team Aqua Grunt F.png|Team Aqua Grunt||560|1|318|Carvanha|♀|28}} | {{trainerentry|Spr RS Team Aqua Grunt F.png|Team Aqua Grunt||560|1|318|Carvanha|♀|28}} | ||
{{trainerdiv|building}} | {{trainerdiv|building}} | ||
{{trainerentry|Spr RS Team Aqua Grunt M.png|Team Aqua Grunt||540|2|041|Zubat|♂|27||261|Poochyena|♂|27}} | {{trainerentry|Spr RS Team Aqua Grunt M.png|Team Aqua Grunt||540|2|041|Zubat|♂|27||261|Poochyena|♂|27}} | ||
{{trainerdiv|building}} | {{trainerdiv|building|2F}} | ||
{{trainerentry|Spr RS Team Aqua Grunt M.png|Team Aqua Grunt||540<br/><small>Potential [[Double Battle]] with the | {{trainerentry|Spr RS Team Aqua Grunt M.png|Team Aqua Grunt||540<br/><small>Potential [[Double Battle]] with the following Grunt</small>|2|261|Poochyena|♂|27||318|Carvanha|♂|27}} | ||
{{trainerentry|Spr RS Team Aqua Grunt F.png|Team Aqua Grunt||540<br/><small>Potential [[Double Battle]] with the | {{trainerentry|Spr RS Team Aqua Grunt F.png|Team Aqua Grunt||540<br/><small>Potential [[Double Battle]] with the previous Grunt</small>|2|041|Zubat|♀|27||261|Poochyena|♀|27}} | ||
{{trainerdiv|building}} | {{trainerdiv|building}} | ||
{{trainerentry|Spr RS Team Aqua Grunt M.png|Team Aqua Grunt||520|3|261|Poochyena|♂|26||041|Zubat|♂|26||318|Carvanha|♂|26}} | {{trainerentry|Spr RS Team Aqua Grunt M.png|Team Aqua Grunt||520|3|261|Poochyena|♂|26||041|Zubat|♂|26||318|Carvanha|♂|26}} | ||
| Line 151: | Line 176: | ||
{{Party/Single | {{Party/Single | ||
|color={{sapphire color | |color={{alpha sapphire color}} | ||
|headcolor={{ | |headcolor={{alpha sapphire color light}} | ||
|bordercolor={{sapphire color}} | |bordercolor={{alpha sapphire color dark}} | ||
|sprite=Spr RS Shelly.png | |sprite=Spr RS Shelly.png | ||
|prize={{PDollar}}1120 | |prize={{PDollar}}1120 | ||
| Line 159: | Line 184: | ||
|name={{color2|000|Shelly}} | |name={{color2|000|Shelly}} | ||
|game=E | |game=E | ||
|location=Weather Institute| | |location=Weather Institute | ||
pokemon=2}} | |pokemon=2}} | ||
|{{Pokémon/3| | |{{Pokémon/3 | ||
ndex=318| | |ndex=318 | ||
pokemon=Carvanha| | |pokemon=Carvanha | ||
game=Emerald| | |game=Emerald | ||
gender=female| | |gender=female | ||
level=28| | |level=28 | ||
type1=Water| | |type1=Water|type2=Dark | ||
type2=Dark| | |ability=Rough Skin | ||
ability=Rough Skin| | |move1=Focus Energy|move1type=Normal | ||
move1=Focus Energy| | |move2=Scary Face|move2type=Normal | ||
move1type=Normal| | |move3=Crunch|move3type=Dark | ||
move2=Scary Face| | |move4=Screech|move4type=Normal}} | ||
move2type=Normal| | |{{Pokémon/3 | ||
move3=Crunch| | |ndex=262 | ||
move3type=Dark| | |pokemon=Mightyena | ||
move4=Screech| | |game=Emerald | ||
move4type=Normal}} | |gender=female | ||
|{{Pokémon/3| | |level=28 | ||
ndex=262| | |type1=Dark | ||
pokemon=Mightyena| | |ability=Intimidate | ||
game=Emerald| | |move1=Bite|move1type=Dark | ||
gender=female| | |move2=Odor Sleuth|move2type=Normal | ||
level=28| | |move3=Roar|move3type=Normal | ||
type1=Dark| | |move4=Swagger|move4type=Normal}} | ||
ability=Intimidate| | {{Party/Footer}} | ||
move1=Bite| | |||
move1type=Dark| | ===Pokémon Omega Ruby=== | ||
move2=Odor Sleuth| | {{trainerheader|building}} | ||
move2type=Normal| | {{trainerdiv|building|1F}} | ||
move3=Roar| | {{trainerentry|VSTeam Magma Grunt M.png{{!}}150px|game=6|Team Magma Grunt||1,160|2|262|Mightyena|♂|29||042|Golbat|♂|29}} | ||
move3type=Normal| | {{trainerdiv|building}} | ||
{{trainerentry|VSTeam Magma Grunt M.png{{!}}150px|game=6|Team Magma Grunt||1,200|1|109|Koffing|♂|30}} | |||
move4type=Normal}} | {{trainerdiv|building|2F}} | ||
{{trainerentry|VSTeam Magma Grunt M.png{{!}}150px|game=6|Team Magma Grunt||1,120|2|322|Numel|♂|28||262|Mightyena|♂|28}} | |||
{{trainerdiv|building}} | |||
{{trainerentry|VSTeam Magma Grunt F.png{{!}}150px|game=6|Team Magma Grunt||1,200|1|042|Golbat|♀|30}} | |||
{{trainerfooter|building|3}} | |||
{{Party/Single | |||
|color={{omega ruby color}} | |||
|bordercolor={{omega ruby color dark}} | |||
|headcolor={{omega ruby color light}} | |||
|sprite=VSTabitha.png | |||
|size=150px | |||
|prize={{pdollar}}3,200 | |||
|class=Magma Admin | |||
|name={{color2|000|Tabitha}} | |||
|game=OR | |||
|location=Weather Institute | |||
|pokemon=1}} | |||
|style="margin:auto" | {{Pokémon/6 | |||
|game=ORAS | |||
|ndex=323 | |||
|pokemon=Camerupt | |||
|gender=male | |||
|level=32 | |||
|type1=Fire|type2=Ground | |||
|ability=Solid Rock | |||
|move1=Lava Plume|move1type=Fire|move1cat=Special | |||
|move2=Earth Power|move2type=Ground|move2cat=Special | |||
|move3=Curse|move3type=Ghost|move3cat=Status | |||
|move4=Take Down|move4type=Normal|move4cat=Physical}} | |||
{{Party/Footer}} | |||
===Pokémon Alpha Sapphire=== | |||
{{trainerheader|building}} | |||
{{trainerdiv|building|1F}} | |||
{{trainerentry|VSTeam Aqua Grunt M.png{{!}}150px|game=6|Team Aqua Grunt||1,120|2|262|Mightyena|♂|28||042|Golbat|♂|28}} | |||
{{trainerdiv|building}} | |||
{{trainerentry|VSTeam Aqua Grunt M.png{{!}}150px|game=6|Team Aqua Grunt||1,200|1|088|Grimer|♂|30}} | |||
{{trainerdiv|building|2F}} | |||
{{trainerentry|VSTeam Aqua Grunt M.png{{!}}150px|game=6|Team Aqua Grunt||1,120|2|318|Carvanha|♂|28||262|Mightyena|♂|28}} | |||
{{trainerdiv|building}} | |||
{{trainerentry|VSTeam Aqua Grunt F.png{{!}}150px|game=6|Team Aqua Grunt||1,200|1|042|Golbat|♀|30}} | |||
{{trainerfooter|building|3}} | |||
{{Party/Single | |||
|color={{alpha sapphire color}} | |||
|headcolor={{alpha sapphire color light}} | |||
|bordercolor={{alpha sapphire color dark}} | |||
|sprite=VSShelly.png | |||
|size=150px | |||
|prize={{pdollar}}3,200 | |||
|class=Aqua Admin | |||
|name={{color2|000|Shelly}} | |||
|game=AS | |||
|location=Weather Institute | |||
|pokemon=1}} | |||
|style="margin:auto" | {{Pokémon/6 | |||
|game=ORAS | |||
|ndex=319 | |||
|pokemon=Sharpedo | |||
|gender=female | |||
|level=32 | |||
|type1=Water|type2=Dark | |||
|ability=Rough Skin | |||
|move1=Swagger|move1type=Normal|move1cat=Status | |||
|move2=Ice Fang|move2type=Ice|move2cat=Physical | |||
|move3=Scary Face|move3type=Normal|move3cat=Status | |||
|move4=Slash|move4type=Normal|move4cat=Physical}} | |||
{{Party/Footer}} | {{Party/Footer}} | ||
==Layout== | ==Layout== | ||
{| class="roundy" style="margin:auto; background: #000; border: 3px solid #{{locationcolor/dark|building}}" | {| class="roundy" style="margin:auto; text-align:center; background: #000; border: 3px solid #{{locationcolor/dark|building}}" | ||
|- | |- | ||
! style="background:#{{locationcolor/light|building}}; {{roundytl|5px}}" | Version | ! style="background:#{{locationcolor/light|building}}; {{roundytl|5px}}" | Version | ||
! style="background:#{{locationcolor/light|building}}" | | ! style="background:#{{locationcolor/light|building}}" | Exterior | ||
! style="background:#{{locationcolor/light|building}}; {{roundytr|5px}}" | | ! style="background:#{{locationcolor/light|building}}" | 1F | ||
! style="background:#{{locationcolor/light|building}}; {{roundytr|5px}}" | 2F | |||
|- | |- | ||
! style="background:#{{ruby color}}" | {{color2|fff|Pokémon Ruby and Sapphire Versions|Ruby}} | ! style="background:#{{ruby color}}" | {{color2|fff|Pokémon Ruby and Sapphire Versions|Ruby}} | ||
| rowspan="2" | [[File:Weather Institute RS.png|140px]] | |||
| rowspan="3" | [[File:Weather Institute 1F RSE.png|180px]] | | rowspan="3" | [[File:Weather Institute 1F RSE.png|180px]] | ||
| rowspan="3" | [[File:Weather Institute 2F RSE.png|212px]] | | rowspan="3" | [[File:Weather Institute 2F RSE.png|212px]] | ||
| Line 209: | Line 303: | ||
! style="background:#{{sapphire color}}" | {{color2|fff|Pokémon Ruby and Sapphire Versions|Sapphire}} | ! style="background:#{{sapphire color}}" | {{color2|fff|Pokémon Ruby and Sapphire Versions|Sapphire}} | ||
|- | |- | ||
! style="background:#{{emerald color}}" | {{color2| | ! style="background:#{{emerald color}}" | {{color2|fff|Pokémon Emerald Version|Emerald}} | ||
| [[File:Weather Institute E.png|140px]] | |||
|- | |||
! style="background:#{{omega ruby color}}" | {{color2|fff|Pokémon Omega Ruby and Alpha Sapphire|Omega Ruby}} | |||
| rowspan="2" | [[File:Weather Institute ORAS.png|200px]] | |||
| rowspan="2" | [[File:Weather Institute 1F ORAS.png|200px]] | |||
| rowspan="2" | [[File:Weather Institute 2F ORAS.png|200px]] | |||
|- | |||
! style="background:#{{alpha sapphire color}}" | {{color2|fff|Pokémon Omega Ruby and Alpha Sapphire|Alpha Sapphire}} | |||
|- | |- | ||
| colspan=" | | colspan="4" style="background:#{{locationcolor/light|building}}; {{roundybottom|5px}}" | | ||
|} | |} | ||
==In the anime== | ==In the anime== | ||
===Main series=== | |||
[[File:Weather Institute anime. | [[File:Weather Institute anime.png|thumb|250px|The Weather Institute in the {{pkmn|anime}}]] | ||
The Weather Institute appeared in ''[[AG083|Unfair Weather Friends]]'', where {{Ash}} and {{ashfr}} visited it and got caught up in a takeover by [[Team Aqua]]. Team Aqua planned to steal all of the facility's data on weather and ancient Pokémon, but their plan was stopped by a disguised [[Team Magma]] member named [[Brodie]], who escaped with the data himself. | |||
[[Bart]] is the manager of the Weather Institute, which employs several scientists, including [[Millie]]. The facility contains multiple rooms with many different machines. A weather data machine stores data like temperature and weather patterns on a large computer so the employees can do tests and experiments later. There is also a huge satellite outside the institute, called the Weather Control Machine, which can manipulate the weather. The Weather Institute has archived hard copies of its research, which act as a backup if the main computer system goes down. | |||
{{-}} | |||
===Pokémon Generations=== | |||
[[File:Weather Institute PG.png|thumb|250px|The Weather Institute in [[Pokémon Generations]]]] | |||
The Weather Institute appeared along with {{rt|119|Hoenn}} in ''[[PG01|The Adventure]]'', where [[Red's Pikachu]] was seen battling a {{p|Vigoroth}} outside of the building. | |||
The inside of the Weather Institute briefly appeared in a flashback in ''[[PG08|The Cavern]]''. [[Team Aqua]] was revealed to have taken over the Institute, restraining the Scientists inside and allowing [[Shelly]] to conduct research on the effects of [[Primal Reversion|Primal]] {{p|Kyogre}} on the weather of [[Hoenn]]. | |||
{{-}} | |||
==In the manga== | ==In the manga== | ||
=== | [[File:Weather Institute Adventures.png|thumb|250px|Weather Institute in [[Pokémon Adventures]]]] | ||
{{adv|Ruby}} | ===Pokémon Adventures=== | ||
===={{MangaArc|Ruby & Sapphire}}==== | |||
Weather Institute appeared from ''[[PS208|On the Loose and Hyper With Zangoose and Seviper II]]'' to ''[[PS211|Hanging Around With Slaking III]]''. In this [[canon]], it is an abandoned building that {{adv|Ruby}} and {{tc|Swimmer}} {{adv|Jack}} fled to after being attacked by a {{pkmn2|wild}} {{p|Zangoose}} and {{p|Seviper}}, only for Ruby to be confronted by his father [[Norman]], who had come to take him home after he had run away to participate in {{pkmn|Contest}}s. As they battled, [[Gabby and Ty]] also arrived at the site with [[Mr. Stone]]'s {{p|Castform}}. | |||
Eventually, both Ruby and Norman fell off the side of the building, but were saved by a combination of [[Feefee|Ruby's Feebas]]'s {{m|Light Screen}} and Ruby's [[Running Shoes]], which Norman had given to him as a gift. After surviving the fall, Ruby fainted, and Norman was approached by [[Flannery]] and [[Winona]], who had come to take him back to the [[Petalburg Gym]], which he had left unattended without permission. Having no other choice, Norman left with them, telling his unconcious son to realize his dream of winning every Contest. Gabby and Ty also allowed [[Fofo|Castform]] to stay with Ruby, as it had taken a liking to him, and took him to [[Verdanturf Town]]. | |||
{{-}} | |||
==Trivia== | ==Trivia== | ||
* A woman | * A woman on {{rt|212|Sinnoh}} west of [[Pastoria City]] in [[Sinnoh]] says she used to work at the Weather Institute of Hoenn. She will trade [[TM]]s of weather-changing moves for [[shard]]s. | ||
==In other languages== | ==In other languages== | ||
{{Langtable|color={{locationcolor/light|building}}|bordercolor={{locationcolor/dark|building}} | {{Langtable|color={{locationcolor/light|building}}|bordercolor={{locationcolor/dark|building}} | ||
|zh_yue=天氣研究所 ''{{tt|Tīnhei Yìhngausó|Weather Institute}}'' {{tt|*|Anime}}<br>氣象研究所 ''{{tt|Heijeuhng Yìhngausó|Weather Institute}}'' {{tt|*|Manga}} | |||
|zh_cmn=天氣研究所 ''{{tt|Tiānqì Yánjiūsuǒ|Weather Institute}}'' {{tt|*|Taiwan}}<br>气象研究所 ''{{tt|Qìxiàng Yánjiūsuǒ|Weather Institute}}'' {{tt|*|Mainland China}} | |||
|fi=Sääinstituutti | |fi=Sääinstituutti | ||
| | |fr=Centre Météo | ||
|de=Klima-Institut | |de=Klima-Institut | ||
|it=Istituto Meteo | |it=Istituto Meteo | ||
|ko=날씨 연구소 ''Nalssi Yeonguso'' | |ko=날씨 연구소 ''Nalssi Yeonguso'' | ||
|es_eu=Instituto Meteorológico}} | |pt_br=Laboratório de Meteorologia (manga)<br>Instituto de Meteorologia ([[PG08]], [[PS208]])<br>Instituto Meteorológico ([[PG01]]) | ||
|es_la=Instituto del Clima | |||
|es_eu=Instituto Meteorológico | |||
|vi=Viện nghiên cứu khí tượng | |||
}} | |||
==See also== | ==See also== | ||
| Line 245: | Line 366: | ||
{{Project Locations notice}} | {{Project Locations notice}} | ||
[[Category:Hoenn locations | [[Category:Hoenn locations]] | ||
[[Category:Ruby and Sapphire locations]] | [[Category:Ruby and Sapphire locations]] | ||
[[Category:Emerald locations]] | [[Category:Emerald locations]] | ||
[[Category:Omega Ruby and Alpha Sapphire locations]] | |||
[[Category:Research centers]] | [[Category:Research centers]] | ||
[[de: | [[de:Klima-Institut]] | ||
[[es:Instituto Meteorológico]] | |||
[[fr:Centre Météo]] | [[fr:Centre Météo]] | ||
[[it:Istituto Meteo]] | [[it:Istituto Meteo]] | ||
[[ja:てんきけんきゅうじょ]] | [[ja:てんきけんきゅうじょ]] | ||
[[zh:天气研究所]] | [[zh:天气研究所]] | ||
Latest revision as of 08:15, 16 August 2024
| ||||
| ||||
| Location: | Route 119, West of Fortree City | |||
|---|---|---|---|---|
| Region: | Hoenn | |||
| Generations: | III, VI | |||
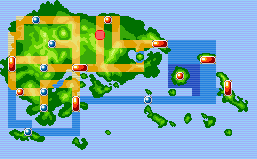 Location of Weather Institute in Hoenn. | ||||
| Pokémon world locations | ||||
The Weather Institute (Japanese: 天気研究所 Weather Institute) is a weather research building located on Route 119 in the region of Hoenn, in Pokémon Ruby, Sapphire, and Emerald, and Omega Ruby and Alpha Sapphire.
The Weather Institute is like a bureau for the Hoenn region. It checks and keeps track of weather conditions throughout Hoenn. The Weather Institute has created an artificial Pokémon named Castform, which has the ability to predict the weather and its conditions on a specific location. Its main project is the weather control machine which allows them to change the weather in certain areas.
Geography
On the first trip through Route 119, the player will find that Team AquaSEAS or Team MagmaROR have invaded the Institute, looking for information about Kyogre or Groudon, respectively, and the rare Pokémon, Castform. The team has also blockaded the bridge just outside the Institute, preventing access to Fortree City until the team is defeated.
This facility is used in Pokémon Emerald to find Groudon and Kyogre after becoming Champion. By speaking to the meteorologist inside, players will learn of unusual weather patterns in certain routes. If he says there is a drought, Groudon slumbers in the Terra Cave; if downpours are coming down, Kyogre awaits in the Marine Cave. If the player does not reach the cave fast enough, it will temporarily disappear and the other cave will appear. However, after defeating or catching one of the Pokémon, the other cave simply relocates if the player does not visit it fast enough.
The Weather Institute has two accessible stories, both with many desks and computers. On the far left side of the bottom floor is a PC and bed which can heal the Pokémon in one's party.
First floor
Upon entering, the first floor is accessible. By going west along the entrance hallway, there will be another opening to three rooms. The room on the western side is a rest area that contains a PC and bed which can heal the Pokémon in a Trainer's party.
The room on the eastern side is the research area where scientists work on projects and study weather patterns within the region. There are four workstations each containing a computer. There is also a computer positioned at the north side of the room, that will study and record all weather patterns within the Hoenn region. In the northwestern corner of the room, there are bookshelves crammed with books and there are plants scattered around the room. The stairs to the second floor is located in the northwestern corner of the room.
Vending Machine
In Pokémon Omega Ruby and Alpha Sapphire, there is a Vending Machine on the first floor of the institute.
|
| ||||||
|
|||||||
Second floor
More workstations are located on this floor along with the head of the Weather Institute's office being up here. In total, there are ten workstations each containing a computer, one of them however is missing a chair. In the northwestern corner of the room, there are bookshelves crammed with books and there are plants scattered around the room.
Right on the far western side of the room is the head of the Weather Institute's office. This is the location that Team MagmaROR/Team AquaSEAS rounded up the residents and scientists of the Weather Institute.
Once the player defeats the villainous team and saves the Weather Institute, the professor of the institute will give the player a Castform, though in Ruby, Sapphire, Omega Ruby, and Alpha Sapphire, the player must have an empty slot in the party to obtain it.
Items
| Item | Location | Games | |
|---|---|---|---|
| Mystic Water | Held by Castform | R S E OR AS | |
| Rocky Helmet | From a Scientist after defeating Team MagmaOR/Team AquaAS | OR AS | |
| Icy Rock | From the receptionist after defeating Team MagmaOR/Team AquaAS or after receiving a Damp Rock (only one rock per day; remains available until received) | OR AS | |
| Smooth Rock | From the receptionist after receiving an Icy Rock (only one rock per day; remains available until received) | OR AS | |
| Heat Rock | From the receptionist after receiving a Smooth Rock (only one rock per day; remains available until received) | OR AS | |
| Damp Rock | From the receptionist after receiving a Heat Rock (only one rock per day; remains available until received) | OR AS | |
Pokémon
Generation III
| Pokémon | Games | Location | Levels | Rate | |||||||||||
|---|---|---|---|---|---|---|---|---|---|---|---|---|---|---|---|
| Gift Pokémon | |||||||||||||||
|
R | S | E |
|
25 | One | |||||||||
| A colored background means that the Pokémon can be found in this location in the specified game. A white background with a colored letter means that the Pokémon cannot be found here. | |||||||||||||||
Generation VI
| Pokémon | Games | Location | Levels | Rate | ||||||||||||
|---|---|---|---|---|---|---|---|---|---|---|---|---|---|---|---|---|
| Gift Pokémon | ||||||||||||||||
|
OR | AS |
|
30 | One | |||||||||||
| A colored background means that the Pokémon can be found in this location in the specified game. A white background with a colored letter means that the Pokémon cannot be found here. | ||||||||||||||||
Trainers
Pokémon Ruby
| Trainer | Pokémon | |||||||||||
|---|---|---|---|---|---|---|---|---|---|---|---|---|
| 1F | ||||||||||||
|
| |||||||||||
|
| |||||||||||
| ||||||||||||
| 2F | ||||||||||||
|
| |||||||||||
| ||||||||||||
|
| |||||||||||
| ||||||||||||
| ||||||||||||
| Trainers with a PokéNav by their names will be registered in the Trainer's Eyes or Match Call function after the first battle, and may have a rematch with the player with higher-level Pokémon. | ||||||||||||
|
|||||||||||||||||||||||||||||||||||||||||||||||||||||
| |||||||||||||||||||||||||||||||||||||||||||||||||||||
Pokémon Sapphire
| Trainer | Pokémon | |||||||||||
|---|---|---|---|---|---|---|---|---|---|---|---|---|
| 1F | ||||||||||||
|
| |||||||||||
|
| |||||||||||
| ||||||||||||
| 2F | ||||||||||||
|
| |||||||||||
| ||||||||||||
|
| |||||||||||
| ||||||||||||
| ||||||||||||
| Trainers with a PokéNav by their names will be registered in the Trainer's Eyes or Match Call function after the first battle, and may have a rematch with the player with higher-level Pokémon. | ||||||||||||
|
|||||||||||||||||||||||||||||||||||||||||||||||||||||
| |||||||||||||||||||||||||||||||||||||||||||||||||||||
Pokémon Emerald
| Trainer | Pokémon | |||||||||||
|---|---|---|---|---|---|---|---|---|---|---|---|---|
| 1F | ||||||||||||
|
| |||||||||||
|
| |||||||||||
| ||||||||||||
| 2F | ||||||||||||
|
| |||||||||||
| ||||||||||||
|
| |||||||||||
| ||||||||||||
|
| |||||||||||
| ||||||||||||
| ||||||||||||
| Trainers with a PokéNav by their names will be registered in the Trainer's Eyes or Match Call function after the first battle, and may have a rematch with the player with higher-level Pokémon. | ||||||||||||
|
|||||||||||||||||||||||||||||||||||||||||||||||||||||
| |||||||||||||||||||||||||||||||||||||||||||||||||||||
Pokémon Omega Ruby
| Trainer | Pokémon | |||||||||||
|---|---|---|---|---|---|---|---|---|---|---|---|---|
| 1F | ||||||||||||
|
| |||||||||||
| ||||||||||||
|
| |||||||||||
| 2F | ||||||||||||
|
| |||||||||||
| ||||||||||||
|
| |||||||||||
| Trainers with a PokéNav by their names will be registered in the Trainer's Eyes or Match Call function after the first battle, and may have a rematch with the player with higher-level Pokémon. | ||||||||||||
|
||||||||||||||||||||||||||||||||||||
| ||||||||||||||||||||||||||||||||||||
Pokémon Alpha Sapphire
| Trainer | Pokémon | |||||||||||
|---|---|---|---|---|---|---|---|---|---|---|---|---|
| 1F | ||||||||||||
|
| |||||||||||
| ||||||||||||
|
| |||||||||||
| 2F | ||||||||||||
|
| |||||||||||
| ||||||||||||
|
| |||||||||||
| Trainers with a PokéNav by their names will be registered in the Trainer's Eyes or Match Call function after the first battle, and may have a rematch with the player with higher-level Pokémon. | ||||||||||||
|
||||||||||||||||||||||||||||||||||||
| ||||||||||||||||||||||||||||||||||||
Layout
| Version | Exterior | 1F | 2F |
|---|---|---|---|
| Ruby | 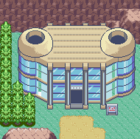
|
|
|
| Sapphire | |||
| Emerald | 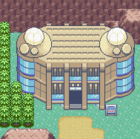
| ||
| Omega Ruby | 
|
|

|
| Alpha Sapphire | |||
In the anime
Main series

The Weather Institute appeared in Unfair Weather Friends, where Ash and his friends visited it and got caught up in a takeover by Team Aqua. Team Aqua planned to steal all of the facility's data on weather and ancient Pokémon, but their plan was stopped by a disguised Team Magma member named Brodie, who escaped with the data himself.
Bart is the manager of the Weather Institute, which employs several scientists, including Millie. The facility contains multiple rooms with many different machines. A weather data machine stores data like temperature and weather patterns on a large computer so the employees can do tests and experiments later. There is also a huge satellite outside the institute, called the Weather Control Machine, which can manipulate the weather. The Weather Institute has archived hard copies of its research, which act as a backup if the main computer system goes down.
Pokémon Generations

The Weather Institute appeared along with Route 119 in The Adventure, where Red's Pikachu was seen battling a Vigoroth outside of the building.
The inside of the Weather Institute briefly appeared in a flashback in The Cavern. Team Aqua was revealed to have taken over the Institute, restraining the Scientists inside and allowing Shelly to conduct research on the effects of Primal Kyogre on the weather of Hoenn.
In the manga

Pokémon Adventures
Ruby & Sapphire arc
Weather Institute appeared from On the Loose and Hyper With Zangoose and Seviper II to Hanging Around With Slaking III. In this canon, it is an abandoned building that Ruby and Swimmer Jack fled to after being attacked by a wild Zangoose and Seviper, only for Ruby to be confronted by his father Norman, who had come to take him home after he had run away to participate in Contests. As they battled, Gabby and Ty also arrived at the site with Mr. Stone's Castform.
Eventually, both Ruby and Norman fell off the side of the building, but were saved by a combination of Ruby's Feebas's Light Screen and Ruby's Running Shoes, which Norman had given to him as a gift. After surviving the fall, Ruby fainted, and Norman was approached by Flannery and Winona, who had come to take him back to the Petalburg Gym, which he had left unattended without permission. Having no other choice, Norman left with them, telling his unconcious son to realize his dream of winning every Contest. Gabby and Ty also allowed Castform to stay with Ruby, as it had taken a liking to him, and took him to Verdanturf Town.
Trivia
- A woman on Route 212 west of Pastoria City in Sinnoh says she used to work at the Weather Institute of Hoenn. She will trade TMs of weather-changing moves for shards.
In other languages
| |||||||||||||||||||||||||||||||||||||
See also

|
This article is part of Project Locations, a Bulbapedia project that aims to write comprehensive articles on every location in the Pokémon world. |
