Appendix:X and Y walkthrough/Section 17: Difference between revisions
| (10 intermediate revisions by 7 users not shown) | |||
| Line 5: | Line 5: | ||
[[File:Sea Spirit's Den XY.png|thumb|Sea Spirit's Den]] | [[File:Sea Spirit's Den XY.png|thumb|Sea Spirit's Den]] | ||
The first wild Pokémon you encounter after becoming the new Champion will be one of three legendary bird Pokémon from the far-off [[Kanto]] region. Only one has been spotted in [[Kalos]], and the one that appears depends on your starter Pokémon. However, the bird will flee immediately after the battle begins, and begin roaming the region. After the first encounter, the Pokédex is able to track its location. After encountering the Pokémon eleven different times, it will travel to the [[Sea Spirit's Den]] in [[Azure Bay]], where you finally have a chance to capture it. Consider stocking up on | The first wild Pokémon you encounter after meeting Professor Sycamore in Lumoise Station (after becoming the new Champion) will be one of three legendary bird Pokémon from the far-off [[Kanto]] region. Only one has been spotted in [[Kalos]], and the one that appears depends on your starter Pokémon. However, the bird will flee immediately after the battle begins, and begin roaming the region. After the first encounter, the Pokédex is able to track its location. After encountering the Pokémon eleven different times, it will travel to the [[Sea Spirit's Den]] in [[Azure Bay]], where you finally have a chance to capture it. Consider stocking up on [[Ultra Ball]]s, [[Dusk Ball]]s, [[Quick Ball]]s, or [[Timer Ball]]s for this battle. | ||
{| style="margin: auto; text-align: center; background: #{{locationcolor/med|cave}}; {{roundy}}; border: 3px solid #{{locationcolor/dark|cave}};" cellpadding="3" | {| style="margin: auto; text-align: center; background: #{{locationcolor/med|cave}}; {{roundy}}; border: 3px solid #{{locationcolor/dark|cave}};" cellpadding="3" | ||
| Line 12: | Line 12: | ||
! colspan="2" style="background: #{{locationcolor/light|cave}}; {{roundytr|5px}};" | Legendary | ! colspan="2" style="background: #{{locationcolor/light|cave}}; {{roundytr|5px}};" | Legendary | ||
|- style="background: #FFF;" | |- style="background: #FFF;" | ||
| {{MSP|650|Chespin}} || {{p|Chespin}} || {{MSP|144|Articuno}} || {{p|Articuno}} | | {{MSP/6|650|Chespin}} || {{p|Chespin}} || {{MSP/6|144|Articuno}} || {{p|Articuno}} | ||
|- style="background: #FFF;" | |- style="background: #FFF;" | ||
| {{MSP|653|Fennekin}} || {{p|Fennekin}} || {{MSP|145|Zapdos}} || {{p|Zapdos}} | | {{MSP/6|653|Fennekin}} || {{p|Fennekin}} || {{MSP/6|145|Zapdos}} || {{p|Zapdos}} | ||
|- | |- | ||
| style="background: #FFF; {{roundybl|5px}};" | {{MSP|656|Froakie}} | | style="background: #FFF; {{roundybl|5px}};" | {{MSP/6|656|Froakie}} | ||
| style="background: #FFF;" | {{p|Froakie}} | | style="background: #FFF;" | {{p|Froakie}} | ||
| style="background: #FFF;" | {{MSP|146|Moltres}} | | style="background: #FFF;" | {{MSP/6|146|Moltres}} | ||
| style="background: #FFF; {{roundybr|5px}};" | {{p|Moltres}} | | style="background: #FFF; {{roundybr|5px}};" | {{p|Moltres}} | ||
|} | |} | ||
| Line 64: | Line 64: | ||
}} | }} | ||
|} | |} | ||
==Pokémon Village== | ==Pokémon Village== | ||
| Line 76: | Line 75: | ||
| | | | ||
{{itlisth|cave}} | {{itlisth|cave}} | ||
{{itemlist|Oval Stone|On a rock on the cave's west side (hidden)|X=yes|y=yes | {{itemlist|Oval Stone|On a rock on the cave's west side (hidden, reappears occasionally)|X=yes|y=yes}} | ||
{{itemlist|Mewtwonite X|Found after capturing Mewtwo|X=yes|y=no | {{itemlist|Mewtwonite X|Found after capturing Mewtwo|X=yes|y=no}} | ||
{{itemlist|Mewtwonite Y|Found after capturing Mewtwo|X=no|y=yes | {{itemlist|Mewtwonite Y|Found after capturing Mewtwo|X=no|y=yes}} | ||
{{itlistfoot|cave}} | {{itlistfoot|cave}} | ||
|} | |} | ||
Mewtwo excels in Special Attack and Speed. Start off with {{t|Bug}}-, {{t|Ghost}}-, or {{type|Dark}} moves to weaken it quickly before following up with {{t|Fighting}} and {{t|Psychic}} attacks. Since it can restore its health with {{m|Recover}}, consider using status-inflicting moves like {{m|Spore}} or {{m|Thunder Wave}} to restrict its use. Alternatively, you could simply use the | Mewtwo excels in Special Attack and Speed. Start off with {{t|Bug}}-, {{t|Ghost}}-, or {{type|Dark}} moves to weaken it quickly before following up with {{t|Fighting}} and {{t|Psychic}} attacks. Since it can restore its health with {{m|Recover}}, consider using status-inflicting moves like {{m|Spore}} or {{m|Thunder Wave}} to restrict its use. Alternatively, you could simply use the [[Master Ball]] you received in the [[Poké Ball Factory]]. | ||
{| style="margin: auto;" | {| style="margin: auto;" | ||
| Line 98: | Line 97: | ||
}} | }} | ||
|} | |} | ||
==Route 18== | ==Route 18== | ||
| Line 116: | Line 114: | ||
{{trainerheader|cave}} | {{trainerheader|cave}} | ||
{{catch/div|cave|B1F}} | {{catch/div|cave|B1F}} | ||
{{Trainerentry|VSWorker A.png{{!}}150px|Worker|Narek|3,072|3|075|Graveler|♂|46|None|075|Graveler|♂|47|None|076|Golem|♂|48|None}} | {{Trainerentry|game=6|VSWorker A.png{{!}}150px|Worker|Narek|3,072|3|075|Graveler|♂|46|None|075|Graveler|♂|47|None|076|Golem|♂|48|None}} | ||
{{trainerdiv|cave}} | {{trainerdiv|cave}} | ||
{{Trainerentry|VSHiker.png{{!}}150px|Hiker|Aaron|2,800|1|112|Rhydon|♂|50|None}} | {{Trainerentry|game=6|VSHiker.png{{!}}150px|Hiker|Aaron|2,800|1|112|Rhydon|♂|50|None}} | ||
{{trainerdiv|cave}} | {{trainerdiv|cave}} | ||
{{Trainerentry|VSHiker.png{{!}}150px|Hiker|Bergin|2,688|2|525|Boldore|♂|48|None|208|Steelix|♂|48|None}} | {{Trainerentry|game=6|VSHiker.png{{!}}150px|Hiker|Bergin|2,688|2|525|Boldore|♂|48|None|208|Steelix|♂|48|None}} | ||
{{trainerdiv|cave}} | {{trainerdiv|cave}} | ||
{{Trainerentry|VSWorker A.png{{!}}150px|Worker|Dimitri|3,200|1|224|Octillery|♂|50|None}} | {{Trainerentry|game=6|VSWorker A.png{{!}}150px|Worker|Dimitri|3,200|1|224|Octillery|♂|50|None}} | ||
{{trainerdiv|cave}} | {{trainerdiv|cave}} | ||
{{Trainerentry|VSWorker B.png{{!}}150px|Worker|Yusif|3,200|1|476|Probopass|♂|50|None}} | {{Trainerentry|game=6|VSWorker B.png{{!}}150px|Worker|Yusif|3,200|1|476|Probopass|♂|50|None}} | ||
{{catch/div|cave|B2F}} | {{catch/div|cave|B2F}} | ||
{{Trainerentry|VSBattle Girl.png{{!}}150px|Battle Girl|Andrea|2,400|2|538|Throh|♂|49|None|534|Conkeldurr|♂|50|None}} | {{Trainerentry|game=6|VSBattle Girl.png{{!}}150px|Battle Girl|Andrea|2,400|2|538|Throh|♂|49|None|534|Conkeldurr|♂|50|None}} | ||
{{trainerdiv|cave}} | {{trainerdiv|cave}} | ||
{{Trainerentry|VSBlack Belt.png{{!}}150px|Black Belt|Gunnar|2,400|2|454|Toxicroak|♂|49|None|539|Sawk|♂|50|None}} | {{Trainerentry|game=6|VSBlack Belt.png{{!}}150px|Black Belt|Gunnar|2,400|2|454|Toxicroak|♂|49|None|539|Sawk|♂|50|None}} | ||
{{trainerdiv|cave}} | {{trainerdiv|cave}} | ||
{{Trainerentry|VSBattle Girl.png{{!}}150px|Battle Girl|Hailey|2,448|2|308|Medicham|♀|48|None|701|Hawlucha|♀|51|None}} | {{Trainerentry|game=6|VSBattle Girl.png{{!}}150px|Battle Girl|Hailey|2,448|2|308|Medicham|♀|48|None|701|Hawlucha|♀|51|None}} | ||
{{trainerdiv|cave}} | {{trainerdiv|cave}} | ||
{{Trainerentry|VSBlack Belt.png{{!}}150px|Black Belt|Ricardo|2,496|1|297|Hariyama|♂|52|None}} | {{Trainerentry|game=6|VSBlack Belt.png{{!}}150px|Black Belt|Ricardo|2,496|1|297|Hariyama|♂|52|None}} | ||
{{trainerdiv|cave}} | {{trainerdiv|cave}} | ||
{{Trainerentry|VSRangers.png{{!}}150px|Rangers|Fern & Lee|8,160|2|031|Nidoqueen|♀|51|None|034|Nidoking|♂|51|None}} | {{Trainerentry|game=6|VSRangers.png{{!}}150px|Rangers|Fern & Lee|8,160|2|031|Nidoqueen|♀|51|None|034|Nidoking|♂|51|None}} | ||
{{trainerfooter|cave|6}} | {{trainerfooter|cave|6}} | ||
|} | |} | ||
| Line 170: | Line 168: | ||
{{itlisth|cave}} | {{itlisth|cave}} | ||
{{catch/div|cave|{{tt|Small Chamber 1|Lower entrance on Route 18, near Black Belt Yanis}}}} | {{catch/div|cave|{{tt|Small Chamber 1|Lower entrance on Route 18, near Black Belt Yanis}}}} | ||
{{itemlist|Dragon Scale|On the sunken part of the floor (requires {{m|Rock Smash}})|X=yes|y=yes | {{itemlist|Dragon Scale|On the sunken part of the floor (requires {{m|Rock Smash}})|X=yes|y=yes}} | ||
{{itemlist|Normal Gem|On a stalagmite near the rear wall (hidden, requires {{m|Rock Smash}})|X=yes|y=yes | {{itemlist|Normal Gem|On a stalagmite near the rear wall (hidden, requires {{m|Rock Smash}})|X=yes|y=yes}} | ||
{{catch/div|cave|{{tt|Small Chamber 2|East of the elevated mine cart tracks}}}} | {{catch/div|cave|{{tt|Small Chamber 2|East of the elevated mine cart tracks}}}} | ||
{{itemlist|TM Fighting|On the sunken part of the floor|X=yes|y=yes|display={{TM|31|Brick Break}}}} | {{itemlist|TM Fighting|On the sunken part of the floor|X=yes|y=yes|display={{TM|31|Brick Break}}}} | ||
{{catch/div|cave|B1F}} | {{catch/div|cave|B1F}} | ||
{{itemlist|Star Piece|East of the eastern bridge (requires {{m|Rock Smash}})|X=yes|y=yes | {{itemlist|Star Piece|East of the eastern bridge (requires {{m|Rock Smash}})|X=yes|y=yes}} | ||
{{itemlist|Dusk Ball|On a rock, southwest of the two western ledges (hidden)|X=yes|y=yes | {{itemlist|Dusk Ball|On a rock, southwest of the two western ledges (hidden)|X=yes|y=yes}} | ||
{{itemlist|Hyper Potion|On a rock, northwest of the western bridge (hidden)|X=yes|y=yes | {{itemlist|Hyper Potion|On a rock, northwest of the western bridge (hidden)|X=yes|y=yes}} | ||
{{itemlist|Heat Rock|Southwest corner (requires {{m|Rock Smash}})|X=yes|y=yes | {{itemlist|Heat Rock|Southwest corner (requires {{m|Rock Smash}})|X=yes|y=yes}} | ||
{{itemlist|Escape Rope|On a hill, northwest of Hiker Bergin|X=yes|y=yes}} | {{itemlist|Escape Rope|On a hill, northwest of Hiker Bergin|X=yes|y=yes}} | ||
{{itemlist|Moon Stone|In the wall, north of Worker Dimitri (hidden, requires {{m|Rock Smash}})|X=yes|y=yes | {{itemlist|Moon Stone|In the wall, north of Worker Dimitri (hidden, requires {{m|Rock Smash}})|X=yes|y=yes}} | ||
{{itemlist|Max Repel|On a stalagmite, northeast of Worker Yusif (hidden)|X=yes|y=yes | {{itemlist|Max Repel|On a stalagmite, northeast of Worker Yusif (hidden)|X=yes|y=yes}} | ||
{{itemlist|Reaper Cloth|East of Worker Yusif, between two ledges|X=yes|y=yes | {{itemlist|Reaper Cloth|East of Worker Yusif, between two ledges|X=yes|y=yes}} | ||
{{catch/div|cave|B2F}} | {{catch/div|cave|B2F}} | ||
{{itemlist|Iron|On a stalagmite near the southwest corner (hidden)|X=yes|y=yes | {{itemlist|Iron|On a stalagmite near the southwest corner (hidden)|X=yes|y=yes}} | ||
{{itemlist|Dusk Stone|Southwest corner|X=yes|y=yes | {{itemlist|Dusk Stone|Southwest corner|X=yes|y=yes}} | ||
{{itemlist|X Attack|Northwest corner|X=yes|y=yes | {{itemlist|X Attack|Northwest corner|X=yes|y=yes}} | ||
{{itemlist|Elixir|North-central area, past Battle Girl Hailey (requires {{m|Rock Smash}})|X=yes|y=yes | {{itemlist|Elixir|North-central area, past Battle Girl Hailey (requires {{m|Rock Smash}})|X=yes|y=yes}} | ||
{{itemlist|Full Heal|East-central area|X=yes|y=yes | {{itemlist|Full Heal|East-central area|X=yes|y=yes}} | ||
{{itemlist|TM Ghost|Near the mine cart in the center (requires {{m|Rock Smash}})|X=yes|y=yes|display={{TM|30|Shadow Ball}}}} | {{itemlist|TM Ghost|Near the mine cart in the center (requires {{m|Rock Smash}})|X=yes|y=yes|display={{TM|30|Shadow Ball}}}} | ||
{{itemlist|Max Potion|Southeast of the mine cart (hidden, requires {{m|Rock Smash}})|X=yes|y=yes | {{itemlist|Max Potion|Southeast of the mine cart (hidden, requires {{m|Rock Smash}})|X=yes|y=yes}} | ||
{{itemlist|Dire Hit|On the stalagmite behind Rangers Fern & Lee (hidden)|X=yes|y=yes | {{itemlist|Dire Hit|On the stalagmite behind Rangers Fern & Lee (hidden)|X=yes|y=yes}} | ||
{{itemlist|Iron Plate|South-central area|X=yes|y=yes | {{itemlist|Iron Plate|South-central area|X=yes|y=yes}} | ||
{{catch/div|cave|Zygarde's Chamber}} | {{catch/div|cave|Zygarde's Chamber}} | ||
{{itemlist|Adamant Orb|Southwest path|X=yes|y=yes | {{itemlist|Adamant Orb|Southwest path|X=yes|y=yes}} | ||
{{itemlist|Lustrous Orb|Southeast path|X=yes|y=yes | {{itemlist|Lustrous Orb|Southeast path|X=yes|y=yes}} | ||
{{itemlist|Griseous Orb|Northwest path|X=yes|y=yes | {{itemlist|Griseous Orb|Northwest path|X=yes|y=yes}} | ||
{{itemlist|Big Nugget|Northeast path, in the sunlit spot (hidden)|X=yes|y=yes | {{itemlist|Big Nugget|Northeast path, in the sunlit spot (hidden)|X=yes|y=yes}} | ||
{{itlistfoot|cave}} | {{itlistfoot|cave}} | ||
|} | |} | ||
| Line 206: | Line 204: | ||
====B1F==== | ====B1F==== | ||
Turn south and go down a small slope to reach a fork in the road. Take the eastern path first; clear the way with {{m|Rock Smash}} and cross the bridge to get a | Turn south and go down a small slope to reach a fork in the road. Take the eastern path first; clear the way with {{m|Rock Smash}} and cross the bridge to get a [[Star Piece]]. Go back and head southwest to jump two ledges. Inspect the small rock here for a hidden [[Dusk Ball]]. Follow the path uphill and check the stalagmite near the bridge for a [[Hyper Potion]]. Cross the bridge to battle Worker Narek. Take the southern path to reach another breakable rock and a [[Heat Rock]] beyond it, then return to Worker Narek and head east. Battle Hiker Aaron and cross the bridge. Go down the slope, head south, then jump the few ledges to reach an [[Escape Rope]] and Hiker Bergin. Follow the path back to Hiker Aaron, cross the bridge, and go down the slope again. This time, head north past Worker Dimitri. Use {{m|Rock Smash}} to find a [[Moon Stone]] in the north wall, then go down the stairs. | ||
====B2F==== | ====B2F==== | ||
Go north past Battle Girl Andrea. Use {{m|Rock Smash}} to follow the narrow tunnel westward; check the stalagmite at the end for a hidden | Go north past Battle Girl Andrea. Use {{m|Rock Smash}} to follow the narrow tunnel westward; check the stalagmite at the end for a hidden [[Iron]]. Go west to get a [[Dusk Stone]], then head northeast toward Black Belt Gunnar. The path leading north takes you to an [[X Attack]]; collect the item before heading east. Climb onto the hill to fight Battle Girl Hailey, then go north to reach an [[Elixir]], and southeast for a [[Full Heal]]. Backtrack a bit to head south from Black Belt Ricardo. At the intersection, go northwest to find {{TM|30|Shadow Ball}} near the mine cart, and a hidden [[Max Potion]] in the corner. Head east to battle Rangers Fern & Lee, and inspect the stalagmite behind them for a [[Dire Hit]]. Continue past them to another intersection; go west to collect an [[Iron Plate]], then climb the stairs to the east. | ||
====B1F (east)==== | ====B1F (east)==== | ||
Head north to fight Worker Yusif. Skirt around the side of the hill and check the stalagmite for a | Head north to fight Worker Yusif. Skirt around the side of the hill and check the stalagmite for a [[Max Repel]]. Jump the ledge to collect the [[Reaper Cloth]], then climb back up the hill and take the stairs in the northwest. | ||
====1F (east)==== | ====1F (east)==== | ||
The layout of the final chamber is shaped similarly to a windmill. Each of the four tunnels leads to a rare item. The southwest tunnel leads to an | The layout of the final chamber is shaped similarly to a windmill. Each of the four tunnels leads to a rare item. The southwest tunnel leads to an [[Adamant Orb]], the southeast tunnel, a [[Lustrous Orb]]. The northwest tunnel holds a [[Griseous Orb]], and the northeast tunnel leads to a hidden [[Big Nugget]]. At the point where these tunnels meet, the legendary Pokémon watches you from atop a small hill. | ||
{{p|Zygarde}}, the Order Pokémon, is a {{2t|Dragon|Ground}} type. Open with {{t|Ice}}-, {{t|Dragon}}-, and {{type|Fairy}} attacks to wear its health down quickly. After that, switch to {{t|Fire}}-, {{t|Poison}}-, and {{type|Rock}} moves to weaken it further. Just remember, if it uses {{m|Camouflage}}, it becomes a pure- | {{p|Zygarde}}, the Order Pokémon, is a {{2t|Dragon|Ground}} type. Open with {{t|Ice}}-, {{t|Dragon}}-, and {{type|Fairy}} attacks to wear its health down quickly. After that, switch to {{t|Fire}}-, {{t|Poison}}-, and {{type|Rock}} moves to weaken it further. Just remember, if it uses {{m|Camouflage}}, it becomes a pure-Rock type Pokémon. | ||
{| style="margin: auto;" | {| style="margin: auto;" | ||
Latest revision as of 20:46, 3 September 2023
Having defeated the Pokémon League, you may now track down the remaining legendary Pokémon.
Azure Bay
Sea Spirit's Den
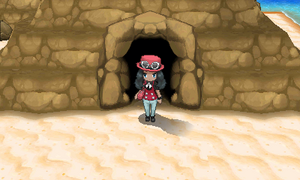
The first wild Pokémon you encounter after meeting Professor Sycamore in Lumoise Station (after becoming the new Champion) will be one of three legendary bird Pokémon from the far-off Kanto region. Only one has been spotted in Kalos, and the one that appears depends on your starter Pokémon. However, the bird will flee immediately after the battle begins, and begin roaming the region. After the first encounter, the Pokédex is able to track its location. After encountering the Pokémon eleven different times, it will travel to the Sea Spirit's Den in Azure Bay, where you finally have a chance to capture it. Consider stocking up on Ultra Balls, Dusk Balls, Quick Balls, or Timer Balls for this battle.
| Starter | Legendary | ||
|---|---|---|---|
| Chespin | Articuno | ||
| Fennekin | Zapdos | ||
| Froakie | Moltres | ||
Articuno is the most defensive-oriented of the trio. Start off with Fire-, Electric-, Rock-, or Steel-type attacks to wear its health down quickly, then follow up with Grass- or Bug-type moves to whittle it down further.
Zapdos is the fastest of the three. Begin with super-effective Rock- or Ice-type moves, before wearing it down gradually with Bug-, Grass-, Flying-, Fighting-, or Steel-type attacks.
Moltres is the most offensive-oriented of the group. Open with Water-, Electric-, or Rock-type attacks, then follow up with Grass-, Fire-, Bug-, Fighting-, Steel-, or Fairy-type moves to wear it down slowly.
|
|
| ||||||||||||||||||||||||||||||||||||||||||||||||||||||||||||||||||||||||||||||||||||||||||||||||||||||
Pokémon Village
Unknown Dungeon
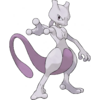
Fly to Snowbelle City and make your way through the Winding Woods of Route 20 again. When you reach Pokémon Village, surf upriver to find that the man that had blocked the cave entrance is gone, so you can finally investigate his claims of powerful Pokémon inside. Unlike another cave of the same name, this one features only a single small chamber. The legendary Pokémon, Mewtwo, can be found in the center of this chamber, standing with its back to the entrance.
| Items | ||||||||||||||||||||
|---|---|---|---|---|---|---|---|---|---|---|---|---|---|---|---|---|---|---|---|---|
| ||||||||||||||||||||
Mewtwo excels in Special Attack and Speed. Start off with Bug-, Ghost-, or Dark-type moves to weaken it quickly before following up with Fighting and Psychic attacks. Since it can restore its health with Recover, consider using status-inflicting moves like Spore or Thunder Wave to restrict its use. Alternatively, you could simply use the Master Ball you received in the Poké Ball Factory.
| ||||||||||||||||||||||||||||||||
Route 18
Terminus Cave
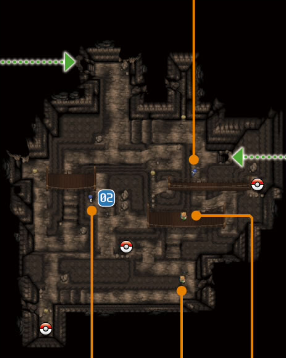
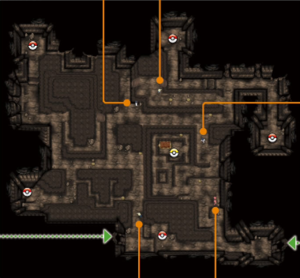
Terminus Cave is a former coal mine that was closed due to rumors of a monster living deep inside. A chill wind blows through this forbidding cave, which houses plenty of treasure for the boldest adventurers. Though the cave was accessible when you first reached Route 18, it was impossible to reach the final chamber until now.
| Trainers | ||||||||||||||||||||||||||||||||||||||||||||||||||||||||||||||||||||||||||||||||||||||||||||||||||||||||||||||||||||||||||||||||||||||||||||||||||||||||||||||||||||||||||||||||||||||||||||||||||||||||||||||||||||||||||||||
|---|---|---|---|---|---|---|---|---|---|---|---|---|---|---|---|---|---|---|---|---|---|---|---|---|---|---|---|---|---|---|---|---|---|---|---|---|---|---|---|---|---|---|---|---|---|---|---|---|---|---|---|---|---|---|---|---|---|---|---|---|---|---|---|---|---|---|---|---|---|---|---|---|---|---|---|---|---|---|---|---|---|---|---|---|---|---|---|---|---|---|---|---|---|---|---|---|---|---|---|---|---|---|---|---|---|---|---|---|---|---|---|---|---|---|---|---|---|---|---|---|---|---|---|---|---|---|---|---|---|---|---|---|---|---|---|---|---|---|---|---|---|---|---|---|---|---|---|---|---|---|---|---|---|---|---|---|---|---|---|---|---|---|---|---|---|---|---|---|---|---|---|---|---|---|---|---|---|---|---|---|---|---|---|---|---|---|---|---|---|---|---|---|---|---|---|---|---|---|---|---|---|---|---|---|---|---|---|---|---|---|---|---|---|---|---|---|---|---|---|---|---|---|
| ||||||||||||||||||||||||||||||||||||||||||||||||||||||||||||||||||||||||||||||||||||||||||||||||||||||||||||||||||||||||||||||||||||||||||||||||||||||||||||||||||||||||||||||||||||||||||||||||||||||||||||||||||||||||||||||
| Available Pokémon | ||||||||||||||||||||||||||||||||||||||||||||||||||||||||||||||||||||||||||||||||||||||||||||||||||||||||||||||||||||||||||||||||||||||||||||||||||||||||||||||||||||||||||||||||||||||||||||||||||||||||||||||||||||||||||||||||||||||||||||||||||||||||||||||||||||||||||||||||||||||||||||||||||||||||||||||||||||||
|---|---|---|---|---|---|---|---|---|---|---|---|---|---|---|---|---|---|---|---|---|---|---|---|---|---|---|---|---|---|---|---|---|---|---|---|---|---|---|---|---|---|---|---|---|---|---|---|---|---|---|---|---|---|---|---|---|---|---|---|---|---|---|---|---|---|---|---|---|---|---|---|---|---|---|---|---|---|---|---|---|---|---|---|---|---|---|---|---|---|---|---|---|---|---|---|---|---|---|---|---|---|---|---|---|---|---|---|---|---|---|---|---|---|---|---|---|---|---|---|---|---|---|---|---|---|---|---|---|---|---|---|---|---|---|---|---|---|---|---|---|---|---|---|---|---|---|---|---|---|---|---|---|---|---|---|---|---|---|---|---|---|---|---|---|---|---|---|---|---|---|---|---|---|---|---|---|---|---|---|---|---|---|---|---|---|---|---|---|---|---|---|---|---|---|---|---|---|---|---|---|---|---|---|---|---|---|---|---|---|---|---|---|---|---|---|---|---|---|---|---|---|---|---|---|---|---|---|---|---|---|---|---|---|---|---|---|---|---|---|---|---|---|---|---|---|---|---|---|---|---|---|---|---|---|---|---|---|---|---|---|---|---|---|---|---|---|---|---|---|---|---|---|---|---|---|---|---|---|---|---|---|---|---|---|---|---|---|---|---|---|---|---|---|---|---|---|---|---|---|---|---|---|---|---|---|---|---|---|---|---|
| ||||||||||||||||||||||||||||||||||||||||||||||||||||||||||||||||||||||||||||||||||||||||||||||||||||||||||||||||||||||||||||||||||||||||||||||||||||||||||||||||||||||||||||||||||||||||||||||||||||||||||||||||||||||||||||||||||||||||||||||||||||||||||||||||||||||||||||||||||||||||||||||||||||||||||||||||||||||
| Items | |||||||||||||||||||||||||||||||||||||||||||||||||||||||||||||||||||||||||||||||||||||||||||||||||||||||||||||||||||||||||||||||||||||||||||||||||||||||||||||||||||||||||||||||||||
|---|---|---|---|---|---|---|---|---|---|---|---|---|---|---|---|---|---|---|---|---|---|---|---|---|---|---|---|---|---|---|---|---|---|---|---|---|---|---|---|---|---|---|---|---|---|---|---|---|---|---|---|---|---|---|---|---|---|---|---|---|---|---|---|---|---|---|---|---|---|---|---|---|---|---|---|---|---|---|---|---|---|---|---|---|---|---|---|---|---|---|---|---|---|---|---|---|---|---|---|---|---|---|---|---|---|---|---|---|---|---|---|---|---|---|---|---|---|---|---|---|---|---|---|---|---|---|---|---|---|---|---|---|---|---|---|---|---|---|---|---|---|---|---|---|---|---|---|---|---|---|---|---|---|---|---|---|---|---|---|---|---|---|---|---|---|---|---|---|---|---|---|---|---|---|---|---|---|---|---|
| |||||||||||||||||||||||||||||||||||||||||||||||||||||||||||||||||||||||||||||||||||||||||||||||||||||||||||||||||||||||||||||||||||||||||||||||||||||||||||||||||||||||||||||||||||
1F
Pass by the old mine cart and go down the northeast stairs to the basement.
B1F
Turn south and go down a small slope to reach a fork in the road. Take the eastern path first; clear the way with Rock Smash and cross the bridge to get a Star Piece. Go back and head southwest to jump two ledges. Inspect the small rock here for a hidden Dusk Ball. Follow the path uphill and check the stalagmite near the bridge for a Hyper Potion. Cross the bridge to battle Worker Narek. Take the southern path to reach another breakable rock and a Heat Rock beyond it, then return to Worker Narek and head east. Battle Hiker Aaron and cross the bridge. Go down the slope, head south, then jump the few ledges to reach an Escape Rope and Hiker Bergin. Follow the path back to Hiker Aaron, cross the bridge, and go down the slope again. This time, head north past Worker Dimitri. Use Rock Smash to find a Moon Stone in the north wall, then go down the stairs.
B2F
Go north past Battle Girl Andrea. Use Rock Smash to follow the narrow tunnel westward; check the stalagmite at the end for a hidden Iron. Go west to get a Dusk Stone, then head northeast toward Black Belt Gunnar. The path leading north takes you to an X Attack; collect the item before heading east. Climb onto the hill to fight Battle Girl Hailey, then go north to reach an Elixir, and southeast for a Full Heal. Backtrack a bit to head south from Black Belt Ricardo. At the intersection, go northwest to find TM30 (Shadow Ball) near the mine cart, and a hidden Max Potion in the corner. Head east to battle Rangers Fern & Lee, and inspect the stalagmite behind them for a Dire Hit. Continue past them to another intersection; go west to collect an Iron Plate, then climb the stairs to the east.
B1F (east)
Head north to fight Worker Yusif. Skirt around the side of the hill and check the stalagmite for a Max Repel. Jump the ledge to collect the Reaper Cloth, then climb back up the hill and take the stairs in the northwest.
1F (east)
The layout of the final chamber is shaped similarly to a windmill. Each of the four tunnels leads to a rare item. The southwest tunnel leads to an Adamant Orb, the southeast tunnel, a Lustrous Orb. The northwest tunnel holds a Griseous Orb, and the northeast tunnel leads to a hidden Big Nugget. At the point where these tunnels meet, the legendary Pokémon watches you from atop a small hill.
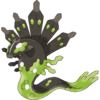
Zygarde, the Order Pokémon, is a Dragon/Ground type. Open with Ice-, Dragon-, and Fairy-type attacks to wear its health down quickly. After that, switch to Fire-, Poison-, and Rock-type moves to weaken it further. Just remember, if it uses Camouflage, it becomes a pure-Rock type Pokémon.
| ||||||||||||||||||||||||||||||||||
Having tied up all the loose ends, your final mission is to complete the Pokédex. The discovery of Kalos-native Pokémon has brought the total number of species to 721, so there is still plenty to keep you busy!
|
X and Y walkthrough |

|
This article is part of Project Walkthroughs, a Bulbapedia project that aims to write comprehensive step-by-step guides on each Pokémon game. |
