|
|
| (49 intermediate revisions by 21 users not shown) |
| Line 1: |
Line 1: |
| {{Route infobox | | {{Route infobox |
| |number=21 | | |number=21 |
| |size=250
| | |image=Kanto Route 21 PE.png |
| |image=Kanto Route 21 HGSS.png | |
| |imageI=Kanto Route 21 RBY.png | | |imageI=Kanto Route 21 RBY.png |
| |imageII=Kanto Route 21 GSC.png | | |imageII=Kanto Route 21 GSC.png |
| |imageIII=Kanto Route 21 FRLG.png | | |imageIII=Kanto Route 21 FRLG.png |
| |type=ocean | | |type=ocean |
| |surf=yes | | |surf={{sup/1}}{{sup/2}}{{sup/3|FRLG}}{{sup/4|HGSS}} |
| |north=Pallet Town | | |north=Pallet Town |
| |south=Cinnabar Island | | |south=Cinnabar Island |
| |region=Kanto | | |region=Kanto |
| |mapdesc=A coastal road where the only threat might be the volcano on the horizon. | | |mapdesc=A coastal road where the only threat might be the volcano on the horizon.{{sup/4|HGSS}}<br>A sea path warmed by the volcano on the horizon.{{sup/7|PE}} |
| }} | | }} |
|
| |
|
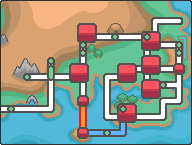
| '''Route 21''' (Japanese: '''21ばんすいどう''' ''Water Route 21''), known as '''Sea Route 21''' in the [[Generation I]] games, is a [[water route]] located in southwest [[Kanto]], connecting [[Pallet Town]] and [[Cinnabar Island]]. | | '''Route 21''' (Japanese: '''21{{tt|番水道|ばんすいどう}}''' ''Water Route 21''), known as '''Sea Route 21''' in [[Generation I]], is a [[water route]] located in southwestern [[Kanto]]. It connects [[Cinnabar Island]] in the south to [[Pallet Town]] in the north. |
|
| |
|
| ==Route description== | | ==Route description== |
| From Pallet, the route begins as a small channel of water. South of the town, an outcrop of land on the route's east side holds the only grassy area on any water route in Pokémon history up until [[Generation IV]]. Past the grassy area, the mainland terminates and the route widens significantly in size. | | From Pallet Town, the route begins as a small channel of water. South of the town, an outcrop of land on the route's east side holds the only grassy area on any water route in Pokémon history up until [[Generation IV]]. Past the grassy area, the mainland terminates and the route widens significantly in size. |
|
| |
|
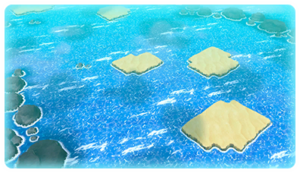
| South of this point, the look of the route varies greatly by [[Generation]]. In [[Generation I]], there are two small bridges containing two Trainers each spread out along the route. Five other Trainers are also found along the route. In [[Generation II]], the bridges remain but only one Trainer is found on one of the bridges. Two more Trainers are located in the water. [[Generation III]] replaced the bridges with sandy islands and added five additional islands as well. Trainers can be found on four of the islands, as well as in five locations in the water, making a total of nine Trainers. | | South of this point, the look of the route varies greatly by [[generation]]. In [[Generation I]], there are two small bridges containing two Trainers each spread out along the route. Five other Trainers are also found along the route. In [[Generation II]], the bridges remain but only one Trainer is found on one of the bridges. Two more Trainers are located in the water. [[Generation III]] replaced the bridges with sandy islands and added five additional islands as well. Trainers can be found on four of the islands, as well as in five locations in the water, making a total of nine Trainers. In [[Generation VII]], there are six Trainers on five islands, and four in the water, making a total of ten Trainers. |
|
| |
|
| In every Generation, the route runs directly north-south in the water, reaching its southern terminus at Cinnabar near the southernmost Trainer. | | In every generation, the route runs directly north-south in the water, reaching its southern terminus at Cinnabar near the southernmost Trainer. |
|
| |
|
| ==Items== | | ==Items== |
| {{itlisth|ocean}} | | {{itlisth|ocean}} |
| {{Itemlist|Pearl|On the island next to Swimmer Spencer after delivering the {{key|III|Sapphire}} to [[Celio]] ''(hidden)''|FR=yes|LG=yes|display={{OBP|Pearl|item}}}} | | {{Itemlist|Pearl|On the island next to {{tc|Swimmer}} Spencer ''(hidden [[Recurring item|recurring item]]; group B)''|FR=yes|LG=yes|display={{i|Pearl}}}} |
| | {{Itemlist|Hyper Potion|On the island closest to [[Pallet Town]]|LP=yes|LE=yes}} |
| | {{Itemlist|TM Ice VI|Reward for defeating {{tc|Coach Trainer}} Pam|LP=yes|LE=yes|display={{TM|35|Ice Punch}}}} |
| | {{Itemlist|Revive|On the lone rock southwest of Coach Trainer Pam ''(hidden)'' (daily)|LP=yes|LE=yes}} |
| | {{Itemlist|Water Stone|On the island where {{tc|Fisherman}} Nolan stands|LP=yes|LE=yes}} |
| | {{Itemlist|PP Up|On the island closest to [[Cinnabar Island]]|LP=yes|LE=yes}} |
| | {{Itemlist|Stardust|On the second island north of [[Cinnabar Island]] ''(hidden)'' (daily)|LP=yes|LE=yes|display=[[Stardust]] ×3}} |
| {{Itemlist|Stardust| | | {{Itemlist|Stardust| |
| * On the sandbar closest to Pallet Town ''(hidden)'' | | * On the sandbar closest to Pallet Town ''(hidden)'' |
| Line 62: |
Line 67: |
| {{catch/entry2|019|Rattata|no|no|yes|Grass|25|all=30%|type1=Normal|11=k}} | | {{catch/entry2|019|Rattata|no|no|yes|Grass|25|all=30%|type1=Normal|11=k}} |
| {{catch/entry2|020|Raticate|no|no|yes|Grass|20|all=10%|type1=Normal|11=k}} | | {{catch/entry2|020|Raticate|no|no|yes|Grass|20|all=10%|type1=Normal|11=k}} |
| {{catch/entry2|114|Tangela|yes|yes|no|Grass|20-35|95%|90%|95%|type1=Grass|11=k}} | | {{catch/entry2|114|Tangela|yes|yes|no|Grass|20,25,30,35|95%|90%|95%|type1=Grass|11=k}} |
| {{catch/entry2|114|Tangela|no|no|yes|Grass|30-35|50%|50%|0%|type1=Grass|11=k}} | | {{catch/entry2|114|Tangela|no|no|yes|Grass|30,35|50%|50%|0%|type1=Grass|11=k}} |
| {{catch/entry2|114|Tangela|no|no|yes|Grass|28-35|0%|0%|60%|type1=Grass|11=k}} | | {{catch/entry2|114|Tangela|no|no|yes|Grass|28,30,35|0%|0%|60%|type1=Grass|11=k}} |
| {{catch/entry2|122|Mr. Mime|yes|yes|no|Grass|28|5%|0%|5%|type1=Psychic|11=k}} | | {{catch/entry2|122|Mr. Mime|yes|yes|no|Grass|28|5%|0%|5%|type1=Psychic|11=k}} |
| {{catch/entry2|122|Mr. Mime|yes|yes|no|Grass|28-30|0%|10%|0%|type1=Psychic|11=k}} | | {{catch/entry2|122|Mr. Mime|yes|yes|no|Grass|28,30|0%|10%|0%|type1=Psychic|11=k}} |
| {{catch/entry2|122|Mr. Mime|no|no|yes|Grass|28-30|10%|10%|0%|type1=Psychic|11=k}} | | {{catch/entry2|122|Mr. Mime|no|no|yes|Grass|28,30|10%|10%|0%|type1=Psychic|11=k}} |
| {{Catch/div|ocean|Surfing}} | | {{Catch/div|ocean|Surfing}} |
| {{Catch/entry2|072|Tentacool|yes|yes|yes|Surf|30-39|all=90%|type1=Water|type2=Poison}} | | {{Catch/entry2|072|Tentacool|yes|yes|yes|Surf|30-39|all=90%|type1=Water|type2=Poison}} |
| Line 91: |
Line 96: |
| {{Catch/div|ocean|Fishing}} | | {{Catch/div|ocean|Fishing}} |
| {{Catch/entryfl|129|Magikarp|yes|yes|Fish Old|5|100%|type1=Water}} | | {{Catch/entryfl|129|Magikarp|yes|yes|Fish Old|5|100%|type1=Water}} |
|
| |
| {{Catch/entryfl|098|Krabby|yes|no|Fish Good|5-15|20%|type1=Water}} | | {{Catch/entryfl|098|Krabby|yes|no|Fish Good|5-15|20%|type1=Water}} |
| {{Catch/entryfl|098|Krabby|no|yes|Fish Good|5-15|60%|type1=Water}} | | {{Catch/entryfl|098|Krabby|no|yes|Fish Good|5-15|60%|type1=Water}} |
| Line 97: |
Line 101: |
| {{Catch/entryfl|116|Horsea|no|yes|Fish Good|5-15|20%|type1=Water}} | | {{Catch/entryfl|116|Horsea|no|yes|Fish Good|5-15|20%|type1=Water}} |
| {{Catch/entryfl|129|Magikarp|yes|yes|Fish Good|5-15|20%|type1=Water}} | | {{Catch/entryfl|129|Magikarp|yes|yes|Fish Good|5-15|20%|type1=Water}} |
|
| |
| {{Catch/entryfl|054|Psyduck|yes|no|Fish Super|25-35|1%|type1=Water}} | | {{Catch/entryfl|054|Psyduck|yes|no|Fish Super|25-35|1%|type1=Water}} |
| {{Catch/entryfl|079|Slowpoke|no|yes|Fish Super|25-35|1%|type1=Water|type2=Psychic}} | | {{Catch/entryfl|079|Slowpoke|no|yes|Fish Super|25-35|1%|type1=Water|type2=Psychic}} |
| Line 109: |
Line 112: |
| ===Generation IV=== | | ===Generation IV=== |
| {{Catch/header|ocean|yes}} | | {{Catch/header|ocean|yes}} |
| {{catch/entryhs|114|Tangela|yes|yes|Grass|20-35|95%|90%|95%|type1=Grass}} | | {{catch/entryhs|114|Tangela|yes|yes|Grass|20, 25, 30, 35|95%|90%|95%|type1=Grass}} |
| {{catch/entryhs|122|Mr. Mime|yes|yes|Grass|28|5%|0%|5%|type1=Psychic}} | | {{catch/entryhs|122|Mr. Mime|yes|yes|Grass|28|5%|0%|5%|type1=Psychic}} |
| {{catch/entryhs|122|Mr. Mime|yes|yes|Grass|28-30|0%|10%|0%|type1=Psychic}} | | {{catch/entryhs|122|Mr. Mime|yes|yes|Grass|28-30|0%|10%|0%|type1=Psychic}} |
| Line 116: |
Line 119: |
| {{Catch/entryhs|073|Tentacruel|yes|yes|Surf|35|all=10%|type1=Water|type2=Poison}} | | {{Catch/entryhs|073|Tentacruel|yes|yes|Surf|35|all=10%|type1=Water|type2=Poison}} |
| {{Catch/div|ocean|Fishing}} | | {{Catch/div|ocean|Fishing}} |
| {{Catch/entryhs|072|Tentacool|yes|yes|Fish Old|10|all=5%|type1=Water|type2=Poison}} | | {{Catch/entryhs|072|Tentacool|yes|yes|Fish Old|10|all=15%|type1=Water|type2=Poison}} |
| {{Catch/entryhs|129|Magikarp|yes|yes|Fish Old|10|all=95%|type1=Water}} | | {{Catch/entryhs|129|Magikarp|yes|yes|Fish Old|10|all=85%|type1=Water}} |
| {{Catch/entryhs|072|Tentacool|yes|yes|Fish Good|20|all=30%|type1=Water|type2=Poison}} | | {{Catch/entryhs|072|Tentacool|yes|yes|Fish Good|20|all=30%|type1=Water|type2=Poison}} |
| {{Catch/entryhs|090|Shellder|yes|yes|Fish Good|20|all=3%|type1=Water}} | | {{Catch/entryhs|090|Shellder|yes|yes|Fish Good|20|all=10%|type1=Water}} |
| {{Catch/entryhs|129|Magikarp|yes|yes|Fish Good|20|all=60%|type1=Water}} | | {{Catch/entryhs|129|Magikarp|yes|yes|Fish Good|20|all=40%|type1=Water}} |
| {{Catch/entryhs|170|Chinchou|yes|yes|Fish Good|20|all=7%|type1=Water|type2=Electric}} | | {{Catch/entryhs|170|Chinchou|yes|yes|Fish Good|20|all=20%|type1=Water|type2=Electric}} |
| {{Catch/entryhs|073|Tentacruel|yes|yes|Fish Super|40|all=7%|type1=Water|type2=Poison}} | | {{Catch/entryhs|073|Tentacruel|yes|yes|Fish Super|40|all=20%|type1=Water|type2=Poison}} |
| {{Catch/entryhs|090|Shellder|yes|yes|Fish Super|40|all=30%|type1=Water}} | | {{Catch/entryhs|090|Shellder|yes|yes|Fish Super|40|all=30%|type1=Water}} |
| {{Catch/entryhs|170|Chinchou|yes|yes|Fish Super|40|all=60%|type1=Water|type2=Electric}} | | {{Catch/entryhs|170|Chinchou|yes|yes|Fish Super|40|all=40%|type1=Water|type2=Electric}} |
| {{Catch/entryhs|171|Lanturn|yes|yes|Fish Super|40|all=3%|type1=Water|type2=Electric}} | | {{Catch/entryhs|171|Lanturn|yes|yes|Fish Super|40|all=10%|type1=Water|type2=Electric}} |
| {{catch/div|ocean|Headbutt}} | | {{catch/div|ocean|Headbutt<br><small>Group A</small>}} |
| {{catch/entryhs|114|Tangela|yes|yes|Headbutt|27-30|all=15%|type1=Grass|10=k}}
| |
| {{catch/entryhs|163|Hoothoot|yes|yes|Headbutt|24-26|all=50%|type1=Normal|type2=Flying|10=k}} | | {{catch/entryhs|163|Hoothoot|yes|yes|Headbutt|24-26|all=50%|type1=Normal|type2=Flying|10=k}} |
| {{catch/entryhs|163|Hoothoot|yes|yes|Headbutt|27-30|all=80%|type1=Normal|type2=Flying|10=k}}
| |
| {{catch/entryhs|165|Ledyba|no|yes|Headbutt|24-26|all=30%|type1=Bug|type2=Flying|10=k}} | | {{catch/entryhs|165|Ledyba|no|yes|Headbutt|24-26|all=30%|type1=Bug|type2=Flying|10=k}} |
| {{catch/entryhs|167|Spinarak|yes|no|Headbutt|24-26|all=30%|type1=Bug|type2=Poison|10=k}} | | {{catch/entryhs|167|Spinarak|yes|no|Headbutt|24-26|all=30%|type1=Bug|type2=Poison|10=k}} |
| {{catch/entryhs|265|Wurmple|yes|yes|Headbutt|24-30|all=20%|type1=Bug|10=k}} | | {{catch/entryhs|265|Wurmple|yes|yes|Headbutt|24-26|all=20%|type1=Bug|10=k}} |
| | {{catch/div|ocean|Headbutt<br><small>Group B</small>}} |
| | {{catch/entryhs|114|Tangela|yes|yes|Headbutt|27-30|all=15%|type1=Grass|10=k}} |
| | {{catch/entryhs|163|Hoothoot|yes|yes|Headbutt|27-30|all=65%|type1=Normal|type2=Flying|10=k}} |
| | {{catch/entryhs|265|Wurmple|yes|yes|Headbutt|27-30|all=20%|type1=Bug|10=k}} |
| {{Catch/div|ocean|Special}} | | {{Catch/div|ocean|Special}} |
| {{catch/entryhs|264|Linoone|yes|yes|Hoenn|35|all=20%|type1=Normal}} | | {{catch/entryhs|264|Linoone|yes|yes|Hoenn|35|all=20%|type1=Normal}} |
| {{catch/entryhs|293|Whismur|yes|yes|Hoenn|25-30|all=20%|type1=Normal}} | | {{catch/entryhs|293|Whismur|yes|yes|Hoenn|25, 30|all=20%|type1=Normal}} |
| {{catch/entryhs|399|Bidoof|yes|yes|Sinnoh|35|all=20%|type1=Normal}} | | {{catch/entryhs|399|Bidoof|yes|yes|Sinnoh|35|all=20%|type1=Normal}} |
| {{catch/entryhs|418|Buizel|yes|yes|Sinnoh|25-30|all=20%|type1=Water}} | | {{catch/entryhs|418|Buizel|yes|yes|Sinnoh|25, 30|all=20%|type1=Water}} |
| {{Catch/footer|ocean}} | | {{Catch/footer|ocean}} |
| | |
| | ===Generation VII=== |
| | {{Catch/header|ocean|no}} |
| | {{Catch/entrype|016|Pidgey|yes|yes|Grass|37-42|10%|type1=Normal|type2=Flying}} |
| | {{Catch/entrype|017|Pidgeotto|yes|yes|Grass|37-42|20%|type1=Normal|type2=Flying}} |
| | {{Catch/entrype|019|Rattata|yes|yes|Grass|37-42|10%|type1=Normal}} |
| | {{Catch/entrype|020|Raticate|yes|yes|Grass|37-42|20%|type1=Normal}} |
| | {{Catch/entrype|043|Oddish|yes|no|Grass|37-42|10%|type1=Grass|type2=Poison}} |
| | {{Catch/entrype|044|Gloom|yes|no|Grass|37-42|14%|type1=Grass|type2=Poison}} |
| | {{Catch/entrype|045|Vileplume|yes|no|Grass|37-42|1%|type1=Grass|type2=Poison}} |
| | {{Catch/entrype|069|Bellsprout|no|yes|Grass|37-42|10%|type1=Grass|type2=Poison}} |
| | {{Catch/entrype|070|Weepinbell|no|yes|Grass|37-42|14%|type1=Grass|type2=Poison}} |
| | {{Catch/entrype|071|Victreebel|no|yes|Grass|37-42|1%|type1=Grass|type2=Poison}} |
| | {{Catch/entrype|114|Tangela|yes|yes|Grass|37-42|15%|type1=Grass}} |
| | {{Catch/div|ocean|Rare Spawns}} |
| | {{Catch/entrype|113|Chansey|yes|yes|Grass|37-42|-}} |
| | {{Catch/div|ocean|Sea Skim}} |
| | {{Catch/entrype|072|Tentacool|yes|yes|Surf|37-42|30%|type1=Water|type2=Poison}} |
| | {{Catch/entrype|073|Tentacruel|yes|yes|Surf|37-42|9%|type1=Water|type2=Poison}} |
| | {{Catch/entrype|120|Staryu|yes|yes|Surf|37-42|30%|type1=Water}} |
| | {{Catch/entrype|121|Starmie|yes|yes|Surf|37-42|1%|type1=Water|type2=Psychic}} |
| | {{Catch/entrype|129|Magikarp|yes|yes|Surf|37-42|30%|type1=Water}} |
| | {{Catch/div|flying|While riding a Flying Pokémon<br><small>After becoming {{color2|000|Pokémon Champion|Champion}}}} |
| | {{Catch/entrype|016|Pidgey|yes|yes|Sky|3-56|60%|type1=Normal|type2=Flying}} |
| | {{Catch/entrype|017|Pidgeotto|yes|yes|Sky|3-56|35%|type1=Normal|type2=Flying}} |
| | {{Catch/entrype|018|Pidgeot|yes|yes|Sky|3-56|5%|type1=Normal|type2=Flying}} |
| | {{Catch/div|flying|Rare Spawns}} |
| | {{Catch/entrype|006|Charizard|yes|yes|Sky|3-56|-|type1=Fire|type2=Flying}} |
| | {{Catch/entrype|144|Articuno|yes|yes|Sky|3-56|-|type1=Ice|type2=Flying}} |
| | {{Catch/entrype|145|Zapdos|yes|yes|Sky|3-56|-|type1=Electric|type2=Flying}} |
| | {{Catch/entrype|146|Moltres|yes|yes|Sky|3-56|-|type1=Fire|type2=Flying}} |
| | {{Catch/entrype|149|Dragonite|yes|yes|Sky|3-56|-|type1=Dragon|type2=Flying}} |
| | {{Catch/footer|ocean|2}} |
|
| |
|
| ==Trainers== | | ==Trainers== |
| | These Trainers are listed from '''north''' to '''south'''. |
| | |
| ===Generation I=== | | ===Generation I=== |
| {{Trainerheader|ocean}} | | {{Trainerheader|ocean}} |
| {{Trainerentry|Spr RG Fisherman.png|Fisherman||945|6|129|Magikarp||27||129|Magikarp||27||129|Magikarp||27||129|Magikarp||27||129|Magikarp||27||129|Magikarp||27|||}} | | {{Trainerentry|Spr RG Fisherman.png|game=1|Fisherman||945|6|129|Magikarp||27||129|Magikarp||27||129|Magikarp||27||129|Magikarp||27||129|Magikarp||27||129|Magikarp||27|||}} |
| {{Trainerdiv|ocean}} | | {{Trainerdiv|ocean}} |
| {{Trainerentry|Spr RG Fisherman.png|Fisherman||980|4|119|Seaking||28||118|Goldeen||28||119|Seaking||28||119|Seaking||28|||}} | | {{Trainerentry|Spr RG Fisherman.png|game=1|Fisherman||980|4|119|Seaking||28||118|Goldeen||28||119|Seaking||28||119|Seaking||28|||}} |
| {{Trainerdiv|ocean}} | | {{Trainerdiv|ocean}} |
| {{Trainerentry|Spr RG Swimmer.png|Swimmer||165|2|117|Seadra||33||073|Tentacruel||33|||}} | | {{Trainerentry|Spr RG Swimmer.png|game=1|Swimmer||165|2|117|Seadra||33||073|Tentacruel||33|||}} |
| {{Trainerdiv|ocean}} | | {{Trainerdiv|ocean}} |
| {{Trainerentry|Spr RG Cue Ball.png|Cue Ball||775|3|072|Tentacool||31||072|Tentacool||31||073|Tentacruel||31|||}} | | {{Trainerentry|Spr RG Cue Ball.png|game=1|Cue Ball||775|3|072|Tentacool||31||072|Tentacool||31||073|Tentacruel||31|||}} |
| {{Trainerdiv|ocean}} | | {{Trainerdiv|ocean}} |
| {{Trainerentry|Spr RG Fisherman.png|Fisherman||1085|2|090|Shellder||31||091|Cloyster||31||||}} | | {{Trainerentry|Spr RG Fisherman.png|game=1|Fisherman||1085|2|090|Shellder||31||091|Cloyster||31||||}} |
| {{Trainerdiv|ocean}} | | {{Trainerdiv|ocean}} |
| {{Trainerentry|Spr RG Fisherman.png|Fisherman||1155|2|119|Seaking||33||118|Goldeen||33|||}} | | {{Trainerentry|Spr RG Fisherman.png|game=1|Fisherman||1155|2|119|Seaking||33||118|Goldeen||33|||}} |
| {{Trainerdiv|ocean}} | | {{Trainerdiv|ocean}} |
| {{Trainerentry|Spr RG Swimmer.png|Swimmer||185|1|121|Starmie||37|||}} | | {{Trainerentry|Spr RG Swimmer.png|game=1|Swimmer||185|1|121|Starmie||37|||}} |
| {{Trainerdiv|ocean}} | | {{Trainerdiv|ocean}} |
| {{Trainerentry|Spr RG Swimmer.png|Swimmer||165|2|120|Staryu||33||008|Wartortle||33|||}} | | {{Trainerentry|Spr RG Swimmer.png|game=1|Swimmer||165|2|120|Staryu||33||008|Wartortle||33|||}} |
| {{Trainerdiv|ocean}} | | {{Trainerdiv|ocean}} |
| {{Trainerentry|Spr RG Swimmer.png|Swimmer||160|3|061|Poliwhirl||32||072|Tentacool||32||117|Seadra||32|||}} | | {{Trainerentry|Spr RG Swimmer.png|game=1|Swimmer||160|3|061|Poliwhirl||32||072|Tentacool||32||117|Seadra||32|||}} |
| {{Trainerfooter|ocean|I}} | | {{Trainerfooter|ocean|I}} |
|
| |
|
| Line 166: |
Line 206: |
| {{Trainerentry|Spr GS Swimmer F.png|Swimmer♀|Nikki|560|4|086|Seel|♀|28|None|086|Seel|♀|28|None|086|Seel|♀|28|None|087|Dewgong|♀|28|None|36=ヒサエ|37=Hisae}} | | {{Trainerentry|Spr GS Swimmer F.png|Swimmer♀|Nikki|560|4|086|Seel|♀|28|None|086|Seel|♀|28|None|086|Seel|♀|28|None|087|Dewgong|♀|28|None|36=ヒサエ|37=Hisae}} |
| {{Trainerdiv|ocean}} | | {{Trainerdiv|ocean}} |
| {{Trainerentry|Spr GS Fisher.png|Fisherman|Arnold|1360|1|073|Tentacruel|♂|34|None|36=テツハル|37=Tetsuharu}} | | {{Trainerentry|Spr GS Fisher.png|Fisher|Arnold|1360|1|073|Tentacruel|♂|34|None|36=テツハル|37=Tetsuharu}} |
| {{Trainerdiv|ocean}} | | {{Trainerdiv|ocean}} |
| {{Trainerentry|Spr GS Swimmer M.png|Swimmer♂|Seth|256|3|195|Quagsire|♂|29|None|224|Octillery|♂|29|None|195|Quagsire|♂|32|None|36=トビオ|37=Tobio}} | | {{Trainerentry|Spr GS Swimmer M.png|Swimmer♂|Seth|256|3|195|Quagsire|♂|29|None|224|Octillery|♂|29|None|195|Quagsire|♂|32|None|36=トビオ|37=Tobio}} |
| Line 191: |
Line 231: |
| {{trainerentry|Spr FRLG Swimmer M.png|Swimmer♂|Jerome|132|2|120|Staryu||33|None|008|Wartortle|♂|33|None|36=モリオ|37=Morio}} | | {{trainerentry|Spr FRLG Swimmer M.png|Swimmer♂|Jerome|132|2|120|Staryu||33|None|008|Wartortle|♂|33|None|36=モリオ|37=Morio}} |
| {{trainerdiv|ocean|Rematch}} | | {{trainerdiv|ocean|Rematch}} |
| {{trainerentry|Spr FRLG Fisherman.png|Fisherman|Wade|1692|6|129|Magikarp|♂|47|None|129|Magikarp|♂|47|None|129|Magikarp|♂|47|None|129|Magikarp|♂|47|None|129|Magikarp|♂|47|None|129|Magikarp|♂|47|None|36=イサオ|37=Isao|38=Vs. Seeker}} | | {{trainerentry|Spr FRLG Fisherman.png|Fisherman|Wade|1692<br/><small>After becoming {{pkmn|Champion}}</small>|6|129|Magikarp|♂|47|None|129|Magikarp|♂|47|None|129|Magikarp|♂|47|None|129|Magikarp|♂|47|None|129|Magikarp|♂|47|None|129|Magikarp|♂|47|None|36=イサオ|37=Isao|38=Vs. Seeker}} |
| {{trainerdiv|ocean}} | | {{trainerdiv|ocean}} |
| {{trainerentry|Spr FRLG Sis and Bro.png|Sis and Bro|Lil & Ian|{{tt|400|First rematch}}/{{tt|440|Second rematch onwards}}|2|117|Seadra|♂|{{tt|50|First rematch}}/{{tt|55|Second rematch onwards}}|None|121|Starmie||{{tt|50|First rematch}}/{{tt|55|Second rematch onwards}}|None|36=チサとカツ|37=Chika and Katsu|38=Vs. Seeker}} | | {{trainerentry|Spr FRLG Sis and Bro.png|Sis and Bro|Lil & Ian|400<br/><small>After becoming {{pkmn|Champion}}</small>|2|117|Seadra|♂|50|None|121|Starmie||50|None|36=チサとカツ|37=Chika and Katsu|38=Vs. Seeker}} |
| | {{trainerentry|Spr FRLG Sis and Bro.png|Sis and Bro|Lil & Ian|440<br/><small>After delivering the {{i|Sapphire}} to [[Celio]]<br/>and defeating the previous team</small>|2|117|Seadra|♂|55|None|121|Starmie||55|None|36=チサとカツ|37=Chika and Katsu|38=Vs. Seeker}} |
| {{trainerdiv|ocean}} | | {{trainerdiv|ocean}} |
| {{trainerentry|Spr FRLG Swimmer M.png|Swimmer♂|Jack|200|1|121|Starmie||50|None|36=ヒデノリ|37=Hidenori|38=Vs. Seeker}} | | {{trainerentry|Spr FRLG Swimmer M.png|Swimmer♂|Jack|200<br/><small>After becoming {{pkmn|Champion}}</small>|1|121|Starmie||50|None|36=ヒデノリ|37=Hidenori|38=Vs. Seeker}} |
| {{trainerfooter|ocean}} | | {{trainerfooter|ocean}} |
|
| |
|
| Line 224: |
Line 265: |
| {{Trainerentry|Spr HGSS Swimmer F.png|Swimmer|Kendra|688|1|199|Slowking|♀|43|None|36=ハナエ|37=Hanae}} | | {{Trainerentry|Spr HGSS Swimmer F.png|Swimmer|Kendra|688|1|199|Slowking|♀|43|None|36=ハナエ|37=Hanae}} |
| {{Trainerfooter|ocean|II}} | | {{Trainerfooter|ocean|II}} |
| | |
| | ===Generation VII=== |
| | {{trainerheader|ocean}} |
| | {{trainerentry|VSFisherman PE.png{{!}}90px|game=PE|Fisherman|Wade|1,680<br>3 {{i|Poké Ball}}s|6|129|Magikarp|♂|42|None|129|Magikarp|♂|42|None|129|Magikarp|♂|42|None|129|Magikarp|♂|42|None|129|Magikarp|♀|42|None|129|Magikarp|♂|42|None|36=イサオ|37=Isao}} |
| | {{trainerdiv|ocean}} |
| | {{trainerentry|VSFisherman PE.png{{!}}90px|game=PE|Fisherman|Ronald|1,680<br>3 {{i|Poké Ball}}s|2|117|Seadra|♀|42|None|130|Gyarados|♀|42|None|36=カズオ|37=Kazuo}} |
| | {{trainerdiv|ocean}} |
| | {{trainerentry|VSCoach Trainer F PE.png{{!}}90px|game=PE|Coach Trainer|Pam|4,500|3|067|Machoke|♂|44|None|124|Jynx|♀|44|None|115|Kangaskhan|♀|45|None|36=オオタ|37=Ōta}} |
| | {{trainerdiv|ocean}} |
| | {{trainerentry|VSRoughneck PE.png{{!}}90px|game=PE|Roughneck|Martin|1,176<br>3 {{i|Poké Ball}}s|2|020|Raticate|♂|42|None|095|Onix|♀|42|None|36=エイスケ|37=Eisuke}} |
| | {{trainerdiv|ocean}} |
| | {{trainerentry|VSSwimmer PE.png{{!}}90px|game=PE|Swimmer|Spencer|840<br>3 {{i|Poké Ball}}s|2|086|Seel|♀|42|None|117|Seadra|♂|42|None|36=トシヒロ|37=Toshihiro}} |
| | {{trainerdiv|ocean}} |
| | {{trainerentry|VSSwimmer PE.png{{!}}90px|game=PE|Swimmer|Jack|840<br>3 {{i|Poké Ball}}s|3|072|Tentacool|♂|42|None|055|Golduck|♂|42|None|073|Tentacruel|♀|42|None|36=ヒデノリ|37=Hidenori}} |
| | {{trainerdiv|ocean}} |
| | {{trainerentry|VSFisherman PE.png{{!}}90px|game=PE|Fisherman|Nolan|1,680<br>3 {{i|Poké Ball}}s|2|073|Tentacruel|♂|42|None|121|Starmie||42|None|36=トシヒコ|37=Toshihiko}} |
| | {{trainerdiv|ocean}} |
| | {{trainerentry|VSSailor PE.png{{!}}90px|game=PE|Sailor|Claude|2,520<br>3 {{i|Poké Ball}}s|2|057|Primeape|♂|42|None|067|Machoke|♂|42|None|36=ヒデユキ|37=Hideyuki}} |
| | {{trainerdiv|ocean}} |
| | {{trainerentry|VSSwimmer PE.png{{!}}90px|game=PE|Swimmer|Roland|840<br>3 {{i|Poké Ball}}s|2|121|Starmie||42|None|099|Kingler|♀|42|None|36=マサトシ|37=Masatoshi}} |
| | {{trainerdiv|ocean}} |
| | {{trainerentry|VSSwimmer PE.png{{!}}90px|game=PE|Swimmer|Jerome|840<br>3 {{i|Poké Ball}}s|1|080|Slowbro|♂|42|None|36=モリオ|37=Morio}} |
| | {{trainerdiv|ocean|After becoming Champion}} |
| | {{trainerentry/master|VSBeauty 2 Master PE.png{{!}}90px|Beauty|Haruka|080|Slowbro|♂|75|Normal|Disable|Psychic|Calm Mind|Normal|Yawn|Ghost|Shadow Ball|36=ハルカ|37=Haruka}} |
| | {{trainerdiv|ocean}} |
| | {{trainerentry/master|VSBeauty 2 Master PE.png{{!}}90px|Beauty|Jill|079|Slowpoke|♂|70|Electric|Thunder Wave|Ground|Earthquake|Normal|Facade|36=フミコ|37=Fumiko}} |
| | {{trainerdiv|ocean}} |
| | {{trainerentry/master|VSBeauty 2 Master PE.png{{!}}90px|Beauty|Nicole|054|Psyduck|♀|70|Psychic|Amnesia|Psychic|Psychic|Psychic|Rest|36=ニコル|37=Nicole}} |
| | {{Trainerfooter|ocean|PE}} |
|
| |
|
| ==Differences among generations== | | ==Differences among generations== |
| ===Generation I and III=== | | [[File:Kanto Route 21 HGSS.png|thumb|150px|Route 21 in {{game|HeartGold and SoulSilver|s}}]] |
| Between Generations I and III, the route is the same with the exception of a few minor cosmetic changes. In Generation III, the bridges are replaced with sandy islands and five additional islands are added as well. Trainers can be found on four of the islands, as well as in five in the water, making a total of nine Trainers. | | ===Generation I, III, and VII=== |
| | Between Generations I, III, and VII, the route is the same with the exception of a few minor cosmetic changes. In Generation III, the bridges are replaced with sandy islands and five additional islands are added as well. Trainers can be found on four of the islands, as well as in five in the water, making a total of nine Trainers. In Generation VII, there are six Trainers on five islands, and four in the water, making a total of ten Trainers. |
|
| |
|
| ===Generation II=== | | ===Generation II=== |
| Line 234: |
Line 305: |
| ===Generation IV=== | | ===Generation IV=== |
| The route is nearly identical to Generation III. | | The route is nearly identical to Generation III. |
| | {{-}} |
|
| |
|
| ==In the manga== | | ==In the manga== |
| [[File:Kanto Route 21 Adventures.png|thumb|200px|Route 21 in Pokémon Adventures]] | | [[File:Kanto Route 21 Adventures.png|thumb|200px|Route 21 in [[Pokémon Adventures]]]] |
| ===In the Pokémon Adventures manga=== | | ===Pokémon Adventures=== |
| | ===={{MangaArc|Red, Green & Blue}}==== |
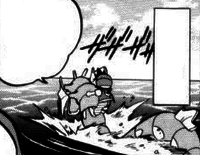
| Route 21 made a brief appearance in ''[[PS027|Kalling Kadabra]]'', where {{adv|Red}} was seen {{m|surf}}ing through it with his [[Gyara]]dos on his way from Cinnabar Island back to Pallet Town to meet {{adv|Professor Oak}}. | | Route 21 made a brief appearance in ''[[PS027|Kalling Kadabra]]'', where {{adv|Red}} was seen {{m|surf}}ing through it with his [[Gyara]]dos on his way from Cinnabar Island back to Pallet Town to meet {{adv|Professor Oak}}. |
| {{-}} | | {{-}} |
|
| |
|
| ==Trivia== | | ==Trivia== |
| * In [[Generation II]] and {{game|HeartGold and SoulSilver|s}}, wild {{p|Mr. Mime}} can be found in the grassy area south of [[Pallet Town]], most likely a reference to [[Mimey|the events]] [[EP064|of the anime]]. | | * In [[Generation II]] and {{game|HeartGold and SoulSilver|s}}, wild {{p|Mr. Mime}} can be found in the grassy area south of [[Pallet Town]]; this is most likely a [[List of cross-canon references|reference]] to [[Mimey|the events]] [[EP064|of the anime]]. |
|
| |
|
| {{Kanto}}<br> | | {{Kanto}}<br> |
| Line 253: |
Line 326: |
| [[Category:FireRed and LeafGreen locations|Route 021]] | | [[Category:FireRed and LeafGreen locations|Route 021]] |
| [[Category:HeartGold and SoulSilver locations|Route 021]] | | [[Category:HeartGold and SoulSilver locations|Route 021]] |
| | [[Category:Let's Go, Pikachu! and Let's Go, Eevee! locations|Route 021]] |
|
| |
|
| [[de:Route 21 (Kanto)]] | | [[de:Route 21 (Kanto)]] |
| | [[es:Ruta 21 (Kanto)]] |
| [[fr:Chenal 21 (Kanto)]] | | [[fr:Chenal 21 (Kanto)]] |
| [[it:Percorso 21 (Kanto)]] | | [[it:Percorso 21 (Kanto)]] |
| [[ja:21ばんすいどう]] | | [[ja:21ばんすいどう (カントー地方)]] |
| [[pl:Kanto Route 21]]
| | [[zh:21号水路(关都)]] |
| [[zh:21号水道(关都)]] | |


