|
|
| (13 intermediate revisions by 7 users not shown) |
| Line 22: |
Line 22: |
| }} | | }} |
|
| |
|
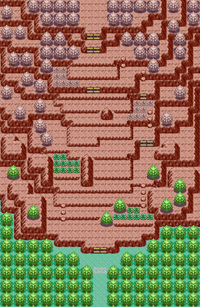
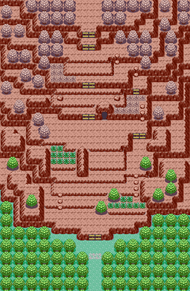
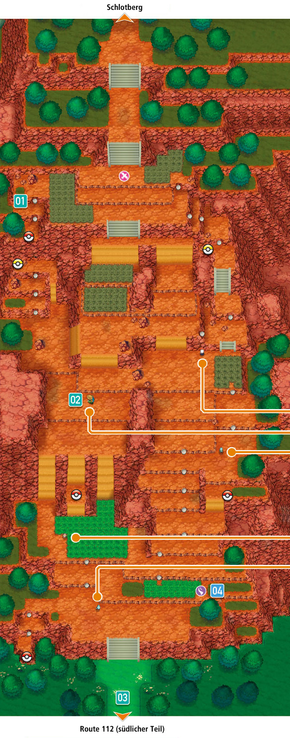
| '''Jagged Pass''' (Japanese: '''デコボコ{{tt|山道|さんどう}}''' ''Rugged Mountain Pass'') is a location in [[Hoenn]]. Jagged Pass connects [[Mt. Chimney]] and {{rt|112|Hoenn}}. Crossing Jagged Pass is the only way to reach [[Lavaridge Town]]. The Jagged Pass is accessible only after Maxie{{sup/3|R}}{{sup/3|E}}{{sup/6|OR}}/Archie{{sup/3|S}}{{sup/6|AS}} is defeated on Mt. Chimney. [[Team Magma]] has a [[Team Magma Hideout|hideout]] here in {{game|Emerald}}. | | '''Jagged Pass''' (Japanese: '''デコボコ{{tt|山道|さんどう}}''' ''Rugged Mountain Pass'') is a location in [[Hoenn]]. Jagged Pass connects [[Mt. Chimney]] and {{rt|112|Hoenn}}. Crossing Jagged Pass is the only way to reach [[Lavaridge Town]]. The Jagged Pass is accessible only after [[Maxie]]{{sup/3|R}}{{sup/3|E}}{{sup/6|OR}}/[[Archie]]{{sup/3|S}}{{sup/6|AS}} is defeated on Mt. Chimney. [[Team Magma]] has a {{OBP|Magma Hideout|Jagged Pass|hideout}} here in {{game|Emerald}}. |
|
| |
|
| ==Route description== | | ==Route description== |
| The Jagged Pass is a steep mountainside path leading down from the summit of the volcano, Mt. Chimney. As its name suggests, the route has steep, sharp [[ledge]]s and rugged rocks. Some of these rocks can be jumped on when riding the [[Acro Bike]]; the bike allows the {{player}} to travel up over the ledges which otherwise prevent uphill travel. | | The Jagged Pass is a steep mountainside path leading down from the summit of the volcano, Mt. Chimney. As its name suggests, the route has steep, sharp [[ledge]]s and rugged rocks. Some of these rocks can be jumped on when riding the [[Acro Bike]]; the bike allows the {{player}} to travel up over the ledges which otherwise prevent uphill travel. |
|
| |
|
| [[Volcanic ash]] constantly falls on the route. It is given off by Mt. Chimney's volcano, and in [[Generation III]] it can be collected in the [[Soot Sack]]. | | [[Volcanic ash]] constantly falls on the route. It is given off by Mt. Chimney's volcano, and in [[Generation III]], it can be collected in the [[Soot Sack]]. |
|
| |
|
| ===Magma Hideout=== | | ===Magma Hideout=== |
| {{main|Team Magma Hideout|Magma Hideout}} | | {{main|Magma Hideout (Jagged Pass)}} |
| In Emerald, the Magma Hideout is located in the middle of the Jagged Pass. If the Key Item [[Magma Emblem]] is in the Bag while traveling up or down the mountain face, the doorway to the Hideout will be revealed, allowing the player to enter the cavern. The Magma Emblem is lost by the team at the peak of [[Mt. Pyre]], so the hideout will remain hidden during the player's initial trip down Jagged Pass, although a single {{tc|Team Magma Grunt}} can be found in front of the hidden doorway. | | In Emerald, the Magma Hideout is located in the middle of the Jagged Pass. If the Key Item [[Magma Emblem]] is in the Bag while traveling up or down the mountain face, the doorway to the Hideout will be revealed, allowing the player to enter the cavern. The Magma Emblem is lost by the team at the peak of [[Mt. Pyre]], so the hideout will remain hidden during the player's initial trip down Jagged Pass, although a single {{tc|Team Magma Grunt}} can be found in front of the hidden doorway. |
|
| |
|
| ==Items== | | ==Items== |
| {{Itlisth|volcano}} | | {{Itlisth|volcano}} |
| {{Itemlist|Full Heal|In the grass southwest of the Mt. Chimney entrance ''(hidden)''|Ru=yes|Sa=yes|E=yes}} | | {{Itemlist|Full Heal|In the ash-covered grassy patch southwest of the Mt. Chimney entrance ''(hidden)''|Ru=yes|Sa=yes|E=yes}} |
| {{Itemlist|Great Ball|Northwest of the entrance from Route 112, on the second ledge ''(hidden)''|Ru=yes|Sa=yes|E=yes|display={{ball|Great}}}} | | {{Itemlist|Burn Heal|North of a tree east of {{tc|Camper}} Ethan|Ru=yes|Sa=yes|E=yes}} |
| {{Itemlist|Burn Heal|Near a large tree east of the {{tc|Picnicker}} Diana|Ru=yes|Sa=yes|E=yes}} | | {{Itemlist|Great Ball|Northwest of the Route 112 entrance, on the second ledge ''(hidden)''|Ru=yes|Sa=yes|E=yes}} |
| {{Itemlist|TM Fire VI|Southeast of the northern entrance (requires [[Acro Bike]])|OR=yes|AS=yes|display={{TM|43|Flame Charge}}}} | | {{Itemlist|TM Fire VI|Southeast of the northern entrance (requires [[Acro Bike]])|OR=yes|AS=yes|display={{TM|43|Flame Charge}}}} |
| {{Itemlist|Super Repel|Southwest of the northern entrance (requires [[Acro Bike]])|OR=yes|AS=yes}} | | {{Itemlist|Super Repel|Southwest of the northern entrance (requires [[Acro Bike]])|OR=yes|AS=yes}} |
| Line 45: |
Line 45: |
| * Inside a small rock between {{tc|Expert}} Shelby and {{tc|Hiker}} Eric ''(hidden)''|OR=yes|AS=yes|display=[[Full Heal]] ×2}} | | * Inside a small rock between {{tc|Expert}} Shelby and {{tc|Hiker}} Eric ''(hidden)''|OR=yes|AS=yes|display=[[Full Heal]] ×2}} |
| {{Itemlist|Max Ether|South of {{tc|Camper}} Ethan|OR=yes|AS=yes}} | | {{Itemlist|Max Ether|South of {{tc|Camper}} Ethan|OR=yes|AS=yes}} |
| {{Itemlist|Great Ball|East of {{tc|Camper}} Ethan ''(hidden)''|OR=yes|AS=yes|display={{ball|Great}}}} | | {{Itemlist|Great Ball|East of {{tc|Camper}} Ethan ''(hidden)''|OR=yes|AS=yes}} |
| {{Itemlist|X Defense|Northwest of the southern entrance (requires [[Acro Bike]])|OR=yes|AS=yes}} | | {{Itemlist|X Defense|Northwest of the southern entrance (requires [[Acro Bike]])|OR=yes|AS=yes}} |
| {{Itemlist|Tyranitarite|Next to the patch of grass northeast of the southern entrance, after defeating or catching {{p|Groudon}}{{sup/6|OR}}/{{p|Kyogre}}{{sup/6|AS}}|OR=yes|AS=yes}} | | {{Itemlist|Tyranitarite|Next to the patch of grass northeast of the southern entrance, after defeating or catching {{p|Groudon}}{{sup/6|OR}}/{{p|Kyogre}}{{sup/6|AS}}|OR=yes|AS=yes}} |
| {{itemlist|Moon Stone|5% chance of receiving one after a rematch with {{tc|Expert}} Shelby|OR=yes|AS=yes}} | | {{itemlist|Moon Stone|5% chance of receiving one after a rematch with {{tc|Expert}} Shelby|OR=yes|AS=yes}} |
| {{Itemlist|Tiny Mushroom|20% chance of receiving one after a rematch with {{tc|Camper}} Ethan|OR=yes|AS=yes}} | | {{Itemlist|Tiny Mushroom|20% chance of receiving one after a rematch with {{tc|Camper}} Ethan or {{tc|Picnicker}} Diana|OR=yes|AS=yes}} |
| {{Itemlist|Tiny Mushroom|20% chance of receiving one after a rematch with {{tc|Picnicker}} Diana|OR=yes|AS=yes}}
| |
| {{Itlistfoot|volcano}} | | {{Itlistfoot|volcano}} |
|
| |
|
| Line 101: |
Line 100: |
| {{trainerentry|Spr RS Hiker.png|Hiker|Eric|800|2|074|Geodude|♂|20||343|Baltoy||20||36=ダイチ|37=Daichi}} | | {{trainerentry|Spr RS Hiker.png|Hiker|Eric|800|2|074|Geodude|♂|20||343|Baltoy||20||36=ダイチ|37=Daichi}} |
| {{trainerdiv|volcano}} | | {{trainerdiv|volcano}} |
| {{trainerentry|Spr RS Team Magma Grunt M.png|Team Magma Grunt||440|2|261|Poochyena|♂|22||322|Numel|♂|22||}} | | {{trainerentry|Spr RS Team Magma Grunt M.png|Team Magma Grunt||440<br><small>Only before obtaining the [[Magma Emblem]]</small>|2|261|Poochyena|♂|22||322|Numel|♂|22||}} |
| {{trainerdiv|volcano}} | | {{trainerdiv|volcano}} |
| {{trainerentry|Spr RS Picnicker.png|Picnicker|Diana|304|3|285|Shroomish|♀|19||043|Oddish|♀|19||333|Swablu|♀|19||36=コズエ|37=Kozue|38=Nav}} | | {{trainerentry|Spr RS Picnicker.png|Picnicker|Diana|304|3|285|Shroomish|♀|19||043|Oddish|♀|19||333|Swablu|♀|19||36=コズエ|37=Kozue|38=Nav}} |
| Line 122: |
Line 121: |
| ===Pokémon Omega Ruby and Alpha Sapphire=== | | ===Pokémon Omega Ruby and Alpha Sapphire=== |
| {{trainerheader|volcano}} | | {{trainerheader|volcano}} |
| {{trainerentry|VSExpert F.png{{!}}150px|Expert|Shelby|2080|2|307|Meditite|♀|24||297|Hariyama|♂|26|36=ミヤコ|37=Miyako|38=Nav}} | | {{trainerentry|VSExpert F.png{{!}}150px|game=6|Expert|Shelby|2080|2|307|Meditite|♀|24||297|Hariyama|♂|26|36=ミヤコ|37=Miyako|38=Nav}} |
| {{trainerdiv|volcano}} | | {{trainerdiv|volcano}} |
| {{trainerentry|VSHiker.png{{!}}150px|Hiker|Eric|800|1|075|Graveler|♂|25||36=ダイチ|37=Daichi}} | | {{trainerentry|VSHiker.png{{!}}150px|game=6|Hiker|Eric|800|1|075|Graveler|♂|25||36=ダイチ|37=Daichi}} |
| {{trainerdiv|volcano}} | | {{trainerdiv|volcano}} |
| {{trainerentry|VSCamper.png{{!}}150px|Camper|Ethan|384|1|316|Gulpin|♂|24|36=ヨシハル|37=Yoshiharu|38=Nav}} | | {{trainerentry|VSCamper.png{{!}}150px|game=6|Camper|Ethan|384|1|316|Gulpin|♂|24|36=ヨシハル|37=Yoshiharu|38=Nav}} |
| {{trainerdiv|volcano}} | | {{trainerdiv|volcano}} |
| {{trainerentry|VSFairy Tale Girl.png{{!}}150px|Fairy Tale Girl|Nellie|368|2|300|Skitty|♀|21||039|Jigglypuff|♀|23||36=ツキコ|37=Tsukiko}} | | {{trainerentry|VSFairy Tale Girl.png{{!}}150px|game=6|Fairy Tale Girl|Nellie|368|2|300|Skitty|♀|21||039|Jigglypuff|♀|23||36=ツキコ|37=Tsukiko}} |
| {{trainerdiv|volcano}} | | {{trainerdiv|volcano}} |
| {{trainerentry|VSPicnicker.png{{!}}150px|Picnicker|Diana|352|2|044|Gloom|♀|22||333|Swablu|♀|22||36=コズエ|37=Kozue|38=Nav}} | | {{trainerentry|VSPicnicker.png{{!}}150px|game=6|Picnicker|Diana|352|2|044|Gloom|♀|22||333|Swablu|♀|22||36=コズエ|37=Kozue|38=Nav}} |
| {{trainerdiv|volcano|Rematch}} | | {{trainerdiv|volcano|Rematch}} |
| {{trainerentry|VSExpert F.png{{!}}150px|Expert|Shelby|2,800<br><small>After acquiring the {{badge|Feather}}</small>|2|307|Meditite|♀|33||297|Hariyama|♂|35||36=ミヤコ|37=Miyako|38=Nav}} | | {{trainerentry|VSExpert F.png{{!}}150px|game=6|Expert|Shelby|2,800<br><small>After earning the {{badge|Feather}}</small>|2|307|Meditite|♀|33||297|Hariyama|♂|35||36=ミヤコ|37=Miyako|38=Nav}} |
| {{trainerentry|VSExpert F.png{{!}}150px|Expert|Shelby|3,360<br><small>After acquiring the {{badge|Mind}}</small>|2|308|Medicham|♀|40||297|Hariyama|♂|42||36=ミヤコ|37=Miyako|38=Nav}} | | {{trainerentry|VSExpert F.png{{!}}150px|game=6|Expert|Shelby|3,360<br><small>After earning the {{badge|Mind}}</small>|2|308|Medicham|♀|40||297|Hariyama|♂|42||36=ミヤコ|37=Miyako|38=Nav}} |
| {{trainerentry|VSExpert F.png{{!}}150px|Expert|Shelby|3,520<br><small>After acquiring the {{badge|Rain}}</small>|3|447|Riolu|♂|44||308|Medicham|♀|44||297|Hariyama|♂|44||36=ミヤコ|37=Miyako|38=Nav}} | | {{trainerentry|VSExpert F.png{{!}}150px|game=6|Expert|Shelby|3,520<br><small>After earning the {{badge|Rain}}</small>|3|447|Riolu|♂|44||308|Medicham|♀|44||297|Hariyama|♂|44||36=ミヤコ|37=Miyako|38=Nav}} |
| {{trainerentry|VSExpert F.png{{!}}150px|Expert|Shelby|4,480<br><small>After entering the [[Hall of Fame]]</small>|3|308|Medicham|♀|54||297|Hariyama|♂|55||448|Lucario|♂|56||36=ミヤコ|37=Miyako|38=Nav}} | | {{trainerentry|VSExpert F.png{{!}}150px|game=6|Expert|Shelby|4,480<br><small>After entering the [[Hall of Fame]]</small>|3|308|Medicham|♀|54||297|Hariyama|♂|55||448|Lucario|♂|56||36=ミヤコ|37=Miyako|38=Nav}} |
| {{trainerdiv|volcano}} | | {{trainerdiv|volcano}} |
| {{trainerentry|VSCamper.png{{!}}150px|Camper|Ethan|448<br><small>After acquiring the {{badge|Balance}}</small>|1|317|Swalot|♂|28||36=ヨシハル|37=Yoshiharu|38=Nav}} | | {{trainerentry|VSCamper.png{{!}}150px|game=6|Camper|Ethan|448<br><small>After earning the {{badge|Balance}}</small>|1|317|Swalot|♂|28||36=ヨシハル|37=Yoshiharu|38=Nav}} |
| {{trainerentry|VSCamper.png{{!}}150px|Camper|Ethan|496<br><small>After acquiring the {{badge|Feather}}</small>|2|317|Swalot|♂|31||042|Golbat|♂|31||36=ヨシハル|37=Yoshiharu|38=Nav}} | | {{trainerentry|VSCamper.png{{!}}150px|game=6|Camper|Ethan|496<br><small>After earning the {{badge|Feather}}</small>|2|317|Swalot|♂|31||042|Golbat|♂|31||36=ヨシハル|37=Yoshiharu|38=Nav}} |
| {{trainerentry|VSCamper.png{{!}}150px|Camper|Ethan|608<br><small>After acquiring the {{badge|Mind}}</small>|2|317|Swalot|♂|38||042|Golbat|♂|38||36=ヨシハル|37=Yoshiharu|38=Nav}} | | {{trainerentry|VSCamper.png{{!}}150px|game=6|Camper|Ethan|608<br><small>After earning the {{badge|Mind}}</small>|2|317|Swalot|♂|38||042|Golbat|♂|38||36=ヨシハル|37=Yoshiharu|38=Nav}} |
| {{trainerentry|VSCamper.png{{!}}150px|Camper|Ethan|752<br><small>After entering the [[Hall of Fame]]</small>|3|317|Swalot|♂|47||435|Skuntank|♂|47||169|Crobat|♂|47||36=ヨシハル|37=Yoshiharu|38=Nav}} | | {{trainerentry|VSCamper.png{{!}}150px|game=6|Camper|Ethan|752<br><small>After entering the [[Hall of Fame]]</small>|3|317|Swalot|♂|47||435|Skuntank|♂|47||169|Crobat|♂|47||36=ヨシハル|37=Yoshiharu|38=Nav}} |
| {{trainerdiv|volcano}} | | {{trainerdiv|volcano}} |
| {{trainerentry|VSPicnicker.png{{!}}150px|Picnicker|Diana|416<br><small>After acquiring the {{badge|Balance}}</small>|2|044|Gloom|♀|26||333|Swablu|♀|26||36=コズエ|37=Kozue|38=Nav}} | | {{trainerentry|VSPicnicker.png{{!}}150px|game=6|Picnicker|Diana|416<br><small>After earning the {{badge|Balance}}</small>|2|044|Gloom|♀|26||333|Swablu|♀|26||36=コズエ|37=Kozue|38=Nav}} |
| {{trainerentry|VSPicnicker.png{{!}}150px|Picnicker|Diana|496<br><small>After acquiring the {{badge|Feather}}</small>|2|044|Gloom|♀|31||333|Swablu|♀|31||36=コズエ|37=Kozue|38=Nav}} | | {{trainerentry|VSPicnicker.png{{!}}150px|game=6|Picnicker|Diana|496<br><small>After earning the {{badge|Feather}}</small>|2|044|Gloom|♀|31||333|Swablu|♀|31||36=コズエ|37=Kozue|38=Nav}} |
| {{trainerentry|VSPicnicker.png{{!}}150px|Picnicker|Diana|608<br><small>After acquiring the {{badge|Mind}}</small>|2|044|Gloom|♀|38||334|Altaria|♀|38||36=コズエ|37=Kozue|38=Nav}} | | {{trainerentry|VSPicnicker.png{{!}}150px|game=6|Picnicker|Diana|608<br><small>After earning the {{badge|Mind}}</small>|2|044|Gloom|♀|38||334|Altaria|♀|38||36=コズエ|37=Kozue|38=Nav}} |
| {{trainerentry|VSPicnicker.png{{!}}150px|Picnicker|Diana|768<br><small>After entering the [[Hall of Fame]]</small>|2|045|Vileplume|♀|48||334|Altaria|♀|48||36=コズエ|37=Kozue|38=Nav}} | | {{trainerentry|VSPicnicker.png{{!}}150px|game=6|Picnicker|Diana|768<br><small>After entering the [[Hall of Fame]]</small>|2|045|Vileplume|♀|48||334|Altaria|♀|48||36=コズエ|37=Kozue|38=Nav}} |
| {{trainerfooter|volcano|3}} | | {{trainerfooter|volcano|3}} |
|
| |
|
| Line 173: |
Line 172: |
| [[File:Jagged Pass anime.png|thumb|250px|Jagged Pass in the {{pkmn|anime}}]] | | [[File:Jagged Pass anime.png|thumb|250px|Jagged Pass in the {{pkmn|anime}}]] |
| Jagged Pass briefly appeared at the end of ''[[AG054|Fight for the Meteorite!]]''. [[Professor Cozmo]] directed {{Ash}} and {{ashfr}} to take the road down the mountainside in order to reach [[Lavaridge Town]] before parting ways with them. | | Jagged Pass briefly appeared at the end of ''[[AG054|Fight for the Meteorite!]]''. [[Professor Cozmo]] directed {{Ash}} and {{ashfr}} to take the road down the mountainside in order to reach [[Lavaridge Town]] before parting ways with them. |
| | {{-}} |
| | |
| | ==In the manga== |
| | [[File:Jagged Pass Adventures.png|thumb|250px|Jagged Pass in [[Pokémon Adventures]]]] |
| | ===Pokémon Adventures=== |
| | ===={{MangaArc|Ruby & Sapphire}}==== |
| | Jagged Pass appeared in ''[[PS216|Mixing It Up with Magcargo]]'', where {{adv|Sapphire}} and [[Flannery]] headed down the mountainside while lamenting their failure at preventing [[Team Aqua]] from stopping [[Mt. Chimney]]'s activity. On the way down, they spotted a hot spring, which had been heated up by the fireball created when Flannery and [[Tabitha]] had tried to revive the volcano. While bathing in the spring, they decided to have a [[Pokémon battle]]. After the battle was over, they left the cooling hot spring and parted ways. Before Sapphire left with her {{p|Tropius}}, [[Troppy]], Flannery gave her a {{badge|Heat}}. |
| {{-}} | | {{-}} |
|
| |
|
| Line 180: |
Line 186: |
| ==In other languages== | | ==In other languages== |
| {{langtable|color={{locationcolor/light|volcano}}|bordercolor={{locationcolor/dark|volcano}}|textcolor={{locationcolor/text|volcano}} | | {{langtable|color={{locationcolor/light|volcano}}|bordercolor={{locationcolor/dark|volcano}}|textcolor={{locationcolor/text|volcano}} |
| |zh_yue=碎石山路 ''{{tt|Seuisehk Sāanlouh|Gravel Mountain Pass}}'' | | |zh_yue=凹凸山道 ''{{tt|Nāpdaht Sāandouh|Rugged Pass}}'' {{tt|*|Games}}<br>碎石山路 ''{{tt|Seuisehk Sāanlouh|Gravel Road}}'' {{tt|*|Adventures}} |
| |zh_cmn=凹凸山道 ''{{tt|Āotú Shāndào|Rugged Mountain Pass}}'' {{tt|*|Pokédex (Taiwan) & Adventures (Mainland China)}}<br>碎石山路 ''{{tt|Suìshí Shānlù|Gravel Mountain Pass}}'' {{tt|*|Adventures (Taiwan)}} | | |zh_cmn=凹凸山道 ''{{tt|Āotú Shāndào / Āotū Shāndào |Rugged Pass}}'' {{tt|*|Games, Adventures (Jilin Publishing), Emerald Guidebook}}<br>碎石山路 ''{{tt|Suìshí Shānlù|Gravel Road}}'' {{tt|*|Adventures (Ching Win)}} |
| |fr=Sentier Sinuroc | | |fr=Sentier Sinuroc |
| |de=Steilpass | | |de=Steilpass |
| |it=Passo Selvaggio | | |it=Passo Selvaggio |
| |ko=울퉁불퉁 산길 ''{{tt|Ultungbultung Sangil|Rugged Mountain Pass}} | | |ko=울퉁불퉁 산길 ''{{tt|Ultungbultung Sangil|Rugged Mountain Pass}} |
| | |pt_br=Passo Pontudo |
| |es=Desfiladero | | |es=Desfiladero |
| |vi=Con Đường Nhấp Nhô' | | |vi=Con Đường Nhấp Nhô' |


