Zero Lab: Difference between revisions
YoungMan16 (talk | contribs) mNo edit summary |
|||
| (8 intermediate revisions by 4 users not shown) | |||
| Line 17: | Line 17: | ||
The Zero Lab's door is initially locked by four separate locks, forcing the {{player}} to visit the four Research Stations around Area Zero in order to unlock the entrance. When the door is first unlocked, a group of [[Paradox Pokémon]] comes out and attacks the player and their friends. Once the path has been cleared, the player is able to enter the laboratory. | The Zero Lab's door is initially locked by four separate locks, forcing the {{player}} to visit the four Research Stations around Area Zero in order to unlock the entrance. When the door is first unlocked, a group of [[Paradox Pokémon]] comes out and attacks the player and their friends. Once the path has been cleared, the player is able to enter the laboratory. | ||
The first floor of the Zero Lab contains the working space and living quarters of [[Professor Sada]]{{sup/9|S}}/[[Professor Turo]]{{sup/9|V}}. The area contains multiple small chambers used to study the crystals found in Area Zero, the Professor's research notes, whiteboards, a bed, and an elevator to the bottom floor. This is where the player first encounters {{wp|Artificial intelligence|AI}} Sada{{sup/9|S}}/Turo{{sup/9|V}}, who reveals that the real professor is [[Death in the Pokémon world|dead]] and asks the player's help in stopping the [[ | The first floor of the Zero Lab contains the working space and living quarters of [[Professor Sada]]{{sup/9|S}}/[[Professor Turo]]{{sup/9|V}}. The area contains multiple small chambers used to study the crystals found in Area Zero, the Professor's research notes, whiteboards, a bed, and an elevator to the bottom floor. This is where the player first encounters {{wp|Artificial intelligence|AI}} Sada{{sup/9|S}}/Turo{{sup/9|V}}, who reveals that the real professor is [[Death in the Pokémon world|dead]] and asks the player's help in stopping the [[time machine]] it and the Professor built together in order to stop an influx of Paradox Pokémon from destroying [[Paldea]]'s ecosystem. | ||
Taking the elevator down to the bottom floor allows the player to reach the time machine room, powered by the [[Terastal phenomenon]]. The AI warns the player that its programming will force it to attack the player when they try to stop the time machine, which indeed happens. After the AI has been defeated, a program called '''Paradise Protection Protocol''' takes over, taking | Taking the elevator down to the bottom floor allows the player to reach the time machine room, powered by the [[Terastal phenomenon]]. The AI warns the player that its programming will force it to attack the player when they try to stop the time machine, which indeed happens. After the AI has been defeated, a program called the '''Paradise Protection Protocol''' (Japanese: '''楽園防衛プログラム''' ''Paradise Defense Program'') takes over, taking control of the AI once more, locking away all [[Poké Ball]]s in the room that are not registered to the Professor's ID, and gathering [[Terastal energy]] for the AI, which crystallizes parts of its body. This forces the player to use their {{ga|Koraidon}}{{sup/9|S}}/{{ga|Miraidon}}{{sup/9|V}} against the member of its {{OBP|Pokémon|species|kind}} used by the AI. Once the player has emerged victorious, the AI is once again freed, but it also realizes that its systems are so inseparably connected to the time machine that it cannot be shut down while it remains present. As such, the AI chooses to use the time machine to [[Time travel|travel to a different era]] to stop the machine. Upon the AI's disappearance, the time machine shuts down permanently. | ||
After the player has obtained the [[Indigo Disk]], the lab's elevator | After the player has obtained the [[Indigo Disk]], they use it to redirect the lab's elevator to the [[Area Zero Underdepths]], rendering the time machine room inaccessible. | ||
{| style="margin:auto; text-align:center; {{roundy|10px}} border: 2px solid #{{locationcolor/dark|building}}; background: #{{locationcolor/med|building}}; font-size:80%" | {| style="margin:auto; text-align:center; {{roundy|10px}} border: 2px solid #{{locationcolor/dark|building}}; background: #{{locationcolor/med|building}}; font-size:80%" | ||
| Line 268: | Line 268: | ||
! Games | ! Games | ||
! Location | ! Location | ||
! Song name | ! Song name (Japanese) | ||
! Song name (English Translation) | |||
! Composition | ! Composition | ||
! Arrangement | ! Arrangement | ||
|- style="background:#FFF" | |- style="background:#FFF" | ||
! rowspan=" | ! rowspan="10" |{{GameIcon|Sc}}{{GameIcon|Vi}} | ||
| After the [[Scarlet Book]]{{sup/9|S}}/[[Violet Book]]{{sup/9|V}}<br> is placed into the time machine | | After the [[Scarlet Book]]{{sup/9|S}}/[[Violet Book]]{{sup/9|V}}<br> is placed into the time machine | ||
| | | 戦闘プログラム起動 | ||
| | | Activating Offensive Protocols | ||
| | | Hiromitsu Maeba <br> [[Toby Fox]] | ||
| Hiromitsu Maeba | |||
|- | |- | ||
| When fighting against the Professor | | When fighting against the Professor | ||
| 戦闘!ゼロラボ | |||
| Battle! (Zero Lab) | | Battle! (Zero Lab) | ||
| | | Toby Fox<ref>[https://toby.fangamer.com/newsletters/winter22/ UNDERTALE / DELTARUNE NEWSLETTER: ISSUE 1 (Winter 2022)]</ref> | ||
| | | Toby Fox | ||
|- | |- | ||
| When the Professor<br>is defeated | | When the Professor<br>is defeated | ||
| Victory! (Zero Lab) | | ゼロラボで勝利 | ||
| | | Victory! (Zero Lab) | ||
| | | Toby Fox | ||
| Hiromitsu Maeba | |||
|- | |- | ||
| When Arven first sees the<br>AI Professor | | When Arven first sees the<br>AI Professor | ||
| | | 再開 | ||
| | | Reunion | ||
| | | Hiromitsu Maeba | ||
| Hiromitsu Maeba | |||
|- | |- | ||
| When the Paradise Protection Protocol<br>activates | | When the Paradise Protection Protocol<br>activates, and after<br>being challenged by<br>the Paradise Protection Protocol | ||
| Paradise Protection Protocol | | 楽園防衛プログラム | ||
| | | Paradise Protection Protocol | ||
| | | Hiromitsu Maeba | ||
| Hiromitsu Maeba | |||
|- | |- | ||
| | | When {{p|Koraidon}}{{sup/9|S}}/{{p|Miraidon}}{{sup/9|V}}<br> is sent out by the player<br> and changes into its<br>battle form | ||
| Battle | | バトルフォルム | ||
| [[ | | Battle Form | ||
| | | [[Gō Ichinose]] | ||
| Gō Ichinose | |||
|- | |- | ||
| When {{p|Koraidon}}{{sup/9|S}}/{{p|Miraidon}}{{sup/9|V}}<br> | | When the player's {{p|Koraidon}}{{sup/9|S}}/{{p|Miraidon}}{{sup/9|V}}<br> battles the rogue {{p|Koraidon}}{{sup/9|S}}/{{p|Miraidon}}{{sup/9|V}} | ||
| | | 戦闘!■■■■ | ||
| | | Battle!<br>(■■■■) | ||
| | | Toby Fox | ||
| Gō Ichinose | |||
|- | |||
| When the Professor<br>is saying their final goodbyes<br> to the group after the {{p|Koraidon}}{{sup/9|S}}/{{p|Miraidon}}{{sup/9|V}} battle. | |||
| 切なる思い | |||
| Earnest Feelings | |||
| Hiromitsu Maeba | |||
| Hiromitsu Maeba | |||
|- | |- | ||
| When the Professor<br>disappears into the time machine | | When the Professor<br>disappears into the time machine | ||
| I bid you adieu! | | ボン・ボヤージュ! | ||
| | | I bid you adieu! | ||
| | | Hiromitsu Maeba | ||
| Hiromitsu Maeba | |||
|- | |- | ||
| As the player, [[Arven]], [[Nemona]], and [[Penny]]<br>discuss the events of the ending | | As the player, [[Arven]], [[Nemona]], and [[Penny]]<br>discuss the events of the ending | ||
| | | ザ・ホームウェイ | ||
| | | The Way Home | ||
| Toby Fox | |||
| Hiromitsu Maeba | |||
| | |||
|} | |} | ||
Latest revision as of 03:57, 17 September 2024
| ||||
| ||||
| Location: | Area Zero | |||
|---|---|---|---|---|
| Region: | Paldea | |||
| Generations: | IX | |||
 Location of Zero Lab in Paldea. | ||||
| Pokémon world locations | ||||
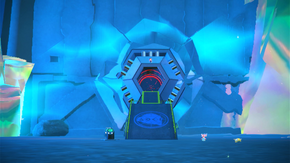
The Zero Lab (Japanese: ゼロラボ Zero Laboratory) is a facility located at the bottom of Area Zero in the Great Crater of Paldea.
In the core series games
The Zero Lab's door is initially locked by four separate locks, forcing the player to visit the four Research Stations around Area Zero in order to unlock the entrance. When the door is first unlocked, a group of Paradox Pokémon comes out and attacks the player and their friends. Once the path has been cleared, the player is able to enter the laboratory.
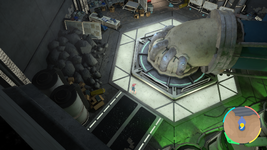
The first floor of the Zero Lab contains the working space and living quarters of Professor SadaS/Professor TuroV. The area contains multiple small chambers used to study the crystals found in Area Zero, the Professor's research notes, whiteboards, a bed, and an elevator to the bottom floor. This is where the player first encounters AI SadaS/TuroV, who reveals that the real professor is dead and asks the player's help in stopping the time machine it and the Professor built together in order to stop an influx of Paradox Pokémon from destroying Paldea's ecosystem.
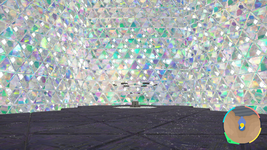
Taking the elevator down to the bottom floor allows the player to reach the time machine room, powered by the Terastal phenomenon. The AI warns the player that its programming will force it to attack the player when they try to stop the time machine, which indeed happens. After the AI has been defeated, a program called the Paradise Protection Protocol (Japanese: 楽園防衛プログラム Paradise Defense Program) takes over, taking control of the AI once more, locking away all Poké Balls in the room that are not registered to the Professor's ID, and gathering Terastal energy for the AI, which crystallizes parts of its body. This forces the player to use their KoraidonS/MiraidonV against the member of its kind used by the AI. Once the player has emerged victorious, the AI is once again freed, but it also realizes that its systems are so inseparably connected to the time machine that it cannot be shut down while it remains present. As such, the AI chooses to use the time machine to travel to a different era to stop the machine. Upon the AI's disappearance, the time machine shuts down permanently.
After the player has obtained the Indigo Disk, they use it to redirect the lab's elevator to the Area Zero Underdepths, rendering the time machine room inaccessible.
|

|
|
| Inside the Zero Lab | Inside the elevator | Inside the time machine |

| ||
| After the Paradise Protection Protocol takes over (Scarlet) |
Journal entry
- Main article: Area Zero journals → Zero Lab
A journal entry describing the professor's efforts in creating a way to lock Poké Balls can be found on a desk. This system is later used to lock the Poké Balls of those not registered to Sada’sS or Turo’sV ID when Paradise Protection Protocol is activated.
Items
| Item | Location | Games | |
|---|---|---|---|
| Booster Energy | 1F; near the elevator | S V | |
Pokémon
During the second battle against the AI Professor, the player's KoraidonS/MiraidonV regains its ability to battle and becomes able to be added to the player's party.
| Pokémon | Games | Location | Levels | Rate | ||||||||||
|---|---|---|---|---|---|---|---|---|---|---|---|---|---|---|
| Special Pokémon | ||||||||||||||
| S | V |
Gift
|
68 | Only one | ||||||||||
| S | V |
Gift
|
68 | Only one | ||||||||||
| A colored background means that the Pokémon can be found in this location in the specified game. A white background with a colored letter means that the Pokémon cannot be found here. | ||||||||||||||
Trainers
Pokémon Scarlet
|
||||||||||||||||||||||||||||||||||||
| ||||||||||||||||||||||||||||||||||||
Pokémon Violet
|
|||||||||||||||||||||||||||||||||||||||||||||||||||||||||||||||||||||||||||||||||||||||||||||||||||||||||||||||||||||||||||||||||||||||||||||||||||||||||||||||||||||||||||||||||||||||||||||||||||||||||||||||||||
| |||||||||||||||||||||||||||||||||||||||||||||||||||||||||||||||||||||||||||||||||||||||||||||||||||||||||||||||||||||||||||||||||||||||||||||||||||||||||||||||||||||||||||||||||||||||||||||||||||||||||||||||||||
|
||||||||||||||||||||||||||||||||||||
| ||||||||||||||||||||||||||||||||||||
Music
| Games | Location | Song name (Japanese) | Song name (English Translation) | Composition | Arrangement |
|---|---|---|---|---|---|
| S V | After the Scarlet BookS/Violet BookV is placed into the time machine |
戦闘プログラム起動 | Activating Offensive Protocols | Hiromitsu Maeba Toby Fox |
Hiromitsu Maeba |
| When fighting against the Professor | 戦闘!ゼロラボ | Battle! (Zero Lab) | Toby Fox[1] | Toby Fox | |
| When the Professor is defeated |
ゼロラボで勝利 | Victory! (Zero Lab) | Toby Fox | Hiromitsu Maeba | |
| When Arven first sees the AI Professor |
再開 | Reunion | Hiromitsu Maeba | Hiromitsu Maeba | |
| When the Paradise Protection Protocol activates, and after being challenged by the Paradise Protection Protocol |
楽園防衛プログラム | Paradise Protection Protocol | Hiromitsu Maeba | Hiromitsu Maeba | |
| When KoraidonS/MiraidonV is sent out by the player and changes into its battle form |
バトルフォルム | Battle Form | Gō Ichinose | Gō Ichinose | |
| When the player's KoraidonS/MiraidonV battles the rogue KoraidonS/MiraidonV |
戦闘!■■■■ | Battle! (■■■■) |
Toby Fox | Gō Ichinose | |
| When the Professor is saying their final goodbyes to the group after the KoraidonS/MiraidonV battle. |
切なる思い | Earnest Feelings | Hiromitsu Maeba | Hiromitsu Maeba | |
| When the Professor disappears into the time machine |
ボン・ボヤージュ! | I bid you adieu! | Hiromitsu Maeba | Hiromitsu Maeba | |
| As the player, Arven, Nemona, and Penny discuss the events of the ending |
ザ・ホームウェイ | The Way Home | Toby Fox | Hiromitsu Maeba |
Trivia
- Two photos can be found hanging on a whiteboard filled with equations, the first depicting a younger Arven playing with his Maschiff, and the second solely depicting Maschiff.
- A smaller version of the first photo, with Arven's body partially out of frame, can be found in Arven's dorm room at Naranja AcademyS/Uva AcademyV.
- One of these photos may possibly be from the lighthouse lab on Poco Path, as it is the former home of the professor and Arven, and because an empty photo frame can be found inside.
- A shelf on the first floor of the lab appears to contain the professor's Gym Badges, as well as their Hall of Fame Badge from Naranja AcademyS/Uva AcademyV.
- The time machine inside the lab appears to have hexagonal walls, similar to that of a mysterious crystalline Pokémon mentioned in the Scarlet BookS/Violet BookV and in the professor's journal entries.
In other languages
| ||||||||||||||||||||||||||
References
| Paldea | ||||||||||
|---|---|---|---|---|---|---|---|---|---|---|
|
| ||||||||||
| ||||||||||
|
|

|
This article is part of Project Locations, a Bulbapedia project that aims to write comprehensive articles on every location in the Pokémon world. |
