|
|
| Line 33: |
Line 33: |
| {{Itlisth|cave}} | | {{Itlisth|cave}} |
| {{Itemlist|TM Fighting|1F; obtained from the Hiker next to the entrance|D=yes|P=yes|Pt=yes|display={{HM|06|Rock Smash}}}} | | {{Itemlist|TM Fighting|1F; obtained from the Hiker next to the entrance|D=yes|P=yes|Pt=yes|display={{HM|06|Rock Smash}}}} |
| {{Itemlist|TM Fighting VI|1F; obtained from the Hiker next to the entrance|BD=yes|SP=yes|display={{TM|98|Rock Smash}} ×3}} | | {{Itemlist|TM Fighting|1F; obtained from the Hiker next to the entrance|BD=yes|SP=yes|display={{TM|98|Rock Smash}} ×3}} |
| {{Itemlist|None|sprite=Dppt poketch {{#ifexpr: ({{#time: H}} mod 2) = 0|m|f}}|1F; obtained from the Hiker next to the entrance|BD=yes|SP=yes|display=[[HM|Hidden Moves]] [[Pokétch|app]]}} | | {{Itemlist|None|sprite=Dppt poketch {{#ifexpr: ({{#time: H}} mod 2) = 0|m|f}}|1F; obtained from the Hiker next to the entrance|BD=yes|SP=yes|display=[[HM|Hidden Moves]] [[Pokétch|app]]}} |
| {{Itemlist|None|sprite=399Bidoof|size=32px|1F; included with the Hidden Moves app|BD=yes|SP=yes|display={{m|Rock Smash}}}} | | {{Itemlist|None|sprite=399Bidoof|size=32px|1F; included with the Hidden Moves app|BD=yes|SP=yes|display={{m|Rock Smash}}}} |
| Line 40: |
Line 40: |
| {{Itemlist|TM Normal|B1F; on the right side of the floor (requires {{m|Rock Smash}})|D=yes|P=yes|Pt=yes|BD=yes|SP=yes|display={{TM|70|Flash}}}} | | {{Itemlist|TM Normal|B1F; on the right side of the floor (requires {{m|Rock Smash}})|D=yes|P=yes|Pt=yes|BD=yes|SP=yes|display={{TM|70|Flash}}}} |
| {{Itemlist|TM Fighting|B1F; left of the jump ramps on the floor (requires {{m|Rock Smash}} and either [[Bicycle]] or {{m|Surf}})|D=yes|P=yes|Pt=yes|BD=yes|SP=yes|display={{TM|31|Brick Break}}}} | | {{Itemlist|TM Fighting|B1F; left of the jump ramps on the floor (requires {{m|Rock Smash}} and either [[Bicycle]] or {{m|Surf}})|D=yes|P=yes|Pt=yes|BD=yes|SP=yes|display={{TM|31|Brick Break}}}} |
| {{Itemlist|Earth Plate|B1F; at the far left of the floor (requires {{m|Rock Smash}}, {{m|Surf}}, and {{m|Strength}})|D=yes|P=yes|Pt=yes}} | | {{Itemlist|Earth Plate|B1F; at the far left of the floor (requires {{m|Rock Smash}}, {{m|Surf}}, and {{m|Strength}})|D=yes|P=yes|Pt=yes|BD=yes|SP=yes|}} |
| {{Itemlist|TM Fighting|B1F; at the far left of the floor (requires {{m|Rock Smash}}, {{m|Surf}}, and {{m|Strength}})|D=yes|P=yes|Pt=yes|display={{TM|01|Focus Punch}}}} | | {{Itemlist|TM Fighting|B1F; at the far left of the floor (requires {{m|Rock Smash}}, {{m|Surf}}, and {{m|Strength}})|D=yes|P=yes|Pt=yes|BD=yes|SP=yes||display={{TM|01|Focus Punch}}}} |
| {{Itlistfoot|cave}} | | {{Itlistfoot|cave}} |
|
| |
|
The Oreburgh Gate (Japanese: クロガネゲート Kurogane Gate) is a small cave that is located on the west side of Oreburgh City, separating it from Route 203. Although the passage between Route 203 and Oreburgh City is small, the cave has a lower floor that can be reached with Rock Smash. Underneath are several items and the only Trainer in the game that uses Riolu in Pokémon Diamond and Pearl, which can be reached using Strength and Surf. There are also ramps that can be jumped using a bicycle, formed naturally from the stone in the cave.
Description
Oreburgh Gate is accessed via Route 203, east of Jubilife City, completing the path between Jubilife and Oreburgh City. The small cave was designed to be a short path in-between routes, but more of it becomes accessible after certain HMs are obtained.
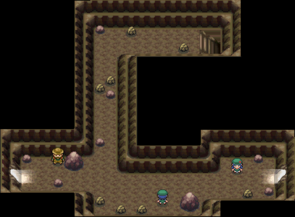
Starting from the western entrance from Route 203, the passage approaches an upside down "T" intersection. By traveling east, past two Trainers, the entrance to Oreburgh can be reached. However, by turning north, the tunnel leads to a stairwell going down to the basement floor. Several breakable rocks are scattered around the tunnel, including one that blocks the passage to the basement and can only be removed with Rock Smash.
The basement floor is much larger and more complex than the ground floor. A series of rocks, ledges, and boulders form a giant maze in the subsurface caverns. A large underground lake cuts through the basement, separating it into two parts. Several items are scattered throughout the area. The cave can be thoroughly navigated through the use of Rock Smash, Bicycle, Surf, and Strength, and the labyrinth can be bypassed almost entirely by surfing around the lake. On the other side of the water, one Trainer and two items, TM01 (Focus Punch) and an Earth Plate, can be found.
Items
Pokémon
Generation IV
| Pokémon
|
Games
|
Location
|
Levels
|
Rate
|
| 1F
|
|
|
D
|
P
|
Pt
|
|
6
|
20%
|
|
|
D
|
P
|
Pt
|
|
5-8
|
50%
|
|
|
D
|
P
|
Pt
|
|
5-7
|
35%
|
|
|
D
|
P
|
Pt
|
|
4-8
|
80%
|
|
|
D
|
P
|
Pt
|
|
5, 7
|
15%
|
| B1F
|
|
|
D
|
P
|
Pt
|
|
8-10
|
60%
|
|
|
D
|
P
|
Pt
|
|
6-9
|
45%
|
|
|
D
|
P
|
Pt
|
|
10
|
5%
|
|
|
D
|
P
|
Pt
|
|
8-10
|
30%
|
|
|
D
|
P
|
Pt
|
|
8-10
|
35%
|
|
|
D
|
P
|
Pt
|
|
7-9
|
10%
|
|
|
D
|
P
|
Pt
|
|
6-8
|
15%
|
| Surfing
|
|
|
D
|
P
|
Pt
|
|
20-30
|
60%
|
|
|
D
|
P
|
Pt
|
|
20-30
|
30%
|
|
|
D
|
P
|
Pt
|
|
20-40
|
5%
|
|
|
D
|
P
|
Pt
|
|
20-30
|
30%
|
|
|
D
|
P
|
Pt
|
|
20-30
|
60%
|
|
|
D
|
P
|
Pt
|
|
20-40
|
5%
|
| Fishing
|
|
|
D
|
P
|
Pt
|
|
3-10
|
100%
|
|
|
D
|
P
|
Pt
|
|
3-15
|
100%
|
|
|
D
|
P
|
Pt
|
|
10-25
|
55%
|
|
|
D
|
P
|
Pt
|
|
10-25
|
45%
|
|
|
D
|
P
|
Pt
|
|
30-55
|
55%
|
|
|
D
|
P
|
Pt
|
|
20-50
|
45%
|
|
|
D
|
P
|
Pt
|
|
30-55
|
45%
|
| A colored background means that the Pokémon can be found in this location in the specified game. A white background with a colored letter means that the Pokémon cannot be found here.
|
Generation VIII
1F
| Pokémon
|
Games
|
Location
|
Levels
|
Rate
|

|

|

|
|
|
BD
|
SP
|
|
6
|
20%
|
|
|
BD
|
SP
|
|
4
|
2%
|
|
|
BD
|
SP
|
|
5
|
40%
|
|
|
BD
|
SP
|
|
6
|
20%
|
|
|
BD
|
SP
|
|
7
|
10%
|
|
|
BD
|
SP
|
|
8
|
8%
|
| A colored background means that the Pokémon can be found in this location in the specified game. A white background with a colored letter means that the Pokémon cannot be found here.
|
B1F
| Pokémon
|
Games
|
Location
|
Levels
|
Rate
|

|

|

|
|
|
BD
|
SP
|
|
8
|
40%
|
|
|
BD
|
SP
|
|
9
|
10%
|
|
|
BD
|
SP
|
|
10
|
10%
|
|
|
BD
|
SP
|
|
8
|
15%
|
|
|
BD
|
SP
|
|
9
|
10%
|
|
|
BD
|
SP
|
|
10
|
5%
|
|
|
BD
|
SP
|
|
9
|
10%
|
| Surfing
|
|
|
BD
|
SP
|
|
20-30
|
60%
|
|
|
BD
|
SP
|
|
20-40
|
5%
|
|
|
BD
|
SP
|
|
20-30
|
30%
|
|
|
BD
|
SP
|
|
20-40
|
5%
|
| Fishing
|
|
|
BD
|
SP
|
|
4-6
|
60%
|
|
|
BD
|
SP
|
|
3-7
|
30%
|
|
|
BD
|
SP
|
|
5-10
|
10%
|
|
|
BD
|
SP
|
|
15-20
|
40%
|
|
|
BD
|
SP
|
|
10-25
|
15%
|
|
|
BD
|
SP
|
|
15-20
|
40%
|
|
|
BD
|
SP
|
|
10-25
|
5%
|
|
|
BD
|
SP
|
|
30-40
|
40%
|
|
|
BD
|
SP
|
|
40-55
|
15%
|
|
|
BD
|
SP
|
|
30-40
|
40%
|
|
|
BD
|
SP
|
|
20-50
|
5%
|
| A colored background means that the Pokémon can be found in this location in the specified game. A white background with a colored letter means that the Pokémon cannot be found here.
|
Trainers
| Trainer
|
Pokémon
|
| 1F
|

|
|
|
Camper Curtis
ハジメ Hajime
Reward: $112
|
|
|
|
|
|
|
|
|
|
|
| B1F (requires Rock Smash)
|
|
|
|
|
|
|
|
| Trainers with a Vs. Seeker by their names, when alerted for a rematch using the item, may use higher-level Pokémon.
|
| Trainer
|
Pokémon
|
| 1F
|

|
|
|
Camper Curtis
ハジメ Hajime
Reward: $112
|
|
|
|
|
|
|
|
|
|
|
| B1F (requires Rock Smash)
|
|
|
|
|
|
|
|
| Trainers with a Vs. Seeker by their names, when alerted for a rematch using the item, may use higher-level Pokémon.
|
| Trainer
|
Pokémon
|
| 1F
|

|
|
|
Camper Curtis
ハジメ Hajime
Reward: $392
|
|
|
|
|
|
|
|
|
|
|
| Trainers with a Vs. Seeker by their names, when alerted for a rematch using the item, may use higher-level Pokémon.
|
Layout
In the manga
Pokémon Adventures
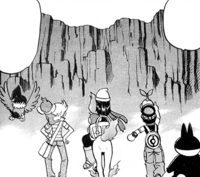
Oreburgh Gate first appeared in Extreme Luxio as Diamond, Pearl, and Platinum prepared to enter it on their way to Oreburgh City. They were seen exiting it at the beginning of the next round, arriving at their destination.
Trivia
- In all languages except French and Spanish, it is named it the same way as gates. Additionally, it serves a similar purpose to them.
In other languages
| Language
|
Title
|
| Chinese
|
Cantonese
|
黑金閘口 Hākgām Jaahpháu *
鋼鐵關口 Gongtit Gwāanháu *
|
| Mandarin
|
黑金閘口 / 黑金闸口 Hēijīn Zhákǒu *
鋼鐵關口 / 钢铁关口 Gāngtiě Guānkǒu *
|
 French French
|
Entrée Charbourg
|
 German German
|
Erzelingen-Tor
|
 Italian Italian
|
Varco Mineropoli
|
 Korean Korean
|
무쇠게이트 Musoe Gate
|
 Spanish Spanish
|
Puerta Pirita
|
 Vietnamese Vietnamese
|
Cổng Kurogane
|
|
|
|


