Raiding Galactic HQ (Part 2)
VS Galactic Boss
Make sure that you go back to Team Galactic Nap Room and heal your Pokémon by taking a nap before proceeding!
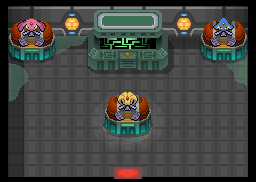
Now that you have healed up, go to the door again. Step forward. Guess who? The boss is Cyrus, the man that you met in Mt. Coronet and Celestic Town! Remember that he was seeking a power that can make a new world? He says that he already knows that you are coming to rescue the Lake guardians. Then he turns around, and continues, saying that you are remarkable and your emotions are "pitifully useless". He swears, "I will make you regret paying heed to your heart!" Then he steps forward, challenging you to a battle!

|
|
Reward: $7740
|
|
|
|
|
|
He has three Pokémon: Murkrow, Golbat and Sneasel. Due to their types, Rock-type moves will destroy his whole team without much effort. However, Fighting-type moves are far more effective when dealing with the speedy but fragile Sneasel, which, at level 43, is also Cyrus' strongest Pokémon. Be careful of Sneasel's Slash, which has a high critical hit ratio, as well as Ice Punch, which can freeze your Pokémon. Take it out fast, because it can lower your defense with Screech before striking hard with its physical attacks. You should know how to deal with Golbat, but watch out for its Poison Fang, which has the potential to badly poison your Pokémon. The first Pokémon he sends out-- Murkrow, is a Dark/Flying-type Pokémon. One of its moves, Embargo, prevents you from using items on your Pokémon, so knock Murkrow out as soon as possible. The weaknesses of its Dark type are covered, so aim at the weaknesses of the Flying type.
After Cyrus is defeated, he continues his rant. He knows that your power comes from compassion towards Pokémon, but he believes that compassion is only "wasteful illusions". He also says that he neither makes Pokémon friends or partners like you, nor uses them as tools like other Team Galactic members. Instead, he makes the power of Pokémon his own. Then he recognizes that you are strong and courageous. He gives you the ultimate Poké Ball: the Master Ball, which he doesn't need, as your reward for the victory. He steps to the right and tells you to take the warp panel ahead to save the Lake guardians. He also mentions that he is "off to Mt. Coronet" to ascend the mountain to its peak, not only to put an end to everything, but also bring about a new beginning for everything. Not sure? He confirms once more—
"That's correct. Mt. Coronet.
Where you and I first met."
He then leaves. Now collect the hidden Nugget with the help of your Pokétch's Dowsing Machine, check the PC, and return to the Nap Room to heal your Pokémon.
VS Saturn, Rescuing the Lake Guardians
Again, make sure that you go back to Team Galactic Nap Room and heal your Pokémon by taking a nap before proceeding!
Return to where you just battled Cyrus. Follow the direction in which he left. There are two cylinders that blocked the one-way exit, so don't think about going out— you still haven't rescued the Lake guardians. Use the warp panel. You will be teleported to a mysterious laboratory. Head all the way east, talk to the scientists along the way (don't worry; they won't fight you), then head inside.
You'll find that Uxie, Mesprit and Azelf are sealed in machines, showing you that they are suffering. Go to the machine between Mesprit and Azelf. You'll find Commander Saturn. Talk to him, then he tells you that he can't believe his boss "let a kid like you come and go freely". He then challenges you to a battle as the revenge for his defeat in Valor Cavern.

|
|
Reward: $3200
|
|
|
|
|
|
Saturn's team has only gained a few levels. If you can beat Cyrus, Saturn's team will not be a big threat (unless you did not heal your Pokémon). But Saturn's Pokémon don't have a common weakness, unlike Cyrus' Pokémon, and Saturn's Toxicroak can use the Bug-type move X-Scissor to counter Psychic-type Pokémon.
After you defeat Saturn again, he steps aside and tells you to press the button. Press it to free the Lake guardians. He then tells you that Cyrus crafted a Red Chain from crystals he took from those three Pokémon. That Red Chain is what Cyrus needs to "shackle and create something on Mt. Coronet". But this is all Saturn knows.
Now, head back to where Cyrus left. The two cylinders are gone. Behind that spot, there is a green one-way warp panel which will take you directly to the ground floor. The exit is only a few steps away from you. Get out from the exit, and you'll find yourself back in Veilstone.
Next, you'll be following Team Galactic to Mt. Coronet-- the highest mountain in Sinnoh, as well as the place where you and Cyrus first met. But before proceeding, you must do some preparation to avoid failure.
Before proceeding......
You should know that you'll be going all the way to the peak of Mt. Coronet. Like Route 216, the summit area is under constant snow, and the snow will mysteriously change to Hail in battles, damaging all non-Ice-type Pokémon. The wild Pokémon are also stronger, reaching Level 40. Also, the Town Map will malfunction and only display where you enter Mt. Coronet, not your current location.
A long and tough journey is up ahead. You'll also face a Legendary Pokémon. To make sure you're prepared, check the following lists.
Useful items
Medicine
- Buy a lot of medicine.
- Buy at least 20 for each necessary medicine. For example, bottles of Hyper Potions, pieces of Revive and status condition healing items (especially bottles of Ice Heal).
- Buying 25 to 30 for each is recommended.
- To save money, stock up on Drinks such as Fresh Water, Soda Pop, Lemonade and Moomoo Milk instead of Super Potions. By now, you should know where to buy the drinks, but in case you forgot:
Poke Balls
- If you are playing Pokémon Diamond Version, buy at least 40 Ultra Balls.
- If you are playing Pokémon Pearl Version, buy at least 40 Net Balls.
- In both games, if you are playing at night, you may also consider using Dusk Balls instead. Buy at least 40.
Required HMs
Pokemon Conditions
Health
Heal your Pokémon. You must do this first because your Pokémon are probably exhausted after raiding Galactic HQ.
Levels
- Train your Pokémon until they are at or above Level 40.
- Having your team around Level 45 is recommended.
- If your Pokémon are at or below Level 40, don't even dare proceeding to the mountainside of Mt. Coronet!
Are you ready?
Once you know you're well prepared and your Pokémon are fully healed, it's time to save the world! Fly to Oreburgh City, go east through Route 207, and enter Mt. Coronet.
Mt. Coronet (Southern Area Part 2)
1F
Surf across the northern pond, climb up the wall, then go up the stairs.
2F (South)
| Available Pokémon (2F-3F)
|
| Pokémon
|
Games
|
Location
|
Levels
|
Rate
|

|

|

|
|
|
D
|
P
|
Pt
|
|
37
|
10%
|
|
|
D
|
P
|
Pt
|
|
37
|
10%
|
|
|
D
|
P
|
Pt
|
|
36
|
20%
|
|
|
D
|
P
|
Pt
|
|
37-38
|
10%
|
|
|
D
|
P
|
Pt
|
|
36-38
|
15%
|
|
|
D
|
P
|
Pt
|
|
38
|
20%
|
|
|
D
|
P
|
Pt
|
|
37
|
10%
|
|
|
D
|
P
|
Pt
|
|
36
|
5%
|
| A colored background means that the Pokémon can be found in this location in the specified game. A white background with a colored letter means that the Pokémon cannot be found here.
|
|
If you went here to collect items after beating the Snowpoint Gym, then just head straight to the cavern that was previously blocked. Now that the cave painting is removed, you can proceed. If you haven't collect the items, collect all of them now. Refer to the previous section of this walkthrough for details.
2F (Northwest), 3F
Once through the tunnel where the painting once was, follow the path and go up the stairs. Once up the stairs, go down the stairs to the east.
2F (Northeast)
Here, you can obtain a hidden Max Revive. After picking it up, go back up the stairs to 3F.
| Item (2F NE)
|
| Item
|
Location
|
Games
|

|
Max Revive
|
On rock at end of small cavern across from the stairs leading from 3F to 2F (hidden)
|
D P
|
|
|
|
Back to 3F
| Item (3F)
|
| Item
|
Location
|
Games
|

|
Super Repel
|
On the rock in the northwest corner (hidden)
|
D P
|
|
|
|
You'll need to start fighting Galactic Grunts again. Head north, grab the hidden Super Repel, fight the grunts, follow the path, then go outside when you are ready to brace the snow.
WARNING! If your Pokémon are at or below Level 40, do not head outside! Train here until they are above Level 40. Otherwise, you'll get your Pokémon pulverized!
Mt. Coronet (Mountainside and Upper Caverns)
When you get to the mountainside and upper caverns, the background music completely changes, and you'll quickly realize that it is snowing. The snow is not as harsh as the blizzard on Route 217, but it can still obscure your view. Combined with the complicated geography, this can prove irritating. In battles, the snow will change into hail that damages all Pokémon that are not at least partially Ice-type.
There are many caverns to enter. Some of them let you proceed, and some of them are dead ends (for now). As the Town Map is malfunctioning, you will need to be very careful not to get lost. Most of the items you can get are hidden, so make sure that your Dowsing Machine is ready.
Southern Mountainside
| Items (S. Mountainside 1)
|
| Item
|
Location
|
Games
|

|
Full Heal
|
In the empty spot in middle of grass east of exit from 3F (hidden)
|
D P
|

|
Nugget
|
On the boulder on the ledge above eastern entrance to 4F (requires Rock Climb) (hidden)
|
D P
|
|
|
|
| Available Pokémon (Mountainside)
|
| Pokémon
|
Games
|
Location
|
Levels
|
Rate
|

|

|

|
|
|
D
|
P
|
Pt
|
|
37-40
|
10%
|
|
|
D
|
P
|
Pt
|
|
36-38
|
20%
|
|
|
D
|
P
|
Pt
|
|
38-40
|
20%
|
|
|
D
|
P
|
Pt
|
|
38-39
|
5%
|
|
|
D
|
P
|
Pt
|
|
39-40
|
5%
|
|
|
D
|
P
|
Pt
|
|
39-40
|
20%
|
20%
|
10%
|
|
|
D
|
P
|
Pt
|
|
39-40
|
20%
|
20%
|
10%
|
|
|
D
|
P
|
Pt
|
|
39
|
0%
|
0%
|
10%
|
|
|
D
|
P
|
Pt
|
|
38-39
|
0%
|
0%
|
10%
|
| A colored background means that the Pokémon can be found in this location in the specified game. A white background with a colored letter means that the Pokémon cannot be found here.
|
|
Head east and follow the path. Grab the hidden Full Heal in the grass. Follow the elevated path to avoid wild battles. Use Rock Climb twice to get above the eastern cave entrance. Grab the hidden Nugget, then climb down again and go through the tunnel.
4F (Part 1)
| Items (4F Part 1)
|
| Item
|
Location
|
Games
|

|
PP Up
|
On a boulder directly west of eastern entrance, surrounded by breakable rocks (requires Rock Smash) (hidden)
|
D P
|

|
TinyMushroom
|
Behind a breakable rock northwest of eastern entrance, near the water (Requires Rock Smash) (hidden)
|
D P
|

|
Ultra Ball
|
On a boulder on the ledge north of eastern entrance (hidden)
|
D P
|
|
|
|
| Available Pokémon (4F, below waterfall)
|
| Pokémon
|
Games
|
Location
|
Levels
|
Rate
|

|

|

|
|
|
D
|
P
|
Pt
|
|
39
|
10%
|
|
|
D
|
P
|
Pt
|
|
39
|
10%
|
|
|
D
|
P
|
Pt
|
|
38
|
20%
|
|
|
D
|
P
|
Pt
|
|
39-40
|
10%
|
|
|
D
|
P
|
Pt
|
|
38-40
|
15%
|
|
|
D
|
P
|
Pt
|
|
38-40
|
25%
|
|
|
D
|
P
|
Pt
|
|
39
|
10%
|
| Surfing and Fishing
|
|
|
D
|
P
|
Pt
|
|
20
|
90%
|
|
|
D
|
P
|
Pt
|
|
20-40
|
10%
|
|
|
D
|
P
|
Pt
|
|
3-10
|
100%
|
|
|
D
|
P
|
Pt
|
|
10-25
|
65%
|
|
|
D
|
P
|
Pt
|
|
10-25
|
35%
|
| A colored background means that the Pokémon can be found in this location in the specified game. A white background with a colored letter means that the Pokémon cannot be found here.
|
|
Use Rock Smash to collect the hidden PP Up and TinyMushroom. Ignore the waterfall and the cave above for now. Without HM07 (Waterfall), you cannot gain access. Go up the stairs to get the hidden Ultra Ball. Then head back outside.
Back to Southern Mountainside
| Item (S. Mountainside 2)
|
| Item
|
Location
|
Games
|

|
Max Potion
|
On the boulder behind breakable rock due south of western entrance to 4F (requires Rock Smash) (hidden)
|
D P
|
|
|
|
This time, go all the way west until you see two paths. Take the lower path, push the boulder with Strength, smash the rock, and get the hidden Max Potion. Then go west and follow the path without grass, and go through the western entrance of 4F. Nothing is on the higher path except wild Pokémon.
4F (Part 2)
| Items (4F Part 2)
|
| Item
|
Location
|
Games
|

|
Revive
|
On the boulder in the northwest corner of the room, behind a breakable rock (requires Rock Smash) (hidden)
|
D P
|

|
Ether
|
On the boulder northwest of the cave above the waterfall (hidden)
|
D P
|

|
Escape Rope
|
On the boulder east of the water above the waterfall (hidden)
|
D P
|
|
|
|
| Available Pokémon (4F, above waterfall)
|
| Pokémon
|
Games
|
Location
|
Levels
|
Rate
|

|

|

|
|
|
D
|
P
|
Pt
|
|
39
|
10%
|
|
|
D
|
P
|
Pt
|
|
39
|
10%
|
|
|
D
|
P
|
Pt
|
|
38
|
20%
|
|
|
D
|
P
|
Pt
|
|
40
|
5%
|
|
|
D
|
P
|
Pt
|
|
40
|
5%
|
|
|
D
|
P
|
Pt
|
|
38-40
|
15%
|
|
|
D
|
P
|
Pt
|
|
38-40
|
25%
|
|
|
D
|
P
|
Pt
|
|
39
|
10%
|
| A colored background means that the Pokémon can be found in this location in the specified game. A white background with a colored letter means that the Pokémon cannot be found here.
|
|
Climb up the wall, and you will see some grunts again. Beat them, grab the items (all of them are hidden, and one of them requires you to smash a rock), follow the path all the way to the east, then head outside.
Northern Mountainside
| Item (N. Mountainside 1)
|
| Item
|
Location
|
Games
|

|
Stardust
|
On the west side of the breakable rock due south of northern exit from 4F (requires Rock Smash) (hidden)
|
D P
|
|
|
|
You're now at another part of the mountainside. Smash the rock south of the exit from 4F, grab the hidden Stardust, then head north. Go down the stairs, and you'll find a cavern. It doesn't look like where you need to proceed, but head inside anyway.
Tunnel
| Items (Tunnel)
|
| Item
|
Location
|
Games
|

|
Max Ether
|
Behind a breakable rock in the southeast corner (requires Rock Smash) (hidden)
|
D P
|

|
Big Mushroom
|
On a boulder southwest of the Max Ether (hidden)
|
D P
|

|
Full Restore
|
Behind a breakable rock in northwest corner (requires Rock Smash) (hidden)
|
D P
|

|
Nugget
|
At the north end of the ledge directly west of exit to northern cavern (hidden)
|
D P
|

|
Rare Candy
|
On a small rock northeast of the northern big rock in the large jumble of rock south of the exit to the northern cavern (requires Rock Smash) (hidden)
|
D P
|

|
Revive
|
On the boulder on north end of ledge south-east of Rare Candy (requires Rock Smash) (hidden)
|
D P
|
|
|
|
| Available Pokémon (Tunnel)
|
| Pokémon
|
Games
|
Location
|
Levels
|
Rate
|

|

|

|
|
|
D
|
P
|
Pt
|
|
39
|
10%
|
|
|
D
|
P
|
Pt
|
|
40
|
10%
|
|
|
D
|
P
|
Pt
|
|
39-40
|
40%
|
|
|
D
|
P
|
Pt
|
|
30
|
10%
|
|
|
D
|
P
|
Pt
|
|
38-40
|
15%
|
|
|
D
|
P
|
Pt
|
|
40
|
10%
|
|
|
D
|
P
|
Pt
|
|
39-40
|
5%
|
| A colored background means that the Pokémon can be found in this location in the specified game. A white background with a colored letter means that the Pokémon cannot be found here.
|
|
There are three grunts for you to fight, and a few items. A grunt blocks the cave inside, saying that he is "totally lost". Behind him is a quick exit you can access after Team Galactic is gone. Fight the grunts, grab all the items, then get out again.
Back to Northern Mountainside
| Items (N. Mountainside 2)
|
| Item
|
Location
|
Games
|

|
Rare Candy
|
On the boulder north of the entrance to the tunnel to the northern cavern (hidden)
|
D P
|

|
Big Mushroom
|
On the boulder at the east end of the far northernmost ledge (hidden)
|
D P
|

|
TinyMushroom
|
On the boulder east of entrance to 5F (hidden)
|
D P
|
|
|
|
Climb up the rocks to the north to get a hidden Rare Candy, then climb back down. It might seem like there are no more paths, but look closely! Immediately to the west, there is a slope for you to climb. After climbing, you'll find another two paths. Any of the paths will take you to the far west. On the northernmost ledge, you can grab a hidden Big Mushroom. East of the entrance to 5F, there is a hidden TinyMushroom. Now, go inside 5F.
4F (Part 3)
| Items (4F Part 3)
|
| Item
|
Location
|
Games
|

|
TinyMushroom
|
On the southernmost rock (hidden)
|
D P
|
|
|
|
| Available Pokémon (4F Part 3)
|
| Pokémon
|
Games
|
Location
|
Levels
|
Rate
|

|

|

|
|
|
D
|
P
|
Pt
|
|
41
|
10%
|
|
|
D
|
P
|
Pt
|
|
41
|
10%
|
|
|
D
|
P
|
Pt
|
|
40
|
20%
|
|
|
D
|
P
|
Pt
|
|
41-42
|
10%
|
|
|
D
|
P
|
Pt
|
|
40
|
5%
|
|
|
D
|
P
|
Pt
|
|
40-42
|
15%
|
|
|
D
|
P
|
Pt
|
|
40-42
|
25%
|
|
|
D
|
P
|
Pt
|
|
41
|
10%
|
| A colored background means that the Pokémon can be found in this location in the specified game. A white background with a colored letter means that the Pokémon cannot be found here.
|
|
The cavern becomes straightforward, but ascends more rapidly as you get closer to the peak. Follow the path, grab the TinyMushroom hidden in one of the rocks along the way, then go up the stairs. (There are really a lot of mushrooms in this mountain!)
5F
| Items (5F)
|
| Item
|
Location
|
Games
|

|
Max Potion
|
On the small rock southeast of first Galactic Grunt (hidden)
|
D P
|

|
Stardust
|
On the southernmost small rock (hidden)
|
D P
|
|
|
|
| Available Pokémon (5F-6F)
|
| Pokémon
|
Games
|
Location
|
Levels
|
Rate
|

|

|

|
|
|
D
|
P
|
Pt
|
|
41
|
10%
|
|
|
D
|
P
|
Pt
|
|
41
|
10%
|
|
|
D
|
P
|
Pt
|
|
40
|
20%
|
|
|
D
|
P
|
Pt
|
|
41-42
|
10%
|
|
|
D
|
P
|
Pt
|
|
40-42
|
15%
|
|
|
D
|
P
|
Pt
|
|
40-42
|
25%
|
|
|
D
|
P
|
Pt
|
|
41
|
10%
|
| A colored background means that the Pokémon can be found in this location in the specified game. A white background with a colored letter means that the Pokémon cannot be found here.
|
|
Follow the path, grab the two hidden items, fight the grunts, then go up the stairs again. (There are items hidden everywhere!)
This cavern is not as complicated as the mountainside is, but is extremely rugged comparing to the lower caverns. Well, this means that you're almost there! You're near the peak!
6F
Follow the insanely rugged path and fight the final grunt in the caverns. She is very determined to render your effort completely wasted, so be careful! You came all the way here and now you cannot lose!
The grunt failed, after all. Now take the exit in front and head outside for the last time. You have reached the summit of Mt. Coronet!
Spear Pillar

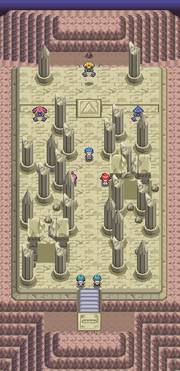
Spear Pillar in Pokémon Diamond

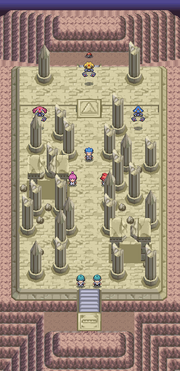
Spear Pillar in Pokémon Pearl
This is it! You are at the summit of Mt. Coronet: Spear Pillar! Go up the stairs and fight the last two grunts in a Double Battle.
Afterwards, the grunts will let you pass. Don't step forward yet: about 10 more steps, and you can no longer leave until the event is over. Check that if you still have at least 30 or more Ultra BallsD, Net BallsP or Dusk BallsNight. If you don't, immediately retreat and buy some!
If you are ready, step forward for the most dangerous sight ever: Commanders Mars and Jupiter, as well as Boss Cyrus, are preparing to destroy the world!


