- This article is about the one of Team Rocket's headquarters in the core series games. For Team Rocket headquarters in the anime, see Team Rocket HQ (anime).
- If you were looking for the Celadon City base, see Team Rocket Hideout.
Team Rocket HQ
Team Rocket's Hideout
|
|
ロケットだんアジト
Team Rocket Hideout
|
| "Wild Missingno. appeared!"
|
|
|
|
| Map description:
|
{{{mapdesc}}}
|
| Location:
|
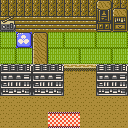
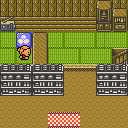
"Just a Souvenir Shop" in Mahogany Town
|
| Region:
|
Johto
|
| Generations:
|
II, IV
|

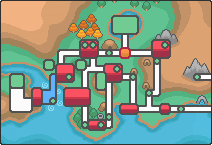
Location of Team Rocket HQ in Johto.
|
| Pokémon world locations
|
The Team Rocket HQ (Japanese: ロケットだんアジト Team Rocket Hideout), referred to as Team Rocket's Hideout in Generation II, is the headquarters and a hideout for Team Rocket in the Johto region, located beneath "Just a Souvenir Shop" in Mahogany Town.
Role
For a period of time in the Generation II and IV games, Team Rocket uses these headquarters as a power source to send out high-frequency sound waves, which disturbs the Pokémon in Mahogany Town, Lake of Rage, and other surrounding locations, affecting their evolutionary patterns. It is also the source of the problems occurring at the lake, involving the appearance of a red Gyarados.
After the player encounters the red Gyarados, Lance requests the player's help to stop Team Rocket's plans. After Ariana is defeated, she explains that they were trying to evolve the Magikarp living in the Lake of Rage because Gyarados are far more profitable and rare than their pre-evolved form. Afterwards, Team Rocket abandons the headquarters and searches for their next course of action.
When Lance and the player invade the HQ, the player must defeat the Team Rocket Grunts on the third basement floor to acquire the two passwords to Giovanni's office. In Generation II, after defeating the Rocket Executive in the office, the Murkrow next to his desk tells the player that the password to the generator room is "Hail Giovanni". In Generation IV, Petrel tells the player the password, but also reveals that the door to the generator only opens when he speaks the password. After defeating him, the Murkrow reveals its ability to mimic voices, and will lead the player to the generator door and open it by speaking the password in Petrel's voice. In Generation II, the player battles a female Rocket Executive at this point, while in Generation IV, the player and Lance battle Ariana and a male Grunt in a Multi Battle. Once the Electrode powering the generator are defeated, Lance gives the player the HM containing Whirlpool as thanks for the assistance.
Though Lance instructs the player to knock out the Electrode powering the generator, the player is able to catch them if they choose to do so, and the result will be the same as if they had knocked them out.
Geography
According to the Team Rocket Grunts found inside the HQ, it was once used as a ninja base, and was presumably renovated by Team Rocket sometime in the past.
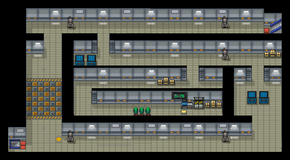
The upper floor of the base contains Persian statues with security cameras in their eyes; walking past one triggers two Team Rocket Grunts that battle the player until they deactivate the cameras using a switch in the center of the area. The far left hallway bypasses most of the Persian cameras, but the floor is booby-trapped with Koffing, Voltorb, and Geodude, which battle the player and have a tendency to Self-Destruct. In Gold and Silver, the player cannot escape from these Pokémon. If the player uses Roar, Whirlwind, or Teleport, the moves will fail every time.
The second floor contains the generator room where six Electrode power the radio transmitter. The room is locked and requires a password to open.
The third floor contains workstations, and a passage back onto the second floor leads to the rear of the HQ, where the main office is located. The office is also locked and requires two passwords to open.
Items
Special encounters
Generation II
Wild Pokémon appear on the trap floor in the following arrangement. It is necessary to encounter at least four of them in order to traverse the trap floor.
Each of the Pokémon found on the trap floor can only be encountered once, and cannot be run from.
Geodude will be holding an Everstone 2% of the time.
Three Electrode appear on B2F as part of the story. If run from, they respawn immediately without leaving the area in Gold and Silver only.
Generation IV
Wild Pokémon appear on the trap floor in the following arrangement. It is possible to traverse the trap floor without encountering any Pokémon.
Each of the Pokémon found on the trap floor can only be encountered once, and will not spawn after defeating the three Electrode on B2F.
Geodude will be holding an Everstone 5% of the time, while Koffing will be holding a Smoke Ball 5% of the time.
Three Electrode appear on B2F as part of the story.
Trainers
Generation II
B1F
| Trainer
|
Pokémon
|
|
|
|
|
|
|
|
|
|
|
|
|
|
|
|
|
|
|
| Trainers with a telephone symbol by their names will give their Pokégear number to the player, and may call or be called for a rematch with higher-level Pokémon.
|
Guards
These two Team Rocket Grunts will appear when the player crosses a statue for the first time, until they press the secret switch. The Grunts must be battled at least once.
| Trainer
|
Pokémon
|
|
|
|
|
|
|
|
|
|
|
|
|
|
|
| Trainers with a telephone symbol by their names will give their Pokégear number to the player, and may call or be called for a rematch with higher-level Pokémon.
|
B2F
| Trainer
|
Pokémon
|
|
|
|
|
|
|
|
|
|
|
|
|
|
|
|
|
|
|
|
| Trainers with a telephone symbol by their names will give their Pokégear number to the player, and may call or be called for a rematch with higher-level Pokémon.
|

|
|
Reward: $1800
|
|
|
|
|
|
B3F
| Trainer
|
Pokémon
|
|
|
|
|
|
|
|
|
|
|
|
|
|
|
|
|
|
|
|
|
|
|
| Trainers with a telephone symbol by their names will give their Pokégear number to the player, and may call or be called for a rematch with higher-level Pokémon.
|

|
|
Reward: $1584
|
|
|
|
|
|
Generation IV
B1F
| Trainer
|
Pokémon
|
|
|
|
|
|
|
|
|
|
|
|
|
|
|
|
|
|
|
| Trainers with a telephone symbol by their names will give their Pokégear number to the player, and may call or be called for a rematch with higher-level Pokémon.
|
Guards
These two Team Rocket Grunts will appear in succession every time the player is in front of a statue until they press the secret switch. The guards must be battled at least once.
| Trainer
|
Pokémon
|
|
|
|
|
|
|
|
|
|
|
|
|
|
|
| Trainers with a telephone symbol by their names will give their Pokégear number to the player, and may call or be called for a rematch with higher-level Pokémon.
|
B2F
| Trainer
|
Pokémon
|
|
|
|
|
|
|
|
|
|
|
|
|
|
|
|
|
|
|
|
| Trainers with a telephone symbol by their names will give their Pokégear number to the player, and may call or be called for a rematch with higher-level Pokémon.
|
Lance battles alongside player against Ariana and a Team Rocket Grunt.

|
|

|
Reward: $2960
|
|
|
|
|
|
B3F
| Trainer
|
Pokémon
|
|
|
|
|
|
|
|
|
|
|
|
|
|
|
|
|
|
|
|
|
|
|
| Trainers with a telephone symbol by their names will give their Pokégear number to the player, and may call or be called for a rematch with higher-level Pokémon.
|

|
|
Reward: $880
|
|
|
|
|
|
Layout
In the side series games
Pokémon Stadium 2
While Team Rocket's Hideout does not appear in Pokémon Stadium 2, the player's progress through the Johto Gym Leader Castle is interrupted by a group of four Team Rocket members after they defeat Jasmine. Similar to the core series games, the player is forced to defeat the villainous team before they're allowed to challenge the Mahogany Gym.
Trainers
Round 1
Round 2
In the spin-off games
Artwork depicting the Team Rocket HQ is seen in Petrel and Ariana's mindscapes.
In the anime

The Team Rocket research facility in the
animeMain series
In Talkin' 'Bout an Evolution and Rage Of Innocence, a research facility at Lake Rage appeared. It was emitting radio signals that forced the Pokémon to evolve, as part of Project R. This facility was guarded by Persian statues with cameras in them, like the Team Rocket HQ in the games. The actual headquarters was mentioned and Professor Sebastian headed there to await the Red Gyarados's transport there, where he intended to study it. The research facility, meanwhile, was destroyed by Lance to avoid it being used ever again.
Pokémon Generations

The Team Rocket HQ in Pokémon Generations
The Team Rocket HQ appeared in The Lake of Rage, where Lance and Ethan infiltrated the facility. Lance easily made his way, through the Team Rocket Grunts trying to stop him, to the radio wave generator control room. There, he encountered Petrel, whose Weezing he also easily defeated with his Dragonite. He then destroyed the generator and freed the Electrode Team Rocket had used to power it.
In the manga
Pokémon Adventures
Team Rocket HQ first appeared in Jumping Jumpluff! and Miltank Melee, where Neo Team Rocket launched an operation to capture Suicune, while also sending out a Ditto disguised as Suicune to do away with anyone who would get in their way. The leader of Neo Team Rocket, the Masked Man, observed the operation from the base.
In Suddenly Suicune (Part 3), the Team Rocket Elite Trio returned to the HQ and reported their failure to capture Suicune to the Masked Man, who ordered them to keep an eye on the Gym Leaders, suspecting that Suicune would continue challenging them, as it had done before.
In Raising Raichu, while inspecting a souvenir shop at the Lake of Rage, Lt. Surge heard machine sounds coming from underground, and had his Raichu blast a hole through the floor. Underneath, he found a Team Rocket facility, as well as the Masked Man. Using his Houndour's howl, the Masked Man summoned a pack of wild Houndour to his aid. However, Lt. Surge managed to get away by letting out his Electrode and having all of them use Self-Destruct simultaneously, escaping in the cover of the explosion.
Pokémon Pocket Monsters
Team Rocket HQ appeared in Stop the Strange Sonic Sound!!. After encountering the red Gyarados at the Lake of Rage, Red and his Pokémon investigated Mahogany Town and found a Team Rocket machine that was causing the Pokémon to go crazy. They also encountered Giovanni, who had a CD that contained the sound the machine was using.
In other languages
Related articles
