Galar Route 2: Difference between revisions
MadDog3847 (talk | contribs) Tag: Manual revert |
|||
| (45 intermediate revisions by 21 users not shown) | |||
| Line 12: | Line 12: | ||
|regionnext=Galar | |regionnext=Galar | ||
}} | }} | ||
'''Route 2''' (Japanese: '''{{tt|2番道路|2ばんどうろ}}''' ''Route 2'') is a route in southern [[Galar]] that extends northeast from [[Wedgehurst]]. [[Professor Magnolia]]'s house is located at its terminus. | '''Route 2''' (Japanese: '''{{tt|2番道路|2ばんどうろ}}''' ''Route 2'') is a [[route]] in southern [[Galar]] that extends northeast from [[Wedgehurst]]. [[Professor Magnolia]]'s house is located at its terminus. | ||
==Role== | ==Role== | ||
When the {{player}} first visits the route, [[Leon]] offers to teach the player and Hop how to [[Caught Pokémon|catch Pokémon]]. However, if the player has already caught a Pokémon, he will assume they already know how. (This requires the player to use one of the five Poké Balls given by [[Mum]] with no prompt, as no other Poké Balls can be obtained before this point.) | |||
At [[Professor Magnolia]]'s house, [[Hop]] asks the Professor to convince Leon to endorse him and the player for the [[Galar League|Gym Challenge]]. Leon agrees to endorse the two if they have a {{pkmn|battle}} that'll impress him. Leon then fully heals the player's team. At this point, the player may pick up items from around the Professor's house, but cannot leave the front yard area until they battle Hop outside the house. Regardless of the outcome, Leon agrees to endorse both of them. Soon after, two [[Wishing Star]]s fall from the sky, and by the next morning, Professor Magnolia has fit each of them into a [[Dynamax Band]], which she gives to the player and Hop. The player's team is again fully healed overnight. | |||
Before the player returns to [[Wedgehurst]], Hop explains to the player how to move slowly in grass to avoid wild Pokémon's attention, and how to whistle with the Left Control Stick to catch their attention. | |||
==Route description== | ==Route description== | ||
{{ | The main section of Route 2 leads over a stone bridge and down a gentle, grassy hillside to [[Professor Magnolia]]'s house. West of the Professor's house lies a big lake, which can be crossed with an upgraded [[Rotom Bike]]. In the middle of the lake is an island, and at the northwest corner of the lake is a short, dead-end path, which contains [[wild Pokémon]] on higher [[level]]s than the main part of the route, as well as {{TM|69|Psycho Cut}}. In the south, the lake also connects to a river, which can be traversed all the way down to the stone bridge at the route entrance | ||
==Items== | ==Items== | ||
{{Itlisth}} | {{Itlisth}} | ||
{{itemlist|Poké Ball|From Leon upon entering the route, | {{itemlist|Poké Ball| | ||
{{itemlist|Potion|Next to the Trainer Tips sign|Sw=yes|Sh=yes|display=[[Potion]] ×2 | * From [[Leon]] upon entering the route (×20) | ||
* In the middle of the route, atop a [[ledge]] (×3)|Sw=yes|Sh=yes|display={{i|Poké Ball}} ×23}} | |||
{{itemlist|Potion|Next to the [[Trainer Tips]] sign|Sw=yes|Sh=yes|display=[[Potion]] ×2}} | |||
{{itemlist|Repel|East of the grass patch in front of [[Professor Magnolia]]'s house, on a dirt patch ''(hidden)''|Sw=yes|Sh=yes}} | {{itemlist|Repel|East of the grass patch in front of [[Professor Magnolia]]'s house, on a dirt patch ''(hidden)''|Sw=yes|Sh=yes}} | ||
{{itemlist|Great Ball|On the west side of Professor Magnolia's house, at the back of her garden|Sw=yes|Sh=yes}} | {{itemlist|Great Ball|On the west side of Professor Magnolia's house, at the back of her garden|Sw=yes|Sh=yes}} | ||
{{itemlist|Fresh Water|In a pot in front of Professor Magnolia's eastern crop plot ''(hidden)''|Sw=yes|Sh=yes}} | {{itemlist|Fresh Water|In a pot in front of Professor Magnolia's eastern crop plot ''(hidden)''|Sw=yes|Sh=yes}} | ||
{{itemlist|TM Dark VI|Behind Professor Magnolia's house, at the end of a long passageway|Sw=yes|Sh=yes|display={{TM|57|Payback}}}} | {{itemlist|TM Dark VI|Behind Professor Magnolia's house, at the end of a long passageway|Sw=yes|Sh=yes|display={{TM|57|Payback}}}} | ||
{{itemlist|Endorsement|From | {{itemlist|Endorsement|From Leon after battling [[Hop]]|Sw=yes|Sh=yes}} | ||
{{itemlist|Wishing Star|From | {{itemlist|Wishing Star|From Hop after battling him|Sw=yes|Sh=yes}} | ||
{{itemlist|Dynamax Band|From Professor Magnolia, after obtaining the Wishing Star|Sw=yes|Sh=yes}} | {{itemlist|Dynamax Band|From Professor Magnolia, after obtaining the Wishing Star|Sw=yes|Sh=yes}} | ||
{{itemlist|Choice Band|East of the bridge near Professor Magnolia's house (requires an upgraded [[Rotom Bike]])|Sw=yes|Sh=yes}} | |||
{{itemlist|Rare Candy|On the island in the lake ''(hidden, approximately 40% chance to reappear each day)'' (requires an upgraded [[Rotom Bike]])|Sw=yes|Sh=yes}} | |||
{{itemlist|PP Max|On the island in the lake (requires an upgraded [[Rotom Bike]])|Sw=yes|Sh=yes}} | |||
{{itemlist|Prism Scale|In water at the north part of the lake ''(hidden)'' (requires an upgraded [[Rotom Bike]])|Sw=yes|Sh=yes}} | |||
{{itemlist|Max Ether|In the northwest corner of the lake ''(hidden)'' (requires an upgraded [[Rotom Bike]])|Sw=yes|Sh=yes}} | |||
{{itemlist|TM Psychic VI|In the northwest corner of the lake (requires an upgraded [[Rotom Bike]])|Sw=yes|Sh=yes|display={{TM|69|Psycho Cut}}}} | |||
{{itemlist|Psychic Seed|On a riverbank south of Professor Magnolia's house (requires an upgraded [[Rotom Bike]])|Sw=yes|Sh=yes}} | |||
{{itemlist|Water Stone|At the end of the river south of Professor Magnolia's house ''(hidden)'' (requires an upgraded [[Rotom Bike]])|Sw=yes|Sh=yes}} | |||
{{Itlistfoot}} | {{Itlistfoot}} | ||
==Pokémon== | ==Pokémon== | ||
=== | ===Wedgehurst side=== | ||
{{catch/header/8|land}} | ====[[Hidden encounter]]s==== | ||
{{catch/entry8| | {{catch/header/8|land|no}} | ||
{{catch/entry8| | {{catch/entry8|163|Hoothoot|yes|yes|Grass|4-6|5%|type1=Normal|type2=Flying}} | ||
{{catch/entry8|270|Lotad|no|yes|Grass|4-6|20%|type1=Water|type2=Grass}} | |||
{{catch/entry8|273|Seedot|yes|no|Grass|4-6|20%|type1=Grass}} | {{catch/entry8|273|Seedot|yes|no|Grass|4-6|20%|type1=Grass}} | ||
{{catch/entry8|509|Purrloin|yes|yes|Grass|4-6|10%|type1=Dark}} | {{catch/entry8|509|Purrloin|yes|yes|Grass|4-6|10%|type1=Dark}} | ||
{{catch/entry8| | {{catch/entry8|821|Rookidee|yes|yes|Grass|4-6|25%|type1=Flying}} | ||
{{catch/entry8|824|Blipbug|yes|yes|Grass|4-6|40%|type1=Bug}} | |||
{{catch/div|water|Fishing}} | {{catch/div|water|Fishing}} | ||
{{catch/entry8|129|Magikarp|yes|yes| | {{catch/entry8|129|Magikarp|yes|yes|Fishing|4-6|80%|type1=Water}} | ||
{{catch/entry8|833|Chewtle|yes|yes| | {{catch/entry8|833|Chewtle|yes|yes|Fishing|4-6|15%|type1=Water}} | ||
{{catch/entry8|846|Arrokuda|yes|yes| | {{catch/entry8|846|Arrokuda|yes|yes|Fishing|4-6|5%|type1=Water}} | ||
{{catch/footer|land}} | {{catch/footer|land}} | ||
===Symbol encounters=== | ====[[Symbol encounter|Visible encounters]]==== | ||
{{catch/header/8|land}} | {{catch/header/8|land|no}} | ||
{{catch/entry8|263G|Zigzagoon|yes|yes|Grass|5-7|2%|type1=Dark|type2=Normal|form=Galarian Form}} | |||
{{catch/entry8|819|Skwovet|yes|yes|Grass|5-7|38%|type1=Normal}} | {{catch/entry8|819|Skwovet|yes|yes|Grass|5-7|38%|type1=Normal}} | ||
{{catch/entry8|821|Rookidee|yes|yes|Grass|5-7|30%|type1=Flying}} | {{catch/entry8|821|Rookidee|yes|yes|Grass|5-7|30%|type1=Flying}} | ||
| Line 71: | Line 71: | ||
{{catch/entry8|833|Chewtle|yes|yes|Grass|5-7|10%|type1=Water}} | {{catch/entry8|833|Chewtle|yes|yes|Grass|5-7|10%|type1=Water}} | ||
{{catch/entry8|835|Yamper|yes|yes|Grass|5-7|5%|type1=Electric}} | {{catch/entry8|835|Yamper|yes|yes|Grass|5-7|5%|type1=Electric}} | ||
{{catch/entry8|263G|Zigzagoon|yes|yes|Grass| | {{catch/footer|land}} | ||
====[[Curry#Joining Pokémon|Curry encounter]]s==== | |||
{{catch/header/8|land|no}} | |||
{{catch/entry8|824|Blipbug|yes|yes|Curry|4-6|11.04%|type1=Bug}} | |||
{{catch/entry8|821|Rookidee|yes|yes|Curry|4-6|17.18%|type1=Flying}} | |||
{{catch/entry8|270|Lotad|no|yes|Curry|4-6|19.63%|type1=Water|type2=Grass}} | |||
{{catch/entry8|273|Seedot|yes|no|Curry|4-6|19.63%|type1=Grass}} | |||
{{catch/entry8|509|Purrloin|yes|yes|Curry|4-6|24.54%|type1=Dark}} | |||
{{catch/entry8|163|Hoothoot|yes|yes|Curry|4-6|27.61%|type1=Normal|type2=Flying}} | |||
{{catch/footer|land}} | |||
====[[Wanderer]]s==== | |||
* Chewtle appears in the middle of the route, on the open path before the Trainer Tips sign. It does not respawn. | |||
* Yamper appears in the middle of the route, on the open path just past the Trainer Tips sign. It does not respawn. | |||
{{catch/header/8|land|no}} | |||
{{catch/entry8|833|Chewtle|yes|yes|Wanderer|8|One|type1=Water}} | |||
{{catch/entry8|835|Yamper|yes|yes|Wanderer|8|One|type1=Electric}} | |||
{{catch/footer|land|2}} | |||
===Across the lake=== | |||
====[[Hidden encounter]]s==== | |||
{{catch/header/8|land|no}} | |||
{{catch/entry8|270|Lotad|no|yes|Grass|37-40|20%|type1=Water|type2=Grass}} | |||
{{catch/entry8|273|Seedot|yes|no|Grass|37-40|20%|type1=Grass}} | |||
{{catch/entry8|509|Purrloin|yes|yes|Grass|37-40|30%|type1=Dark}} | |||
{{catch/entry8|824|Blipbug|yes|yes|Grass|37-40|10%|type1=Bug}} | |||
{{catch/entry8|829|Gossifleur|yes|yes|Grass|37-40|35%|type1=Grass}} | |||
{{catch/entry8|833|Chewtle|yes|yes|Grass|37-40|5%|type1=Water}} | |||
{{catch/div|water|Fishing}} | |||
{{catch/entry8|129|Magikarp|yes|yes|Fishing|37-40|59%|type1=Water}} | |||
{{catch/entry8|349|Feebas|yes|yes|Fishing|37-40|1%|type1=Water}} | |||
{{catch/entry8|833|Chewtle|yes|yes|Fishing|37-40|40%|type1=Water}} | |||
{{catch/footer|land}} | |||
====[[Symbol encounter|Visible encounters]]==== | |||
{{catch/header/8|land|no}} | |||
{{catch/entry8|263G|Zigzagoon|yes|yes|Grass|40-43|50%|type1=Dark|type2=Normal|form=Galarian Form}} | |||
{{catch/entry8|824|Blipbug|yes|yes|Grass|40-43|30%|type1=Bug}} | |||
{{catch/entry8|827|Nickit|yes|yes|Grass|40-43|15%|type1=Dark}} | |||
{{catch/entry8|835|Yamper|yes|yes|Grass|40-43|5%|type1=Electric}} | |||
{{catch/div|water|Surfing}} | {{catch/div|water|Surfing}} | ||
{{catch/entry8|130|Gyarados|yes|yes|Surf|38-40|2%|type1=Water|type2=Flying}} | |||
{{catch/entry8|846|Arrokuda|yes|yes|Surf|38-40|70%|type1=Water}} | {{catch/entry8|846|Arrokuda|yes|yes|Surf|38-40|70%|type1=Water}} | ||
{{catch/entry8|847|Barraskewda|yes|yes|Surf|38-40|28%|type1=Water}} | {{catch/entry8|847|Barraskewda|yes|yes|Surf|38-40|28%|type1=Water}} | ||
{{catch/footer|land}} | {{catch/footer|land}} | ||
==== | ====[[Curry#Joining Pokémon|Curry encounter]]s==== | ||
{{catch/header/8|land|no}} | |||
{{catch/entry8|829|Gossifleur|yes|yes|Curry|37-40|12.96%|type1=Grass}} | |||
{{catch/entry8|509|Purrloin|yes|yes|Curry|37-40|14.81%|type1=Dark}} | |||
{{catch/entry8|270|Lotad|no|yes|Curry|37-40|19.75%|type1=Water|type2=Grass}} | |||
{{catch/entry8|273|Seedot|yes|no|Curry|37-40|19.75%|type1=Grass}} | |||
{{catch/entry8|824|Blipbug|yes|yes|Curry|37-40|24.69%|type1=Bug}} | |||
{{catch/entry8|833|Chewtle|yes|yes|Curry|37-40|27.78%|type1=Water}} | |||
{{catch/footer|land}} | |||
====[[Wanderer]]s==== | |||
* | * Lapras appears in the water in the north section of the lake (requires an upgraded [[Rotom Bike]]) after acquiring the {{badge|Dark}}. It does not respawn. | ||
* | * Drednaw appears on the island in the lake (requires an upgraded [[Rotom Bike]]). It does not respawn. | ||
* | * Obstagoon appears in the northwest corner of the lake (requires an upgraded [[Rotom Bike]]). It does not respawn. | ||
{{catch/header/8|land}} | {{catch/header/8|land|no}} | ||
{{catch/entry8| | {{catch/entry8|131|Lapras|yes|yes|Wanderer|55|One|type1=Water|type2=Ice}} | ||
{{catch/entry8| | {{catch/entry8|834|Drednaw|yes|yes|Wanderer|50|One|type1=Water|type2=Rock}} | ||
{{catch/entry8| | {{catch/entry8|862|Obstagoon|yes|yes|Wanderer|50|One|type1=Dark|type2=Normal}} | ||
{{catch/footer|land|2}} | {{catch/footer|land|2}} | ||
==Trainers== | ==Trainers== | ||
{{trainerheader|land}} | {{trainerheader|land}} | ||
{{Trainerentry| | {{Trainerentry|VSYoungster SwSh.png{{!}}150px|game=8|Youngster|Jake|360|1|819|Skwovet|♂|6|None|36=ゲン|37=Gen}} | ||
{{trainerdiv|land}} | {{trainerdiv|land}} | ||
{{Trainerentry| | {{Trainerentry|VSLass SwSh.png{{!}}150px|game=8|Lass|Lauren|504|1|833|Chewtle|♀|6|None|36=リコ|37=Riko}} | ||
{{trainerdiv|land}} | {{trainerdiv|land}} | ||
{{Trainerentry| | {{Trainerentry|VSYoungster SwSh.png{{!}}150px|game=8|Youngster|Benjamin|420|2|824|Blipbug|♂|5|None|827|Nickit|♂|7|None|36=カン|37=Kan}} | ||
{{trainerfooter|land|8}} | {{trainerfooter|land|8}} | ||
{{MSP|810|Grookey}} If the {{player}} chose {{p|Grookey}}:<br> | {{MSP/8|810|Grookey}} If the {{player}} chose {{p|Grookey}}:<br> | ||
{{Party/Single | {{Party/Single | ||
|color={{sword color}} | |color={{sword color}} | ||
| Line 120: | Line 162: | ||
|name={{color2|000|Hop}} | |name={{color2|000|Hop}} | ||
|game=SwSh | |game=SwSh | ||
|location=Route 2 | |location=Galar Route 2 | ||
| | |locationname=Route 2 | ||
|pokemon=3}} | |pokemon=3}} | ||
|{{Pokémon/8 | |{{Pokémon/8 | ||
| Line 154: | Line 196: | ||
{{Party/Footer}} | {{Party/Footer}} | ||
{{MSP|813|Scorbunny}} If the {{player}} chose {{p|Scorbunny}}:<br> | {{MSP/8|813|Scorbunny}} If the {{player}} chose {{p|Scorbunny}}:<br> | ||
{{Party/Single | {{Party/Single | ||
|color={{sword color}} | |color={{sword color}} | ||
| Line 166: | Line 208: | ||
|name={{color2|000|Hop}} | |name={{color2|000|Hop}} | ||
|game=SwSh | |game=SwSh | ||
|location=Route 2 | |location=Galar Route 2 | ||
| | |locationname=Route 2 | ||
|pokemon=3}} | |pokemon=3}} | ||
|{{Pokémon/8 | |{{Pokémon/8 | ||
| Line 200: | Line 242: | ||
{{Party/Footer}} | {{Party/Footer}} | ||
{{MSP|816|Sobble}} If the {{player}} chose {{p|Sobble}}:<br> | {{MSP/8|816|Sobble}} If the {{player}} chose {{p|Sobble}}:<br> | ||
{{Party/Single | {{Party/Single | ||
|color={{sword color}} | |color={{sword color}} | ||
| Line 212: | Line 254: | ||
|name={{color2|000|Hop}} | |name={{color2|000|Hop}} | ||
|game=SwSh | |game=SwSh | ||
|location=Route 2 | |location=Galar Route 2 | ||
| | |locationname=Route 2 | ||
|pokemon=3}} | |pokemon=3}} | ||
|{{Pokémon/8 | |{{Pokémon/8 | ||
| Line 245: | Line 287: | ||
|move3=Ember|move3type=Fire|move3cat=Special}} | |move3=Ember|move3type=Fire|move3cat=Special}} | ||
{{Party/Footer}} | {{Party/Footer}} | ||
{{ | |||
==Trivia== | |||
* Route 2 is one of only four numbered routes in the [[Pokémon world]] that is a dead end, the others being {{rt|25|Kanto}} in [[Kanto]], {{rt|224|Sinnoh}} in [[Sinnoh]] (if the {{player}} does not have [[Oak's Letter]]), and {{rt|18|Unova}} in [[Unova]]. | |||
{{Galar}}<br> | {{Galar}}<br> | ||
| Line 257: | Line 301: | ||
[[es:Ruta 2 (Galar)]] | [[es:Ruta 2 (Galar)]] | ||
[[fr:Route 2 (Galar)]] | [[fr:Route 2 (Galar)]] | ||
[[it:Percorso 2 (Galar)]] | |||
[[ja:2ばんどうろ (ガラル地方)]] | [[ja:2ばんどうろ (ガラル地方)]] | ||
[[zh:2号道路(伽勒尔)]] | [[zh:2号道路(伽勒尔)]] | ||
Latest revision as of 20:04, 15 August 2024
| ||||||||
| ||||||||
Connecting locations
| ||||||||
Location 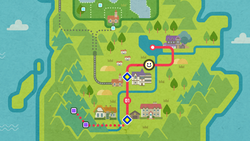 Location of Route 2 in Galar. | ||||||||
Pokémon world routes
| ||||||||
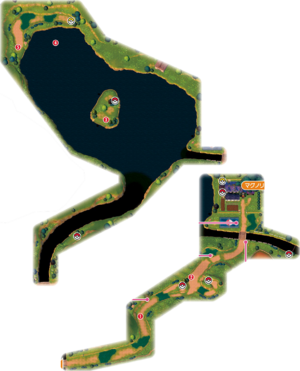
Route 2 (Japanese: 2番道路 Route 2) is a route in southern Galar that extends northeast from Wedgehurst. Professor Magnolia's house is located at its terminus.
Role
When the player first visits the route, Leon offers to teach the player and Hop how to catch Pokémon. However, if the player has already caught a Pokémon, he will assume they already know how. (This requires the player to use one of the five Poké Balls given by Mum with no prompt, as no other Poké Balls can be obtained before this point.)
At Professor Magnolia's house, Hop asks the Professor to convince Leon to endorse him and the player for the Gym Challenge. Leon agrees to endorse the two if they have a battle that'll impress him. Leon then fully heals the player's team. At this point, the player may pick up items from around the Professor's house, but cannot leave the front yard area until they battle Hop outside the house. Regardless of the outcome, Leon agrees to endorse both of them. Soon after, two Wishing Stars fall from the sky, and by the next morning, Professor Magnolia has fit each of them into a Dynamax Band, which she gives to the player and Hop. The player's team is again fully healed overnight.
Before the player returns to Wedgehurst, Hop explains to the player how to move slowly in grass to avoid wild Pokémon's attention, and how to whistle with the Left Control Stick to catch their attention.
Route description
The main section of Route 2 leads over a stone bridge and down a gentle, grassy hillside to Professor Magnolia's house. West of the Professor's house lies a big lake, which can be crossed with an upgraded Rotom Bike. In the middle of the lake is an island, and at the northwest corner of the lake is a short, dead-end path, which contains wild Pokémon on higher levels than the main part of the route, as well as TM69 (Psycho Cut). In the south, the lake also connects to a river, which can be traversed all the way down to the stone bridge at the route entrance
Items
| Item | Location | Games | |
|---|---|---|---|
| Poké Ball ×23 | Sw Sh | ||
| Potion ×2 | Next to the Trainer Tips sign | Sw Sh | |
| Repel | East of the grass patch in front of Professor Magnolia's house, on a dirt patch (hidden) | Sw Sh | |
| Great Ball | On the west side of Professor Magnolia's house, at the back of her garden | Sw Sh | |
| Fresh Water | In a pot in front of Professor Magnolia's eastern crop plot (hidden) | Sw Sh | |
| TM57 (Payback) | Behind Professor Magnolia's house, at the end of a long passageway | Sw Sh | |
| Endorsement | From Leon after battling Hop | Sw Sh | |
| Wishing Star | From Hop after battling him | Sw Sh | |
| Dynamax Band | From Professor Magnolia, after obtaining the Wishing Star | Sw Sh | |
| Choice Band | East of the bridge near Professor Magnolia's house (requires an upgraded Rotom Bike) | Sw Sh | |
| Rare Candy | On the island in the lake (hidden, approximately 40% chance to reappear each day) (requires an upgraded Rotom Bike) | Sw Sh | |
| PP Max | On the island in the lake (requires an upgraded Rotom Bike) | Sw Sh | |
| Prism Scale | In water at the north part of the lake (hidden) (requires an upgraded Rotom Bike) | Sw Sh | |
| Max Ether | In the northwest corner of the lake (hidden) (requires an upgraded Rotom Bike) | Sw Sh | |
| TM69 (Psycho Cut) | In the northwest corner of the lake (requires an upgraded Rotom Bike) | Sw Sh | |
| Psychic Seed | On a riverbank south of Professor Magnolia's house (requires an upgraded Rotom Bike) | Sw Sh | |
| Water Stone | At the end of the river south of Professor Magnolia's house (hidden) (requires an upgraded Rotom Bike) | Sw Sh | |
Pokémon
Wedgehurst side
Hidden encounters
| Pokémon | Games | Location | Levels | Rate | ||||||||||
|---|---|---|---|---|---|---|---|---|---|---|---|---|---|---|
| Sw | Sh | 4-6 | 5% | |||||||||||
| Sw | Sh | 4-6 | 20% | |||||||||||
| Sw | Sh | 4-6 | 20% | |||||||||||
| Sw | Sh | 4-6 | 10% | |||||||||||
| Sw | Sh | 4-6 | 25% | |||||||||||
| Sw | Sh | 4-6 | 40% | |||||||||||
| Fishing | ||||||||||||||
| Sw | Sh | 4-6 | 80% | |||||||||||
| Sw | Sh | 4-6 | 15% | |||||||||||
| Sw | Sh | 4-6 | 5% | |||||||||||
| A colored background means that the Pokémon can be found in this location in the specified game. A white background with a colored letter means that the Pokémon cannot be found here. | ||||||||||||||
Visible encounters
| Pokémon | Games | Location | Levels | Rate | |||||||||
|---|---|---|---|---|---|---|---|---|---|---|---|---|---|
| Sw | Sh | 5-7 | 2% | ||||||||||
| Sw | Sh | 5-7 | 38% | ||||||||||
| Sw | Sh | 5-7 | 30% | ||||||||||
| Sw | Sh | 5-7 | 15% | ||||||||||
| Sw | Sh | 5-7 | 10% | ||||||||||
| Sw | Sh | 5-7 | 5% | ||||||||||
| A colored background means that the Pokémon can be found in this location in the specified game. A white background with a colored letter means that the Pokémon cannot be found here. | |||||||||||||
Curry encounters
| Pokémon | Games | Location | Levels | Rate | |||||||||
|---|---|---|---|---|---|---|---|---|---|---|---|---|---|
| Sw | Sh | 4-6 | 11.04% | ||||||||||
| Sw | Sh | 4-6 | 17.18% | ||||||||||
| Sw | Sh | 4-6 | 19.63% | ||||||||||
| Sw | Sh | 4-6 | 19.63% | ||||||||||
| Sw | Sh | 4-6 | 24.54% | ||||||||||
| Sw | Sh | 4-6 | 27.61% | ||||||||||
| A colored background means that the Pokémon can be found in this location in the specified game. A white background with a colored letter means that the Pokémon cannot be found here. | |||||||||||||
Wanderers
- Chewtle appears in the middle of the route, on the open path before the Trainer Tips sign. It does not respawn.
- Yamper appears in the middle of the route, on the open path just past the Trainer Tips sign. It does not respawn.
| Pokémon | Games | Location | Levels | Rate | |||||||||
|---|---|---|---|---|---|---|---|---|---|---|---|---|---|
| Sw | Sh |
Wanderer
|
8 | One | |||||||||
| Sw | Sh |
Wanderer
|
8 | One | |||||||||
| A colored background means that the Pokémon can be found in this location in the specified game. A white background with a colored letter means that the Pokémon cannot be found here. | |||||||||||||
Across the lake
Hidden encounters
| Pokémon | Games | Location | Levels | Rate | ||||||||||
|---|---|---|---|---|---|---|---|---|---|---|---|---|---|---|
| Sw | Sh | 37-40 | 20% | |||||||||||
| Sw | Sh | 37-40 | 20% | |||||||||||
| Sw | Sh | 37-40 | 30% | |||||||||||
| Sw | Sh | 37-40 | 10% | |||||||||||
| Sw | Sh | 37-40 | 35% | |||||||||||
| Sw | Sh | 37-40 | 5% | |||||||||||
| Fishing | ||||||||||||||
| Sw | Sh | 37-40 | 59% | |||||||||||
| Sw | Sh | 37-40 | 1% | |||||||||||
| Sw | Sh | 37-40 | 40% | |||||||||||
| A colored background means that the Pokémon can be found in this location in the specified game. A white background with a colored letter means that the Pokémon cannot be found here. | ||||||||||||||
Visible encounters
| Pokémon | Games | Location | Levels | Rate | ||||||||||
|---|---|---|---|---|---|---|---|---|---|---|---|---|---|---|
| Sw | Sh | 40-43 | 50% | |||||||||||
| Sw | Sh | 40-43 | 30% | |||||||||||
| Sw | Sh | 40-43 | 15% | |||||||||||
| Sw | Sh | 40-43 | 5% | |||||||||||
| Surfing | ||||||||||||||
| Sw | Sh | 38-40 | 2% | |||||||||||
| Sw | Sh | 38-40 | 70% | |||||||||||
| Sw | Sh | 38-40 | 28% | |||||||||||
| A colored background means that the Pokémon can be found in this location in the specified game. A white background with a colored letter means that the Pokémon cannot be found here. | ||||||||||||||
Curry encounters
| Pokémon | Games | Location | Levels | Rate | |||||||||
|---|---|---|---|---|---|---|---|---|---|---|---|---|---|
| Sw | Sh | 37-40 | 12.96% | ||||||||||
| Sw | Sh | 37-40 | 14.81% | ||||||||||
| Sw | Sh | 37-40 | 19.75% | ||||||||||
| Sw | Sh | 37-40 | 19.75% | ||||||||||
| Sw | Sh | 37-40 | 24.69% | ||||||||||
| Sw | Sh | 37-40 | 27.78% | ||||||||||
| A colored background means that the Pokémon can be found in this location in the specified game. A white background with a colored letter means that the Pokémon cannot be found here. | |||||||||||||
Wanderers
- Lapras appears in the water in the north section of the lake (requires an upgraded Rotom Bike) after acquiring the Dark Badge. It does not respawn.
- Drednaw appears on the island in the lake (requires an upgraded Rotom Bike). It does not respawn.
- Obstagoon appears in the northwest corner of the lake (requires an upgraded Rotom Bike). It does not respawn.
| Pokémon | Games | Location | Levels | Rate | |||||||||
|---|---|---|---|---|---|---|---|---|---|---|---|---|---|
| Sw | Sh |
Wanderer
|
55 | One | |||||||||
| Sw | Sh |
Wanderer
|
50 | One | |||||||||
| Sw | Sh |
Wanderer
|
50 | One | |||||||||
| A colored background means that the Pokémon can be found in this location in the specified game. A white background with a colored letter means that the Pokémon cannot be found here. | |||||||||||||
Trainers
| Trainer | Pokémon | |||||||||||
|---|---|---|---|---|---|---|---|---|---|---|---|---|
|
| |||||||||||
|
| |||||||||||
|
| |||||||||||
| ||||||||||||
|
|||||||||||||||||||||||||||||||||||||||||||||||||||||||||||||||||||||||||||||||||||||||||||||||||||||||||
| |||||||||||||||||||||||||||||||||||||||||||||||||||||||||||||||||||||||||||||||||||||||||||||||||||||||||
 If the player chose Scorbunny:
|
|||||||||||||||||||||||||||||||||||||||||||||||||||||||||||||||||||||||||||||||||||||||||||||||||||||||||
| |||||||||||||||||||||||||||||||||||||||||||||||||||||||||||||||||||||||||||||||||||||||||||||||||||||||||
|
|||||||||||||||||||||||||||||||||||||||||||||||||||||||||||||||||||||||||||||||||||||||||||||||||||||||||
| |||||||||||||||||||||||||||||||||||||||||||||||||||||||||||||||||||||||||||||||||||||||||||||||||||||||||
Trivia
- Route 2 is one of only four numbered routes in the Pokémon world that is a dead end, the others being Route 25 in Kanto, Route 224 in Sinnoh (if the player does not have Oak's Letter), and Route 18 in Unova.

|
This article is part of Project Routes, a Bulbapedia project that aims to write comprehensive articles on every route in the Pokémon world. |
