Victory Road (Hoenn): Difference between revisions
Blaziken257 (talk | contribs) |
m Text replacement - "rexpanded=yes" to "r|expanded=yes" Tags: Mobile edit Mobile web edit |
||
| (111 intermediate revisions by 56 users not shown) | |||
| Line 1: | Line 1: | ||
{{bad picture|2=Guidebook labels}} | |||
{{incomplete|needs=Missing exterior image from Generation VI}} | |||
{{Infobox location | {{Infobox location | ||
|image=Victory Road E.png | |image=Victory Road E.png | ||
| Line 8: | Line 10: | ||
|location=[[Ever Grande City]] | |location=[[Ever Grande City]] | ||
|region=Hoenn | |region=Hoenn | ||
|generation={{Gen|III}} | |mapdesc=This challenging path forces Trainers who hope to overcome the Pokémon League to first surpass their own limits. | ||
|generation={{Gen|III}}, {{gen|VI}} | |||
}} | }} | ||
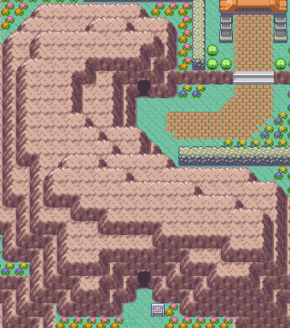
[[Hoenn]]'s '''Victory Road''' (Japanese: '''チャンピオンロード''' ''Champion Road'') is, much like in other | [[Hoenn]]'s '''Victory Road''' (Japanese: '''チャンピオンロード''' ''Champion Road'') is, much like in other [[region]]s, the route that takes [[Pokémon League]]-bound {{pkmn|Trainer}}s to the [[Elite Four]]. Its two entrances are located within [[Ever Grande City]]. | ||
Victory Road begins as a complex cave with bridges leading across rock formations. | Victory Road begins as a complex cave with bridges leading across rock formations. [[Wally]] will battle the {{player}} near Victory Road's exit{{sup/3|RS}}{{sup/6|ORAS}}/entrance{{sup/3|E}}. In {{game|Emerald}}, Wally can also be [[rematch]]ed near the exit. | ||
Players will need {{m|Strength}}, {{m|Rock Smash}}, and {{m|Surf}} to make their way through the cave. {{m|Flash}} and {{m|Waterfall}}, while not required, make traversing the cave easier. | Players will need {{m|Strength}}, {{m|Rock Smash}}, and {{m|Surf}} to make their way through the cave. {{m|Flash}} and {{m|Waterfall}}, while not required, make traversing the cave easier. | ||
In {{pkmn|Omega Ruby and Alpha Sapphire}}, Victory Road's B1F has two exits to Ever Grande City outside, one of which leads to an area where {{TM|29|Psychic}} can be found. Surf and Strength are required to access these exits. | |||
==Items== | ==Items== | ||
{{Itlisth|cave}} | {{Itlisth|cave}} | ||
{{Itemlist|Max Elixir|1F|Ru=yes|Sa=yes|E=yes | {{Itemlist|Max Elixir|1F, above ledge in eastern part of the floor|Ru=yes|Sa=yes|E=yes}} | ||
{{Itemlist|PP Up|1F | {{Itemlist|PP Up|1F, in southeastern corner|Ru=yes|Sa=yes|E=yes}} | ||
{{Itemlist|Ultra Ball|1F | {{Itemlist|Ultra Ball|1F, at the end of the ledge in the southeast corner, left of the PP Up ''(hidden)''|Ru=yes|Sa=yes|E=yes}} | ||
{{Itemlist|Full Restore|B1F|Ru=yes|Sa=yes|E=yes | {{Itemlist|Full Restore|B1F, north of Cooltrainer Samuel (requires {{m|Strength}} and {{m|Rock Smash}})|Ru=yes|Sa=yes|E=yes}} | ||
{{Itemlist|Max Repel|B2F | {{Itemlist|Max Repel|B2F, in a nook by the ladder at the northeast corner ''(hidden)''|Ru=yes|Sa=yes|E=yes}} | ||
{{Itemlist|TM Psychic|B1F | {{Itemlist|TM Psychic|B1F, in northeastern corner|Ru=yes|Sa=yes|E=yes|display={{TM|29|Psychic}}}} | ||
{{Itemlist|Elixir|B2F | {{Itemlist|Full Heal|B2F, near Cooltrainer Vito|Ru=yes|Sa=yes|E=yes}} | ||
{{Itemlist|Full | {{Itemlist|Elixir|B2F, in a small two-square nook to the right above the eastern waterfall (requires {{m|Surf}}) ''(hidden)''|Ru=yes|Sa=yes|E=yes}} | ||
{{Itemlist|Full Heal|1F, across the bridge above {{tc|Ace Trainer}} Albert (requires {{m|Surf}})|OR=yes|AS=yes}} | |||
{{Itemlist|Max Repel|1F, in a rock to the east of the staircase leading to {{tc|Ace Trainer}} Hope (requires {{m|Surf}}) ''(hidden)''|OR=yes|AS=yes}} | |||
{{Itemlist|Ultra Ball|B1F, small rock, left of the ladder (requires {{m|Surf}}) ''(hidden)''|OR=yes|AS=yes}} | |||
{{Itemlist|PP Up|B1F, northeastern corner, behind the two [[Movable boulder|boulders]] (requires {{m|Surf}} and {{m|Strength}})|OR=yes|AS=yes}} | |||
{{Itemlist|Elixir|1F, west of the northernmost bridge, on the empty tile next to a big rock and south of a small rock (requires {{m|Surf}}) ''(hidden)''|OR=yes|AS=yes}} | |||
{{Itemlist|Max Elixir|B1F, southwest from the ladder north of {{tc|Street Thug}} Regan on 1F (requires {{m|Surf}})|OR=yes|AS=yes}} | |||
{{Itemlist|TM Fire VI|B1F, north of {{tc|Expert}} Theodore, behind the two boulders (requires {{m|Strength}})|OR=yes|AS=yes|display={{TM|35|Flamethrower}}}} | |||
{{Itemlist|Full Restore|B1F, northwest of {{tc|Ace Trainer}} Vito|OR=yes|AS=yes}} | |||
{{Itemlist|Iron|2F, west of the southernmost bridge ''(hidden)''|OR=yes|AS=yes}} | |||
{{Itemlist|TM Bug VI|2F, atop the southern {{OBP|waterfall|obstacle}} (requires {{m|Surf}} and {{m|Waterfall}})|OR=yes|AS=yes|display={{TM|81|X-Scissor}}}} | |||
{{Itemlist|Dawn Stone|2F, from [[Wally]] after defeating him (requires {{m|Surf}} and {{m|Strength}})|OR=yes|AS=yes}} | |||
{{Itemlist|PP Max|B1F, 5% chance of receiving one after a rematch with {{tc|Ace Duo}} Jude & Rory|OR=yes|AS=yes}} | |||
{{Itlistfoot|cave}} | {{Itlistfoot|cave}} | ||
==Pokémon== | ==Pokémon== | ||
===1F=== | ===Generation III=== | ||
====1F==== | |||
{{Catch/header|cave|no}} | {{Catch/header|cave|no}} | ||
{{Catch/entry3|041|Zubat|yes|yes|yes|Cave|36|10%|type1=Poison|type2=Flying}} | {{Catch/entry3|041|Zubat|yes|yes|yes|Cave|36|10%|type1=Poison|type2=Flying}} | ||
{{Catch/entry3|042|Golbat|yes|yes|yes|Cave|38 | {{Catch/entry3|042|Golbat|yes|yes|yes|Cave|38, 40|25%|type1=Poison|type2=Flying}} | ||
{{Catch/entry3|293|Whismur|yes|yes|yes|Cave|36|5%}} | {{Catch/entry3|293|Whismur|yes|yes|yes|Cave|36|5%}} | ||
{{Catch/entry3|294|Loudred|yes|yes|yes|Cave|40|10%}} | {{Catch/entry3|294|Loudred|yes|yes|yes|Cave|40|10%}} | ||
{{Catch/entry3|296|Makuhita|yes|yes|yes|Cave|36|10%|type1=Fighting}} | {{Catch/entry3|296|Makuhita|yes|yes|yes|Cave|36|10%|type1=Fighting}} | ||
{{Catch/entry3|297|Hariyama|yes|yes|yes|Cave|38 | {{Catch/entry3|297|Hariyama|yes|yes|yes|Cave|38, 40|25%|type1=Fighting}} | ||
{{Catch/entry3|304|Aron|yes|yes|yes|Cave|36|5%|type1=Steel|type2=Rock}} | {{Catch/entry3|304|Aron|yes|yes|yes|Cave|36|5%|type1=Steel|type2=Rock}} | ||
{{Catch/entry3|305|Lairon|yes|yes|yes|Cave|40|10%|type1=Steel|type2=Rock}} | {{Catch/entry3|305|Lairon|yes|yes|yes|Cave|40|10%|type1=Steel|type2=Rock}} | ||
{{Catch/footer|cave}} | {{Catch/footer|cave}} | ||
===B1F=== | ====B1F==== | ||
{{Catch/header|cave|no}} | {{Catch/header|cave|no}} | ||
{{Catch/entry3|042|Golbat|yes|yes|yes|Cave|38 | {{Catch/entry3|042|Golbat|yes|yes|yes|Cave|38, 40, 42|35%|type1=Poison|type2=Flying}} | ||
{{Catch/entry3|297|Hariyama|yes|yes|yes|Cave|38 | {{Catch/entry3|297|Hariyama|yes|yes|yes|Cave|38, 40, 42|35%|type1=Fighting}} | ||
{{Catch/entry3|303|Mawile|no|no|yes|Cave|38|5%|type1=Steel}} | {{Catch/entry3|303|Mawile|no|no|yes|Cave|38|5%|type1=Steel}} | ||
{{Catch/entry3|305|Lairon|yes|yes|no|Cave|40 | {{Catch/entry3|305|Lairon|yes|yes|no|Cave|40, 42|15%|type1=Steel|type2=Rock}} | ||
{{Catch/entry3|305|Lairon|no|no|yes|Cave|40 | {{Catch/entry3|305|Lairon|no|no|yes|Cave|40, 42|25%|type1=Steel|type2=Rock}} | ||
{{Catch/entry3|307|Meditite|yes|yes|no|Cave|38|5%|type1=Fighting|type2=Psychic}} | {{Catch/entry3|307|Meditite|yes|yes|no|Cave|38|5%|type1=Fighting|type2=Psychic}} | ||
{{Catch/entry3|308|Medicham|yes|yes|no|Cave|40|10%|type1=Fighting|type2=Psychic}} | {{Catch/entry3|308|Medicham|yes|yes|no|Cave|40|10%|type1=Fighting|type2=Psychic}} | ||
{{Catch/div|cave|Rock Smash}} | {{Catch/div|cave|Rock Smash}} | ||
{{Catch/entry3|074|Geodude|yes|yes|yes|Rock Smash|30-40| | {{Catch/entry3|074|Geodude|yes|yes|yes|Rock Smash|30-40|30%|type1=Rock|type2=Ground}} | ||
{{Catch/entry3|075|Graveler|yes|yes|yes|Rock Smash|30-40| | {{Catch/entry3|075|Graveler|yes|yes|yes|Rock Smash|30-40|70%|type1=Rock|type2=Ground}} | ||
{{Catch/footer|cave}} | {{Catch/footer|cave}} | ||
===B2F=== | ====B2F==== | ||
{{Catch/header|cave|no}} | {{Catch/header|cave|no}} | ||
{{Catch/entry3|042|Golbat|yes|yes|yes|Cave|40 | {{Catch/entry3|042|Golbat|yes|yes|yes|Cave|40, 42, 44|35%|type1=Poison|type2=Flying}} | ||
{{Catch/entry3|302|Sableye|no|yes|yes|Cave|40 | {{Catch/entry3|302|Sableye|no|yes|yes|Cave|40, 42, 44|35%|type1=Dark|type2=Ghost}} | ||
{{Catch/entry3|303|Mawile|yes|no|no|Cave|40 | {{Catch/entry3|303|Mawile|yes|no|no|Cave|40, 42, 44|35%|type1=Steel}} | ||
{{Catch/entry3|303|Mawile|no|no|yes|Cave|42 | {{Catch/entry3|303|Mawile|no|no|yes|Cave|42, 44|5%|type1=Steel}} | ||
{{Catch/entry3|305|Lairon|yes|yes|no|Cave|40 | {{Catch/entry3|305|Lairon|yes|yes|no|Cave|40, 42, 44|15%|type1=Steel|type2=Rock}} | ||
{{Catch/entry3|305|Lairon|no|no|yes|Cave|40 | {{Catch/entry3|305|Lairon|no|no|yes|Cave|40, 42, 44|25%|type1=Steel|type2=Rock}} | ||
{{Catch/entry3|308|Medicham|yes|yes|no|Cave|40 | {{Catch/entry3|308|Medicham|yes|yes|no|Cave|40, 42, 44|15%|type1=Fighting|type2=Psychic}} | ||
{{Catch/div|water|Surfing}} | {{Catch/div|water|Surfing}} | ||
{{Catch/entry3|042|Golbat|yes|yes|yes|Surf|25-40|100%|type1=Poison|type2=Flying}} | {{Catch/entry3|042|Golbat|yes|yes|yes|Surf|25-40|100%|type1=Poison|type2=Flying}} | ||
| Line 77: | Line 93: | ||
{{Catch/entry3|339|Barboach|yes|yes|yes|Fish Super|25-35|80%|type1=Water|type2=Ground}} | {{Catch/entry3|339|Barboach|yes|yes|yes|Fish Super|25-35|80%|type1=Water|type2=Ground}} | ||
{{Catch/entry3|340|Whiscash|yes|yes|yes|Fish Super|30-45|20%|type1=Water|type2=Ground}} | {{Catch/entry3|340|Whiscash|yes|yes|yes|Fish Super|30-45|20%|type1=Water|type2=Ground}} | ||
{{Catch/footer|cave}} | |||
===Generation VI=== | |||
====Entrance, 1F, and B1F==== | |||
{{Catch/header|cave|no}} | |||
{{Catch/entryoras|042|Golbat|yes|yes|Cave|37, 39|20%|type1=Poison|type2=Flying}} | |||
{{Catch/entryoras|294|Loudred|yes|yes|Cave|37, 39|20%|type1=Normal}} | |||
{{Catch/entryoras|297|Hariyama|yes|yes|Cave|38, 40|15%|type1=Fighting}} | |||
{{Catch/entryoras|302|Sableye|no|yes|Cave|40|10%|type1=Dark|type2=Ghost}} | |||
{{Catch/entryoras|303|Mawile|yes|no|Cave|40|10%|type1=Steel|type2=Fairy}} | |||
{{Catch/entryoras|305|Lairon|yes|yes|Cave|37, 39|20%|type1=Steel|type2=Rock}} | |||
{{Catch/entryoras|308|Medicham|yes|yes|Cave|38, 40|15%|type1=Fighting|type2=Psychic}} | |||
{{Catch/div|cave|{{color2|000|Horde Encounter}}}} | |||
{{Catch/entryoras|041|Zubat|yes|yes|Horde Encounter|20|60%|type1=Poison|type2=Flying}} | |||
{{Catch/entryoras|294|Loudred|yes|yes|Horde Encounter|20|5%|type1=Normal}} | |||
{{Catch/entryoras|304|Aron|yes|yes|Horde Encounter|20|35%|type1=Steel|type2=Rock}} | |||
{{Catch/div|water|Surfing}} | |||
{{Catch/entryoras|042|Golbat|yes|yes|Surf|30, 40|35%|type1=Poison|type2=Flying}} | |||
{{Catch/entryoras|072|Tentacool|yes|yes|Surf|25|50%|type1=Water|type2=Poison}} | |||
{{Catch/entryoras|073|Tentacruel|yes|yes|Surf|35|15%|type1=Water|type2=Poison}} | |||
{{Catch/div|water|Fishing}} | |||
{{Catch/entryoras|072|Tentacool|yes|yes|Fish Old|5|35%|type1=Water|type2=Poison}} | |||
{{Catch/entryoras|129|Magikarp|yes|yes|Fish Old|10, 15|65%|type1=Water}} | |||
{{Catch/entryoras|129|Magikarp|yes|yes|Fish Good|25|60%|type1=Water}} | |||
{{Catch/entryoras|320|Wailmer|yes|yes|Fish Good|25|5%|type1=Water}} | |||
{{Catch/entryoras|370|Luvdisc|yes|yes|Fish Good|25|35%|type1=Water}} | |||
{{Catch/entryoras|320|Wailmer|yes|yes|Fish Super|30, 40|40%|type1=Water}} | |||
{{Catch/entryoras|370|Luvdisc|yes|yes|Fish Super|35|60%|type1=Water}} | |||
{{Catch/footer|cave}} | |||
====2F==== | |||
{{Catch/header|cave|no}} | |||
{{Catch/div|water|Surfing}} | |||
{{Catch/entryoras|042|Golbat|yes|yes|Surf|25, 30, 35, 40|100%|type1=Poison|type2=Flying}} | |||
{{Catch/div|water|Fishing}} | |||
{{Catch/entryoras|118|Goldeen|yes|yes|Fish Old|5|35%|type1=Water}} | |||
{{Catch/entryoras|129|Magikarp|yes|yes|Fish Old|10, 15|65%|type1=Water}} | |||
{{Catch/entryoras|118|Goldeen|yes|yes|Fish Good|25|35%|type1=Water}} | |||
{{Catch/entryoras|129|Magikarp|yes|yes|Fish Good|25|60%|type1=Water}} | |||
{{Catch/entryoras|339|Barboach|yes|yes|Fish Good|25|5%|type1=Water|type2=Ground}} | |||
{{Catch/entryoras|339|Barboach|yes|yes|Fish Super|30, 35, 40|100%|type1=Water|type2=Ground}} | |||
{{Catch/footer|cave}} | {{Catch/footer|cave}} | ||
==Trainers== | ==Trainers== | ||
===Ruby and Sapphire=== | ==={{game|Ruby and Sapphire|s}}=== | ||
{{trainerheader|cave | {{trainerheader|cave}} | ||
{{trainerentry|Spr RS Cooltrainer M.png|Cooltrainer|Albert|2064|2|310|Manectric|♂|43||089|Muk|♂|43|36=ショウ|37=Shō}} | {{trainerentry|Spr RS Cooltrainer M.png|Cooltrainer|Albert|2064|2|310|Manectric|♂|43||089|Muk|♂|43|36=ショウ|37=Shō}} | ||
{{trainerdiv|cave}} | {{trainerdiv|cave}} | ||
| Line 101: | Line 158: | ||
{{trainerdiv|cave}} | {{trainerdiv|cave}} | ||
{{trainerentry|Spr RS Cooltrainer M.png|Cooltrainer|Edgar|2112|1|332|Cacturne|♂|44|36=コウキ|37=Kōki}} | {{trainerentry|Spr RS Cooltrainer M.png|Cooltrainer|Edgar|2112|1|332|Cacturne|♂|44|36=コウキ|37=Kōki}} | ||
{{trainerfooter|cave|3||}} | {{trainerfooter|cave|3}} | ||
===Emerald=== | |||
{{trainerheader|cave | [[Rematch]]es against Wally are available after the {{pkmn|Champion}} has been defeated. He also uses two [[Super Potion]]s. | ||
{{Party/Single | |||
|color={{tcg grass color light}} | |||
|bordercolor={{tcg grass color}} | |||
|headcolor=CED8F6 | |||
|sprite=Spr RS Wally.png | |||
|prize={{PDollar}}{{tt|2700|First battle}}/{{tt|2880|First rematch}}/{{tt|3060|Second rematch}}/{{tt|3240|Third rematch}}/{{tt|3420|Fourth rematch onwards}} | |||
|class={{PK}}{{MN}} Trainer | |||
|classlink=Pokémon Trainer | |||
|name={{color2|000|Wally}} | |||
|game=RS | |||
|location=Victory Road (Hoenn) | |||
|locationname=Victory Road | |||
|pokemon=5}} | |||
|{{Pokémon/3 | |||
|game=Ruby | |||
|ndex=334 | |||
|pokemon=Altaria | |||
|gender=male | |||
|level={{tt|44|First battle}}/{{tt|47|First rematch}}/{{tt|50|Second rematch}}/{{tt|53|Third rematch}}/{{tt|56|Fourth rematch onwards}} | |||
|type1=Dragon|type2=Flying | |||
|ability=Natural Cure | |||
|move1=Safeguard|move1type=Normal | |||
|move2=Dragon Dance|move2type=Dragon | |||
|move3=Aerial Ace|move3type=Flying | |||
|move4=DragonBreath|move4type=Dragon}} | |||
|{{Pokémon/3 | |||
|game=Ruby | |||
|ndex=301 | |||
|pokemon=Delcatty | |||
|gender=female | |||
|level={{tt|43|First battle}}/{{tt|46|First rematch}}/{{tt|49|Second rematch}}/{{tt|52|Third rematch}}/{{tt|55|Fourth rematch onwards}} | |||
|type1=Normal | |||
|ability=Cute Charm | |||
|move1=Sing|move1type=Normal | |||
|move2=Faint Attack|move2type=Dark | |||
|move3=Charm|move3type=Normal | |||
|move4=Assist|move4type=Normal}} | |||
|{{Pokémon/3 | |||
|game=Ruby | |||
|ndex=315 | |||
|pokemon=Roselia | |||
|gender=male | |||
|level={{tt|44|First battle}}/{{tt|47|First rematch}}/{{tt|50|Second rematch}}/{{tt|53|Third rematch}}/{{tt|56|Fourth rematch onwards}} | |||
|type1=Grass|type2=Poison | |||
|ability=Natural Cure | |||
|move1=Leech Seed|move1type=Grass | |||
|move2=Toxic|move2type=Poison | |||
|move3=Magical Leaf|move3type=Grass | |||
|move4=Giga Drain|move4type=Grass}} | |||
{{Party/Div|color={{tcg grass color light}}}} | |||
|style="margin:auto"|{{Pokémon/3 | |||
|game=Ruby | |||
|ndex=082 | |||
|pokemon=Magneton | |||
|level={{tt|41|First battle}}/{{tt|44|First rematch}}/{{tt|47|Second rematch}}/{{tt|50|Third rematch}}/{{tt|53|Fourth rematch onwards}} | |||
|type1=Electric|type2=Steel | |||
|ability=Magnet Pull | |||
|move1=Thunderbolt | |||
|move1type=Electric|move1cat=Status | |||
|move2=Tri Attack|move2type=Normal | |||
|move3=Screech|move3type=Normal | |||
|move4=Supersonic|move4type=Normal}} | |||
|style="margin:auto"|{{Pokémon/3 | |||
|game=Ruby | |||
|ndex=282 | |||
|pokemon=Gardevoir | |||
|gender=male | |||
|level={{tt|45|First battle}}/{{tt|48|First rematch}}/{{tt|51|Second rematch}}/{{tt|54|Third rematch}}/{{tt|57|Fourth rematch onwards}} | |||
|type1=Psychic | |||
|ability=Synchronize | |||
|move1=Psychic|move1type=Psychic | |||
|move2=Double Team|move2type=Normal | |||
|move3=Future Sight|move3type=Psychic | |||
|move4=Calm Mind|move4type=Psychic}} | |||
{{Party/Footer}} | |||
==={{game|Emerald}}=== | |||
{{trainerheader|cave}} | |||
{{trainerentry|Spr RS Cooltrainer M.png|Cooltrainer|Albert|2064|2|082|Magneton||43||089|Muk|♂|43|36=ショウ|37=Shō}} | {{trainerentry|Spr RS Cooltrainer M.png|Cooltrainer|Albert|2064|2|082|Magneton||43||089|Muk|♂|43|36=ショウ|37=Shō}} | ||
{{trainerdiv|cave}} | {{trainerdiv|cave}} | ||
| Line 116: | Line 251: | ||
{{trainerentry|Spr RS Cooltrainer M.png|Cooltrainer|Owen|2016|3|352|Kecleon|♂|42||075|Graveler|♂|42||321|Wailord|♂|42|36=カケル|37=Kakeru}} | {{trainerentry|Spr RS Cooltrainer M.png|Cooltrainer|Owen|2016|3|352|Kecleon|♂|42||075|Graveler|♂|42||321|Wailord|♂|42|36=カケル|37=Kakeru}} | ||
{{trainerdiv|cave}} | {{trainerdiv|cave}} | ||
{{trainerentry|Spr RS Cooltrainer F.png|Cooltrainer|Dianne|2064|2|344|Claydol||43||171|Lanturn|♀|43|36=ココロ|37=Kokoro}} | {{trainerentry|Spr RS Cooltrainer F.png|Cooltrainer|Dianne|2064<br/><small>Potential [[Double Battle]] with Felix</small>|2|344|Claydol||43||171|Lanturn|♀|43|36=ココロ|37=Kokoro}} | ||
{{trainerentry|Spr RS Cooltrainer M.png|Cooltrainer|Felix|2064<br/><small>Potential [[Double Battle]] with Dianne</small>|2|308|Medicham|♂|43||344|Claydol||43|36=コウジロウ|37=Kōjirō}} | |||
{{trainerdiv|cave}} | {{trainerdiv|cave}} | ||
{{trainerentry|Spr RS Cooltrainer F.png|Cooltrainer|Caroline|2064|2|227|Skarmory|♀|43||302|Sableye|♀|43|36=コトミ|37=Kotomi}} | |||
{{trainerentry|Spr RS Cooltrainer F.png|Cooltrainer|Caroline| | |||
{{trainerdiv|cave}} | {{trainerdiv|cave}} | ||
{{trainerentry|Spr RS Cooltrainer M.png|Cooltrainer|[[Winstrate family|Vito]]|2016|4|085|Dodrio|♂|42||064|Kadabra|♂|42||101|Electrode||42||275|Shiftry|♂|42|||36=リョウヘイ|37=Ryōhei}} | {{trainerentry|Spr RS Cooltrainer M.png|Cooltrainer|[[Winstrate family|Vito]]|2016|4|085|Dodrio|♂|42||064|Kadabra|♂|42||101|Electrode||42||275|Shiftry|♂|42|||36=リョウヘイ|37=Ryōhei}} | ||
| Line 126: | Line 260: | ||
{{trainerentry|Spr RS Cooltrainer F.png|Cooltrainer|Michelle|2016|3|324|Torkoal|♀|42||308|Medicham|♀|42||272|Ludicolo|♀|42|36=カズミ|37=Kazumi}} | {{trainerentry|Spr RS Cooltrainer F.png|Cooltrainer|Michelle|2016|3|324|Torkoal|♀|42||308|Medicham|♀|42||272|Ludicolo|♀|42|36=カズミ|37=Kazumi}} | ||
{{trainerdiv|cave}} | {{trainerdiv|cave}} | ||
{{trainerentry|Spr RS Cooltrainer M.png|Cooltrainer|Mitchell|2064|2|337|Lunatone||43||338|Solrock||43|36=テッペイ|37=Teppei | {{trainerentry|Spr RS Cooltrainer M.png|Cooltrainer|Mitchell|2064<br/><small>Potential [[Double Battle]] with Halle</small>|2|337|Lunatone||43||338|Solrock||43|36=テッペイ|37=Teppei}} | ||
{{trainerentry|Spr RS Cooltrainer F.png|Cooltrainer|Halle|2064<br/><small>Potential [[Double Battle]] with Mitchell</small>|2|302|Sableye|♀|43||359|Absol|♀|43|36=ヒロエ|37=Hiroe}} | |||
{{trainerentry|Spr RS Cooltrainer F.png|Cooltrainer|Halle|2064|2|302|Sableye|♀|43||359|Absol|♀|43|36=ヒロエ|37=Hiroe}} | |||
{{trainerdiv|cave}} | {{trainerdiv|cave}} | ||
{{trainerentry|Spr RS Cooltrainer M.png|Cooltrainer|Edgar|2064|2|332|Cacturne|♂|43||279|Pelipper|♂|43|36=コウキ|37=Kōki}} | {{trainerentry|Spr RS Cooltrainer M.png|Cooltrainer|Edgar|2064|2|332|Cacturne|♂|43||279|Pelipper|♂|43|36=コウキ|37=Kōki}} | ||
{{trainerdiv|cave}} | {{trainerdiv|cave}} | ||
{{trainerentry|Spr RS Cooltrainer F.png|Cooltrainer|Katelynn|2064|2|282|Gardevoir|♀|43||289|Slaking|♀|43|36=スズカ|37=Suzuka | {{trainerentry|Spr RS Cooltrainer F.png|Cooltrainer|Katelynn|2064<br/><small>Potential [[Double Battle]] with Quincy</small>|2|282|Gardevoir|♀|43||289|Slaking|♀|43|36=スズカ|37=Suzuka}} | ||
{{trainerentry|Spr RS Cooltrainer M.png|Cooltrainer|Quincy|2064<br/><small>Potential [[Double Battle]] with Katelynn</small>|2|289|Slaking|♂|43||356|Dusclops|♂|43|36=タダトシ|37=Tadatoshi}} | |||
{{trainerentry|Spr RS Cooltrainer M.png|Cooltrainer|Quincy|2064|2|289|Slaking|♂|43||356|Dusclops|♂|43|36=タダトシ|37=Tadatoshi}} | {{trainerfooter|cave|3}} | ||
{{trainerfooter|cave|3 | |||
[[Rematch]]es against Wally are available after the {{pkmn|Champion}} has been defeated. He also uses two [[Full Restore]]s. | |||
{{Party | {{Party/Single | ||
|color={{tcg grass color light}} | |color={{tcg grass color light}} | ||
|headcolor= | |headcolor=CED8F6 | ||
|bordercolor={{tcg grass color}} | |bordercolor={{tcg grass color}} | ||
|sprite=Spr RS Wally.png | |sprite=Spr RS Wally.png | ||
|prize={{PDollar}} | |prize={{PDollar}}{{tt|2700|First battle}}/{{tt|2880|First rematch}}/{{tt|3060|Second rematch}}/{{tt|3240|Third rematch}}/{{tt|3420|Fourth rematch onwards}} | ||
|class=Pokémon Trainer | |class={{PK}}{{MN}} Trainer | ||
|name=Wally | |classlink=Pokémon Trainer | ||
|game= | |name={{color2|000|Wally}} | ||
|game=E | |||
|location=Victory Road (Hoenn) | |location=Victory Road (Hoenn) | ||
|locationname=Victory Road | |locationname=Victory Road | ||
|pokemon=5 | |pokemon=5}} | ||
| | |{{Pokémon/3 | ||
|game= | |game=Emerald | ||
|ndex=334 | |ndex=334 | ||
|pokemon=Altaria | |pokemon=Altaria | ||
|gender=male | |gender=male | ||
|level=44 | |level={{tt|44|First battle}}/{{tt|47|First rematch}}/{{tt|50|Second rematch}}/{{tt|53|Third rematch}}/{{tt|56|Fourth rematch onwards}} | ||
|type1=Dragon | |type1=Dragon|type2=Flying | ||
|type2=Flying | |||
|ability=Natural Cure | |ability=Natural Cure | ||
|move1= | |move1=Aerial Ace|move1type=Flying | ||
|move1type= | |move2=Safeguard|move2type=Normal | ||
|move3=DragonBreath|move3type=Dragon | |||
|move2= | |move4=Dragon Dance|move4type=Dragon}} | ||
|move2type= | |{{Pokémon/3 | ||
|game=Emerald | |||
|move3= | |||
|move3type= | |||
|move4= | |||
|move4type=Dragon | |||
| | |||
|game= | |||
|ndex=301 | |ndex=301 | ||
|pokemon=Delcatty | |pokemon=Delcatty | ||
|gender=female | |gender=female | ||
|level=43 | |level={{tt|43|First battle}}/{{tt|46|First rematch}}/{{tt|49|Second rematch}}/{{tt|52|Third rematch}}/{{tt|55|Fourth rematch onwards}} | ||
|type1=Normal | |type1=Normal | ||
|ability=Cute Charm | |ability=Cute Charm | ||
|move1=Sing | |move1=Sing|move1type=Normal | ||
|move1type=Normal | |move2=Assist|move2type=Normal | ||
|move3=Charm|move3type=Normal | |||
|move2= | |move4=Faint Attack|move4type=Dark}} | ||
|move2type= | |{{Pokémon/3 | ||
|game=Emerald | |||
|move3=Charm | |||
|move3type=Normal | |||
|move4= | |||
|move4type= | |||
}} | |||
| | |||
|game= | |||
|ndex=315 | |ndex=315 | ||
|pokemon=Roselia | |pokemon=Roselia | ||
|gender=male | |gender=male | ||
|level=44 | |level={{tt|44|First battle}}/{{tt|47|First rematch}}/{{tt|50|Second rematch}}/{{tt|53|Third rematch}}/{{tt|56|Fourth rematch onwards}} | ||
|type1=Grass | |type1=Grass|type2=Poison | ||
|type2=Poison | |ability=Natural Cure | ||
|ability= | |move1=Magical Leaf|move1type=Grass | ||
|move1= | |move2=Leech Seed|move2type=Grass | ||
|move1type=Grass | |move3=Giga Drain|move3type=Grass | ||
|move4=Toxic|move4type=Poison}} | |||
|move2= | {{Party/Div|color={{tcg grass color light}}}} | ||
|move2type= | | style="margin:auto" |{{Pokémon/3 | ||
|game=Emerald | |||
|move3= | |||
|move3type=Grass | |||
|move4= | |||
|move4type= | |||
| | |||
}} | |||
| | |||
|game= | |||
|ndex=082 | |ndex=082 | ||
|pokemon=Magneton | |pokemon=Magneton | ||
| | |level={{tt|41|First battle}}/{{tt|44|First rematch}}/{{tt|47|Second rematch}}/{{tt|50|Third rematch}}/{{tt|53|Fourth rematch onwards}} | ||
| | |type1=Electric|type2=Steel | ||
|type1=Electric | |||
|type2=Steel | |||
|ability=Magnet Pull | |ability=Magnet Pull | ||
|move1= | |move1=Supersonic|move1type=Normal | ||
|move1type= | |move2=Thunderbolt|move2type=Electric | ||
|move3=Tri Attack|move3type=Normal | |||
|move2= | |move4=Screech|move4type=Normal}} | ||
|move2type= | | style="margin:auto" |{{Pokémon/3 | ||
|game=Emerald | |||
|move3= | |||
|move3type=Normal | |||
|move4= | |||
|move4type=Normal | |||
}} | |||
| | |||
|game= | |||
|ndex=282 | |ndex=282 | ||
|pokemon=Gardevoir | |pokemon=Gardevoir | ||
|gender=male | |gender=male | ||
|level=45 | |level={{tt|45|First battle}}/{{tt|48|First rematch}}/{{tt|51|Second rematch}}/{{tt|54|Third rematch}}/{{tt|57|Fourth rematch onwards}} | ||
|type1=Psychic | |type1=Psychic | ||
|ability=Synchronize | |ability=Synchronize | ||
|move1=Psychic | |move1=Double Team|move1type=Normal | ||
| | |move2=Calm Mind|move2type=Psychic | ||
|move1cat= | |move3=Psychic|move3type=Psychic | ||
|move2= | |move4=Future Sight|move4type=Psychic}} | ||
|move2type=Normal | {{Party/Footer}} | ||
|move2cat=Status | |||
|move3= | ==={{g|Omega Ruby and Alpha Sapphire}}=== | ||
|move3type= | {{trainerheader|cave}} | ||
|move3cat=Status | {{trainerentry|VSAce Trainer M ORAS.png{{!}}150px|game=6|Ace Trainer|Albert|2,700|2|561|Sigilyph|♂|45||464|Rhyperior|♂|45|36=ショウ|37=Shō}} | ||
|move4= | {{trainerdiv|cave}} | ||
| | {{trainerentry|VSAce Trainer F ORAS.png{{!}}150px|game=6|Ace Trainer|Hope|2,820|1|478|Froslass|♀|47|36=アヤナ|37=Ayana}} | ||
|move4cat=Status | {{trainerdiv|cave}} | ||
}} | {{trainerentry|VSExpert F.png{{!}}150px|game=6|Expert|Bryn|3,600|2|237|Hitmontop|♂|45||538|Throh|♂|45|36=タエ|37=Tae}} | ||
}} | {{trainerdiv|cave}} | ||
{{trainerentry|VSAce Trainer M ORAS.png{{!}}150px|game=6|Ace Trainer|Edgar|2,820|1|303|Mawile|♂|47|36=ノブヒコ|37=Nobuhiko}} | |||
{{trainerdiv|cave}} | |||
{{trainerentry|VSStreet Thug.png{{!}}150px|game=6|Street Thug|Regan|1,376|2|229|Houndoom|♂|43||275|Shiftry|♂|43|36=マサテル|37=Masateru}} | |||
{{trainerdiv|cave}} | |||
{{trainerentry|VSAce Duo ORAS.png{{!}}150px|game=6|Ace Duo|Jude & Rory|2,820|2|348|Armaldo|♂|47||346|Cradily|♂|47|36=トリとイマ|37=Tori and Ima|38=Nav}} | |||
{{trainerdiv|cave}} | |||
{{trainerentry|VSExpert M.png{{!}}150px|game=6|Expert|Theodore|3,760|1|539|Sawk|♂|47|36=ゼンジロウ|37=Zenjirō}} | |||
{{trainerdiv|cave}} | |||
{{trainerentry|VSAce Trainer M ORAS.png{{!}}150px|game=6|Ace Trainer|[[Winstrate family|Vito]]|2,640|3|101|Electrode||44||555|Darmanitan|♂|44||317|Swalot|♂|44|36=リョウヘイ|37=Ryōhei}} | |||
{{trainerdiv|cave}} | |||
{{trainerentry|VSDragon Tamer.png{{!}}150px|game=6|Dragon Tamer|Egon|2,820|1|230|Kingdra|♂|47|36=タツキ|37=Tatsuki}} | |||
{{trainerdiv|cave}} | |||
{{trainerentry|VSBrains & Brawn.png{{!}}150px|game=6|Brains & Brawn|Aden & Finn|3,008|2|518|Musharna|♂|47||057|Primeape|♂|47|36=デンとカネ|37=Den and Kane}} | |||
{{trainerdiv|cave|Rematch}} | |||
{{trainerentry|VSAce Duo ORAS.png{{!}}150px|game=6|Ace Duo|Jude & Rory|3,360<br><small>After entering the [[Hall of Fame]]</small>|2|348|Armaldo|♂|56||346|Cradily|♂|56||36=トリとイマ|37=Tori and Ima}} | |||
{{trainerfooter|cave|3}} | |||
{{Party/Single | |||
|color={{tcg grass color light}} | |||
|bordercolor={{tcg grass color}} | |||
|headcolor=CED8F6 | |||
|sprite=VSWally 2.png | |||
|size=150px | |||
|prize={{PDollar}}1,920 | |||
|class=Pokémon Trainer | |||
|classlink=Pokémon Trainer | |||
|name={{color2|000|Wally}} | |||
|game=ORAS | |||
|location=Victory Road (Hoenn) | |||
|locationname=Victory Road | |||
|pokemon=5}} | |||
|{{Pokémon/6 | |||
|ndex=334 | |||
|pokemon=Altaria | |||
|gender=male | |||
|level=46 | |||
|type1=Dragon|type2=Flying | |||
|ability=Natural Cure | |||
|move1=Aerial Ace|move1type=Flying|move1cat=Physical | |||
|move2=Safeguard|move2type=Normal|move2cat=Status | |||
|move3=Dragon Pulse|move3type=Dragon|move3cat=Special | |||
|move4=Cotton Guard|move4type=Grass|move4cat=Status}} | |||
|{{Pokémon/6 | |||
|ndex=301 | |||
|pokemon=Delcatty | |||
|gender=female | |||
|level=46 | |||
|type1=Normal | |||
|ability=Cute Charm | |||
|move1=Sing|move1type=Normal|move1cat=Status | |||
|move2=Disarming Voice|move2type=Fairy|move2cat=Special | |||
|move3=Charm|move3type=Fairy|move3cat=Status | |||
|move4=Feint Attack|move4type=Dark|move4cat=Physical}} | |||
|{{Pokémon/6 | |||
|ndex=315 | |||
|pokemon=Roselia | |||
|gender=female | |||
|level=46 | |||
|type1=Grass|type2=Poison | |||
|ability=Poison Point | |||
|move1=Synthesis|move1type=Grass|move1cat=Status | |||
|move2=Leech Seed|move2type=Grass|move2cat=Status | |||
|move3=Petal Blizzard|move3type=Grass|move3cat=Physical | |||
|move4=Toxic|move4type=Poison|move4cat=Status}} | |||
{{Party/Div|color={{tcg grass color light}}}} | |||
|style="margin:auto"|{{Pokémon/6 | |||
|ndex=082 | |||
|pokemon=Magneton | |||
|level=46 | |||
|type1=Electric|type2=Steel | |||
|ability=Sturdy | |||
|move1=Screech|move1type=Normal|move1cat=Status | |||
|move2=Discharge|move2type=Electric|move2cat=Special | |||
|move3=Tri Attack|move3type=Normal|move3cat=Special | |||
|move4=Flash Cannon|move4type=Steel|move4cat=Special}} | |||
|style="margin:auto"|{{Pokémon/6 | |||
|ndex=475 | |||
|pokemon=Gallade | |||
|gender=male | |||
|level=48 | |||
|type1=Psychic|type2=Fighting | |||
|ability=Steadfast | |||
|held=Galladite | |||
|move1=Psycho Cut|move1type=Psychic|move1cat=Physical | |||
|move2=Close Combat|move2type=Fighting|move2cat=Physical | |||
|move3=Slash|move3type=Normal|move3cat=Physical | |||
|move4=Swords Dance|move4type=Normal|move4cat=Status}} | |||
{{Party/Footer}} | |||
== | ==Appearance== | ||
{{ | {| class="roundy" style="margin:auto; background:#000; border:3px solid #{{Locationcolor/dark|cave}}" | ||
{| | |- | ||
! style="background:#{{Locationcolor/light|cave}}; {{roundytl|5px}}" | Game | |||
! style="background:#{{Locationcolor/light|cave}}" | Entrance | |||
! style="background:#{{Locationcolor/light|cave}}" | B2F | |||
! style="background:#{{Locationcolor/light|cave}}" | B1F | |||
! style="background:#{{Locationcolor/light|cave}}" | 1F | |||
! style="background:#{{Locationcolor/light|cave}}" | 2F | |||
! style="background:#{{Locationcolor/light|cave}}; {{roundytr|5px}}" | Wally's room | |||
|- | |||
! style="background:#{{ruby color}}" | {{color2|fff|Pokémon Ruby and Sapphire Versions|Ruby}} | |||
| rowspan=3 | | |||
| rowspan=2 | [[File:Victory Road B2F RS.png|120px]] | |||
| rowspan=2 | [[File:Victory Road B1F RS.png|120px]] | |||
| rowspan=2 | [[File:Victory Road 1F RS.png|120px]] | |||
| rowspan=3 | | |||
|- | |- | ||
! style="background:#{{ | ! style="background:#{{sapphire color}}" | {{color2|fff|Pokémon Ruby and Sapphire Versions|Sapphire}} | ||
|- | |- | ||
! style="background:#{{ | ! style="background:#{{emerald color}}" | {{color2|fff|Pokémon Emerald Version|Emerald}} | ||
| [[File:Victory Road B2F E.png|120px]] | |||
| [[File:Victory Road B1F E.png|120px]] | |||
| [[File:Victory Road 1F E.png|120px]] | |||
|- | |- | ||
! style="background:#{{ | ! style="background:#{{omega ruby color}}" | {{color2|fff|Pokémon Omega Ruby and Alpha Sapphire|Omega Ruby}} | ||
| rowspan=2 | [[File:Victory Road entrance ORAS.png|120px]] | |||
| rowspan=2 | | |||
| rowspan=2 | [[File:Victory Road B1F ORAS.png|120px]] | |||
| rowspan=2 | [[File:Victory Road 1F ORAS.png|120px]] | |||
| rowspan=2 | [[File:Victory Road 2F ORAS.png|120px]] | |||
| rowspan=2 | [[File:Victory Road Wally room ORAS.png|120px]] | |||
|- | |- | ||
| colspan= | ! style="background:#{{alpha sapphire color}}" | {{color2|fff|Pokémon Omega Ruby and Alpha Sapphire|Alpha Sapphire}} | ||
|- | |||
| colspan=7 style="background:#{{Locationcolor/light|cave}}; {{roundybottom|5px}}" | | |||
|} | |} | ||
==In the spin-off games== | |||
===[[Pokémon Masters EX]]=== | |||
Artwork depicting Hoenn's Victory Road is seen in {{mas|Wally}}'s mindscape. | |||
{| style="background: #7B30B2; {{roundy}}; border: #7B30B2;" | |||
| | |||
{| style="background: #AB60E2; {{roundy}}; border: #AB60E2;" | |||
|- style="text-align:center" | |||
| | |||
{| style="background: #{{fighting color light}}; {{roundy}}; border: #{{fighting color light}}; padding: 0px 5px 5px 5px" | |||
|- | |||
|<big>'''{{color2|000|Wally (Masters)#Gallade|Wally & Gallade}}'''</big> | |||
|- | |||
| [[File:Wally Mindscape.png|200px]] | |||
|} | |||
|} | |||
|} | |||
==In the TCG== | |||
This listing is of cards mentioning or featuring Victory Road in the [[Pokémon Trading Card Game]]. | |||
{{cardlist/header|Related cards|Fighting|char=yes}} | |||
{{cardlist/entry|cardname={{TCG ID|Ancient Origins|Ace Trainer|69}}|type=Supporter|expanded=yes|enset=Ancient Origins|enrarity=Uncommon|ennum=69/98|jpsetlink=Ancient Origins|jpset=Bandit Ring|jprarity=Uncommon|jpnum=076/081}} | |||
{{cardlist/footer|Fighting}} | |||
==Trivia== | ==Trivia== | ||
[[File:Cooltrainer Lanturn Earthquake | [[File:Cooltrainer Lanturn Earthquake E.png|200px|thumb|{{p|Lanturn}} with {{m|Earthquake}}]] | ||
* In Emerald, Cooltrainer Dianne has a {{p|Lanturn}} that knows {{m|Earthquake}}, a move Lanturn [[Game move errors|cannot legitimately know]]. | * In Emerald, {{tc|Ace Trainer|Cooltrainer}} Dianne has a {{p|Lanturn}} that knows {{m|Earthquake}}, a move Lanturn [[Game move errors|cannot legitimately know]]. | ||
* The music in Victory Road was remixed in [[Super Smash Bros. Brawl]] as | * The music in Victory Road was remixed in [[Super Smash Bros. Brawl]] as music for the {{St|Spear Pillar}} stage. | ||
* Cooltrainer Vito is the member of the [[Winstrate family]] that | * Cooltrainer{{sup/3|RSE}}/Ace Trainer{{sup/6|ORAS}} Vito is the member of the [[Winstrate family]] that the other family members mention after the player has beaten them at {{rt|111|Hoenn}}. | ||
* | * In [[Generation III]], while it is possible to enter Victory Road without having eight Badges, or technically any Badges at all due to the fact that the Badge checkpoint isn't until just before taking on the Elite Four, the {{player}} is required to have at least seven of them — missing only [[Fortree City]]'s {{Badge|Feather}} — to enter. This is due to the game's progress, as being able to use {{m|Waterfall}} outside of battle ({{Badge|Rain}}) to enter [[Ever Grande City]] requires the use of {{m|Dive}} outside of battle ({{Badge|Mind}}) to enter [[Sootopolis City]], itself requiring the use of {{m|Surf}} outside of battle ({{Badge|Balance}}) to reach [[Mossdeep City]], which requires the player to have obtained the first four Badges in the region prior to battling [[Norman]]. In [[Generation VI]], due to the player being required to earn the Feather Badge before being able to continue, this is no longer true. | ||
* Even though [[Wally]] challenges the player to a battle near the entrance in {{game|Emerald}}, the [[rematch]]es with him take place near the exit, the same place where he's battled in {{game|Ruby and Sapphire|s}}. | |||
* The ledge in the southwestern section of B1F in Ruby and Sapphire was made one tile shorter in non-English European versions of the game, making that part of the floor two-way instead of one-way. This ledge, along with the one it leads up to in the southwestern section of B2F, are removed from all localizations of Emerald in order to prevent a dead-end game state should a player enter Victory Road from the Pokémon League side without carrying an [[Escape Rope]], or a Pokémon that can learn {{m|Dig}} or {{m|Surf}}. | |||
{{Hoenn}}<br> | ==In other languages== | ||
{{langtable|color={{locationcolor/light|cave}}|bordercolor={{locationcolor/dark|cave}} | |||
|zh_cmn=冠軍之路 ''{{tt|Guànjūn-zhī Lù|Champion Road}}'' | |||
|fr=Route Victoire | |||
|de=Siegesstraße | |||
|it=Via Vittoria | |||
|ko=챔피언로드 ''Champion Road'' | |||
|es=Calle Victoria | |||
}} | |||
{{-}} | |||
{{Victory Roads}} | |||
{{Hoenn}}<br/> | |||
{{Project Locations notice}} | {{Project Locations notice}} | ||
| Line 293: | Line 530: | ||
[[Category:Ruby and Sapphire locations]] | [[Category:Ruby and Sapphire locations]] | ||
[[Category:Emerald locations]] | [[Category:Emerald locations]] | ||
[[Category:Omega Ruby and Alpha Sapphire locations]] | |||
[[Category:Caves]] | [[Category:Caves]] | ||
[[de:Siegesstraße (Hoenn)]] | [[de:Siegesstraße (Hoenn)]] | ||
| Line 301: | Line 538: | ||
[[it:Via Vittoria (Hoenn)]] | [[it:Via Vittoria (Hoenn)]] | ||
[[ja:チャンピオンロード (ホウエン地方)]] | [[ja:チャンピオンロード (ホウエン地方)]] | ||
[[zh:冠军之路(丰缘)]] | |||
Latest revision as of 14:27, 4 April 2024

|
The picture used in this article is unsatisfactory. Please feel free to replace it so it conforms to Bulbapedia conventions. Reason: Guidebook labels |

|
This article is incomplete. Please feel free to edit this article to add missing information and complete it. Reason: Missing exterior image from Generation VI |
| ||||
| ||||
| Map description: | This challenging path forces Trainers who hope to overcome the Pokémon League to first surpass their own limits. | |||
|---|---|---|---|---|
| Location: | Ever Grande City | |||
| Region: | Hoenn | |||
| Generations: | III, VI | |||
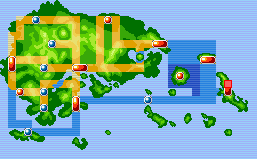 Location of Victory Road in Hoenn. | ||||
| Pokémon world locations | ||||
Hoenn's Victory Road (Japanese: チャンピオンロード Champion Road) is, much like in other regions, the route that takes Pokémon League-bound Trainers to the Elite Four. Its two entrances are located within Ever Grande City.
Victory Road begins as a complex cave with bridges leading across rock formations. Wally will battle the player near Victory Road's exitRSORAS/entranceE. In Pokémon Emerald, Wally can also be rematched near the exit.
Players will need Strength, Rock Smash, and Surf to make their way through the cave. Flash and Waterfall, while not required, make traversing the cave easier.
In Omega Ruby and Alpha Sapphire, Victory Road's B1F has two exits to Ever Grande City outside, one of which leads to an area where TM29 (Psychic) can be found. Surf and Strength are required to access these exits.
Items
| Item | Location | Games | |
|---|---|---|---|
| Max Elixir | 1F, above ledge in eastern part of the floor | R S E | |
| PP Up | 1F, in southeastern corner | R S E | |
| Ultra Ball | 1F, at the end of the ledge in the southeast corner, left of the PP Up (hidden) | R S E | |
| Full Restore | B1F, north of Cooltrainer Samuel (requires Strength and Rock Smash) | R S E | |
| Max Repel | B2F, in a nook by the ladder at the northeast corner (hidden) | R S E | |
| TM29 (Psychic) | B1F, in northeastern corner | R S E | |
| Full Heal | B2F, near Cooltrainer Vito | R S E | |
| Elixir | B2F, in a small two-square nook to the right above the eastern waterfall (requires Surf) (hidden) | R S E | |
| Full Heal | 1F, across the bridge above Ace Trainer Albert (requires Surf) | OR AS | |
| Max Repel | 1F, in a rock to the east of the staircase leading to Ace Trainer Hope (requires Surf) (hidden) | OR AS | |
| Ultra Ball | B1F, small rock, left of the ladder (requires Surf) (hidden) | OR AS | |
| PP Up | B1F, northeastern corner, behind the two boulders (requires Surf and Strength) | OR AS | |
| Elixir | 1F, west of the northernmost bridge, on the empty tile next to a big rock and south of a small rock (requires Surf) (hidden) | OR AS | |
| Max Elixir | B1F, southwest from the ladder north of Street Thug Regan on 1F (requires Surf) | OR AS | |
| TM35 (Flamethrower) | B1F, north of Expert Theodore, behind the two boulders (requires Strength) | OR AS | |
| Full Restore | B1F, northwest of Ace Trainer Vito | OR AS | |
| Iron | 2F, west of the southernmost bridge (hidden) | OR AS | |
| TM81 (X-Scissor) | 2F, atop the southern waterfall (requires Surf and Waterfall) | OR AS | |
| Dawn Stone | 2F, from Wally after defeating him (requires Surf and Strength) | OR AS | |
| PP Max | B1F, 5% chance of receiving one after a rematch with Ace Duo Jude & Rory | OR AS | |
Pokémon
Generation III
1F
| Pokémon | Games | Location | Levels | Rate | |||||||||||
|---|---|---|---|---|---|---|---|---|---|---|---|---|---|---|---|
|
R | S | E |
|
36 | 10% | |||||||||
|
R | S | E |
|
38, 40 | 25% | |||||||||
|
R | S | E |
|
36 | 5% | |||||||||
|
R | S | E |
|
40 | 10% | |||||||||
|
R | S | E |
|
36 | 10% | |||||||||
|
R | S | E |
|
38, 40 | 25% | |||||||||
|
R | S | E |
|
36 | 5% | |||||||||
|
R | S | E |
|
40 | 10% | |||||||||
| A colored background means that the Pokémon can be found in this location in the specified game. A white background with a colored letter means that the Pokémon cannot be found here. | |||||||||||||||
B1F
| Pokémon | Games | Location | Levels | Rate | |||||||||||
|---|---|---|---|---|---|---|---|---|---|---|---|---|---|---|---|
|
R | S | E |
|
38, 40, 42 | 35% | |||||||||
|
R | S | E |
|
38, 40, 42 | 35% | |||||||||
|
R | S | E |
|
38 | 5% | |||||||||
|
R | S | E |
|
40, 42 | 15% | |||||||||
|
R | S | E |
|
40, 42 | 25% | |||||||||
|
R | S | E |
|
38 | 5% | |||||||||
|
R | S | E |
|
40 | 10% | |||||||||
| Rock Smash | |||||||||||||||
|
R | S | E |
|
30-40 | 30% | |||||||||
|
R | S | E |
|
30-40 | 70% | |||||||||
| A colored background means that the Pokémon can be found in this location in the specified game. A white background with a colored letter means that the Pokémon cannot be found here. | |||||||||||||||
B2F
| Pokémon | Games | Location | Levels | Rate | |||||||||||
|---|---|---|---|---|---|---|---|---|---|---|---|---|---|---|---|
|
R | S | E |
|
40, 42, 44 | 35% | |||||||||
|
R | S | E |
|
40, 42, 44 | 35% | |||||||||
|
R | S | E |
|
40, 42, 44 | 35% | |||||||||
|
R | S | E |
|
42, 44 | 5% | |||||||||
|
R | S | E |
|
40, 42, 44 | 15% | |||||||||
|
R | S | E |
|
40, 42, 44 | 25% | |||||||||
|
R | S | E |
|
40, 42, 44 | 15% | |||||||||
| Surfing | |||||||||||||||
|
R | S | E |
|
25-40 | 100% | |||||||||
| Fishing | |||||||||||||||
|
R | S | E |
|
5-10 | 30% | |||||||||
|
R | S | E |
|
5-10 | 70% | |||||||||
|
R | S | E |
|
10-30 | 20% | |||||||||
|
R | S | E |
|
10-30 | 60% | |||||||||
|
R | S | E |
|
10-30 | 20% | |||||||||
|
R | S | E |
|
25-35 | 80% | |||||||||
|
R | S | E |
|
30-45 | 20% | |||||||||
| A colored background means that the Pokémon can be found in this location in the specified game. A white background with a colored letter means that the Pokémon cannot be found here. | |||||||||||||||
Generation VI
Entrance, 1F, and B1F
| Pokémon | Games | Location | Levels | Rate | ||||||||||||
|---|---|---|---|---|---|---|---|---|---|---|---|---|---|---|---|---|
|
OR | AS |
|
37, 39 | 20% | |||||||||||
|
OR | AS |
|
37, 39 | 20% | |||||||||||
|
OR | AS |
|
38, 40 | 15% | |||||||||||
|
OR | AS |
|
40 | 10% | |||||||||||
|
OR | AS |
|
40 | 10% | |||||||||||
|
OR | AS |
|
37, 39 | 20% | |||||||||||
|
OR | AS |
|
38, 40 | 15% | |||||||||||
| Horde Encounter | ||||||||||||||||
|
OR | AS |
|
20 | 60% | |||||||||||
|
OR | AS |
|
20 | 5% | |||||||||||
|
OR | AS |
|
20 | 35% | |||||||||||
| Surfing | ||||||||||||||||
|
OR | AS |
|
30, 40 | 35% | |||||||||||
|
OR | AS |
|
25 | 50% | |||||||||||
|
OR | AS |
|
35 | 15% | |||||||||||
| Fishing | ||||||||||||||||
|
OR | AS |
|
5 | 35% | |||||||||||
|
OR | AS |
|
10, 15 | 65% | |||||||||||
|
OR | AS |
|
25 | 60% | |||||||||||
|
OR | AS |
|
25 | 5% | |||||||||||
|
OR | AS |
|
25 | 35% | |||||||||||
|
OR | AS |
|
30, 40 | 40% | |||||||||||
|
OR | AS |
|
35 | 60% | |||||||||||
| A colored background means that the Pokémon can be found in this location in the specified game. A white background with a colored letter means that the Pokémon cannot be found here. | ||||||||||||||||
2F
| Pokémon | Games | Location | Levels | Rate | ||||||||||||
|---|---|---|---|---|---|---|---|---|---|---|---|---|---|---|---|---|
| Surfing | ||||||||||||||||
|
OR | AS |
|
25, 30, 35, 40 | 100% | |||||||||||
| Fishing | ||||||||||||||||
|
OR | AS |
|
5 | 35% | |||||||||||
|
OR | AS |
|
10, 15 | 65% | |||||||||||
|
OR | AS |
|
25 | 35% | |||||||||||
|
OR | AS |
|
25 | 60% | |||||||||||
|
OR | AS |
|
25 | 5% | |||||||||||
|
OR | AS |
|
30, 35, 40 | 100% | |||||||||||
| A colored background means that the Pokémon can be found in this location in the specified game. A white background with a colored letter means that the Pokémon cannot be found here. | ||||||||||||||||
Trainers
Pokémon Ruby and Sapphire
| Trainer | Pokémon | |||||||||||
|---|---|---|---|---|---|---|---|---|---|---|---|---|
|
| |||||||||||
| ||||||||||||
|
| |||||||||||
|
| |||||||||||
|
| |||||||||||
| ||||||||||||
| ||||||||||||
|
| |||||||||||
| ||||||||||||
|
| |||||||||||
| ||||||||||||
| ||||||||||||
|
| |||||||||||
| ||||||||||||
|
| |||||||||||
| ||||||||||||
| ||||||||||||
| ||||||||||||
|
| |||||||||||
| ||||||||||||
| ||||||||||||
|
| |||||||||||
| Trainers with a PokéNav by their names will be registered in the Trainer's Eyes or Match Call function after the first battle, and may have a rematch with the player with higher-level Pokémon. | ||||||||||||
Rematches against Wally are available after the Champion has been defeated. He also uses two Super Potions.
|
[show] |
Pokémon Emerald
| Trainer | Pokémon | |||||||||||
|---|---|---|---|---|---|---|---|---|---|---|---|---|
|
| |||||||||||
| ||||||||||||
|
| |||||||||||
|
| |||||||||||
|
| |||||||||||
| ||||||||||||
| ||||||||||||
|
| |||||||||||
| ||||||||||||
| ||||||||||||
|
| |||||||||||
| ||||||||||||
| ||||||||||||
|
| |||||||||||
| ||||||||||||
|
| |||||||||||
| ||||||||||||
|
| |||||||||||
| ||||||||||||
|
| |||||||||||
| ||||||||||||
| ||||||||||||
| ||||||||||||
|
| |||||||||||
| ||||||||||||
| ||||||||||||
|
| |||||||||||
| ||||||||||||
|
| |||||||||||
| ||||||||||||
|
| |||||||||||
| ||||||||||||
|
| |||||||||||
| ||||||||||||
|
| |||||||||||
| ||||||||||||
| Trainers with a PokéNav by their names will be registered in the Trainer's Eyes or Match Call function after the first battle, and may have a rematch with the player with higher-level Pokémon. | ||||||||||||
Rematches against Wally are available after the Champion has been defeated. He also uses two Full Restores.
|
[show] |
Pokémon Omega Ruby and Alpha Sapphire
| Trainer | Pokémon | |||||||||||
|---|---|---|---|---|---|---|---|---|---|---|---|---|
|
| |||||||||||
| ||||||||||||
|
| |||||||||||
|
| |||||||||||
| ||||||||||||
|
| |||||||||||
|
| |||||||||||
| ||||||||||||
|
| |||||||||||
| ||||||||||||
|
| |||||||||||
|
| |||||||||||
| ||||||||||||
| ||||||||||||
|
| |||||||||||
|
| |||||||||||
| ||||||||||||
| Rematch | ||||||||||||
|
| |||||||||||
| ||||||||||||
| Trainers with a PokéNav by their names will be registered in the Trainer's Eyes or Match Call function after the first battle, and may have a rematch with the player with higher-level Pokémon. | ||||||||||||
|
[show] |
Appearance
| Game | Entrance | B2F | B1F | 1F | 2F | Wally's room |
|---|---|---|---|---|---|---|
| Ruby | 
|

|

|
|||
| Sapphire | ||||||
| Emerald | 
|

|

| |||
| Omega Ruby | 
|

|

|

|

| |
| Alpha Sapphire | ||||||
In the spin-off games
Pokémon Masters EX
Artwork depicting Hoenn's Victory Road is seen in Wally's mindscape.
|
In the TCG
This listing is of cards mentioning or featuring Victory Road in the Pokémon Trading Card Game.
| Related cards Cards listed with a blue background are only legal to use in the current Expanded format. Cards listed with a green background are legal to use in both the current Standard and Expanded formats. | |||||||
|---|---|---|---|---|---|---|---|
| Card | Type | English Expansion |
Rarity | # | Japanese Expansion |
Rarity | # |
| Ace Trainer | Su | Ancient Origins | 69/98 | Bandit Ring | 076/081 | ||
Trivia

- In Emerald, Cooltrainer Dianne has a Lanturn that knows Earthquake, a move Lanturn cannot legitimately know.
- The music in Victory Road was remixed in Super Smash Bros. Brawl as music for the Spear Pillar stage.
- CooltrainerRSE/Ace TrainerORAS Vito is the member of the Winstrate family that the other family members mention after the player has beaten them at Route 111.
- In Generation III, while it is possible to enter Victory Road without having eight Badges, or technically any Badges at all due to the fact that the Badge checkpoint isn't until just before taking on the Elite Four, the player is required to have at least seven of them — missing only Fortree City's Feather Badge — to enter. This is due to the game's progress, as being able to use Waterfall outside of battle (Rain Badge) to enter Ever Grande City requires the use of Dive outside of battle (Mind Badge) to enter Sootopolis City, itself requiring the use of Surf outside of battle (Balance Badge) to reach Mossdeep City, which requires the player to have obtained the first four Badges in the region prior to battling Norman. In Generation VI, due to the player being required to earn the Feather Badge before being able to continue, this is no longer true.
- Even though Wally challenges the player to a battle near the entrance in Pokémon Emerald, the rematches with him take place near the exit, the same place where he's battled in Pokémon Ruby and Sapphire.
- The ledge in the southwestern section of B1F in Ruby and Sapphire was made one tile shorter in non-English European versions of the game, making that part of the floor two-way instead of one-way. This ledge, along with the one it leads up to in the southwestern section of B2F, are removed from all localizations of Emerald in order to prevent a dead-end game state should a player enter Victory Road from the Pokémon League side without carrying an Escape Rope, or a Pokémon that can learn Dig or Surf.
In other languages
| ||||||||||||||||||||||||
| Victory Roads |
|---|
| Kanto • Hoenn • Sinnoh • Unova (BW) • Unova (B2W2) • Kalos • Alola |

|
This article is part of Project Locations, a Bulbapedia project that aims to write comprehensive articles on every location in the Pokémon world. |
