Hoenn Route 128: Difference between revisions
m (templates) |
m (→Items: I think someone got this confused with the ORAS placement) |
||
| (115 intermediate revisions by 57 users not shown) | |||
| Line 1: | Line 1: | ||
{{ | {{bad picture|2=Guidebook labels}} | ||
| | {{Route infobox | ||
| | |number=128 | ||
|type=water | |size=250 | ||
| | |generation=3 | ||
| | |image=Hoenn Route 128 ORAS.png | ||
| | |imageIII=Hoenn Route 128 RSE.png | ||
| | |type=ocean | ||
| | |mapdesc=The ocean floor beneath this water route is rumored to contain an undiscovered ruin. | ||
|surf=yes | |||
|dive=yes | |||
|north=Route 127 | |||
|regionnorth=Hoenn | |||
|south=Route 129 | |||
|regionsouth=Hoenn | |||
|east=Ever Grande City | |||
|region=Hoenn | |region=Hoenn | ||
}} | }} | ||
Route 128 | '''Route 128''' (Japanese: '''{{tt|128番水道|128ばんすいどう}}''' ''Water Route 128'') is a [[water route]] in southeast [[Hoenn]], connecting {{rt|127|Hoenn}}, {{rt|129|Hoenn}}, and [[Ever Grande City]]. The [[Seafloor Cavern]] is located [[underwater]] near the center of the route. | ||
==Route description== | ==Route description== | ||
Route 128 retains the north-south alignment of Route 127 as it proceeds south past a pair of islands with one | Route 128 retains the north-south alignment of Route 127 as it proceeds south past a pair of islands with one Trainer each. The route turns to the southeast as it swerves to avoid the top of the [[Seafloor Cavern]]. On the east side of the cavern's surface, Route 128 splits into two paths, the main north-south path and an east-west path leading to the base of Ever Grande. | ||
The main path of Route 128 continues southwest from this junction, passing two more islands and a | The main path of Route 128 continues southwest from this junction, passing two more islands and a Trainer before turning to the south and becoming Route 129. | ||
===Ever Grande connector=== | ===Ever Grande connector=== | ||
To bypass an island located due east of the path's western terminus, the connector heads to the northeast, then to the southeast before taking on an easterly alignment near a large island playing host to a | To bypass an island located due east of the path's western terminus, the connector heads to the northeast, then to the southeast before taking on an easterly alignment near a large island playing host to a {{tc|Fisherman}}. After passing a {{tc|Triathlete}}, the path enters the city limits of Ever Grande a short distance to the east. | ||
===Underwater=== | ===Underwater=== | ||
Most of the western portion of Route 128, including the area around the Seafloor Cavern, contains underwater passages that can be reached using Dive. The entrance to the Seafloor Cavern is, fittingly, on the seafloor near the southern terminus of Route 128. North of the cavern, the underwater passage continues onto the seafloor of Route 127. | |||
Most of the western portion of Route 128, including the area around the Seafloor Cavern, contains underwater passages that can be reached using Dive. The entrance to the Seafloor Cavern is, fittingly, on the seafloor near the southern terminus of Route 128. North of the cavern, the underwater passage continues onto the | |||
==Items== | ==Items== | ||
* | All items on Route 128 can only be accessed with the use of {{m|Surf}}, except for the Heart Scale on the island with the route sign in Omega Ruby and Alpha Sapphire, which may be accessed using {{m|Fly}} (after visiting [[Ever Grande City]]) or [[Soaring in the sky|Soar]]. | ||
{{Itlisth|ocean}} | |||
{{Itemlist|Heart Scale| | |||
* On the smallest northern island, near {{tc|Ace Trainer|Cooltrainer}} Alexa{{sup/3|Ru}}{{sup/3|Sa}}/Ruben{{sup/3|E}} ''(hidden)'' | |||
* On the southwest corner of the island north of {{tc|Fisherman}} Wayne ''(hidden)'' | |||
* On the south side of the southwestmost island ''(hidden)''|Ru=yes|Sa=yes|E=yes|display=[[Heart Scale]] ×3}} | |||
{{Itemlist|Heart Scale| | |||
*On the sand ring around the [[Seafloor Cavern]] {{m|Dive}} spot, south of the Dive spot ''(hidden)'' | |||
*On the island with the route sign, west of the sign ''(hidden)'' | |||
*On the small island west of the island with the route sign ''(hidden)''|OR=yes|AS=yes|display=[[Heart Scale]] ×3}} | |||
{{Itemlist|Zinc|15% chance of receiving one after a rematch with {{tc|Triathlete}} Isaiah|OR=yes|AS=yes}} | |||
{{Itlistfoot|ocean}} | |||
===Underwater=== | |||
All items found underwater necessarily require {{m|Surf}} and {{m|Dive}}. | |||
{{Itlisth|ocean}} | |||
{{Itemlist|Protein|On the rock in the small Dive spot at the center of the ring-shaped island ''(hidden)''|Ru=yes|Sa=yes|E=yes}} | |||
{{Itemlist|Pearl|On the rock in the easternmost Dive spot ''(hidden)''|Ru=yes|Sa=yes|E=yes|display={{i|Pearl}}}} | |||
{{Itemlist|Stone Plate|In the main area, in the northwest corner, one tile away from the north and west edges ''(hidden)''|OR=yes|AS=yes}} | |||
{{Itemlist|Draco Plate|In the main area, in the middle of the west side, in a line directly north from the westernmost edge of the Dive spot to the south ''(hidden)''|OR=yes|AS=yes}} | |||
{{Itemlist|Pixie Plate|In the main area, in the southeast, three tiles north of the end of the southeast leg of the Dive spot ''(hidden)''|OR=yes|AS=yes}} | |||
{{Itemlist|Adamant Orb|In the central area (accessed by the Dive spot at the center of the ring-shaped island), in the center one tile south of the northmost wall ''(hidden)''|OR=yes|AS=yes}} | |||
{{Itemlist|Protein|In the eastern area—accessed by the small Dive spot at the mouth of the branch to [[Ever Grande City]]—in the southwest corner of the patch of bare seafloor among the seaweed ''(hidden)''|OR=yes|AS=yes}} | |||
{{Itemlist|Pearl|In the eastern area—accessed by the small Dive spot at the mouth of the branch to Ever Grande City—one tile north and west away from the southeast corner ''(hidden)''|OR=yes|AS=yes|display={{i|Pearl}}}} | |||
{{Itlistfoot|ocean}} | |||
==Pokémon== | ==Pokémon== | ||
{{ | ===Generation III=== | ||
{{ | {{Catch/header|ocean|no}} | ||
{{ | {{Catch/div|ocean|Surfing}} | ||
{{ | {{catch/entry3|072|Tentacool|yes|yes|yes|Surf|5-35|60%|type1=Water|type2=Poison}} | ||
{{ | {{catch/entry3|278|Wingull|yes|yes|yes|Surf|10-30|35%|type1=Water|type2=Flying}} | ||
{{ | {{catch/entry3|279|Pelipper|yes|yes|yes|Surf|25-30|5%|type1=Water|type2=Flying}} | ||
{{ | {{Catch/div|ocean|Fishing}} | ||
{{ | {{catch/entry3|072|Tentacool|yes|yes|yes|Fish Old|5-10|30%|type1=Water|type2=Poison}} | ||
{{ | {{catch/entry3|129|Magikarp|yes|yes|yes|Fish Old|5-10|70%|type1=Water}} | ||
{{ | {{catch/entry3|129|Magikarp|yes|yes|yes|Fish Good|10-30|60%|type1=Water}} | ||
{{ | {{catch/entry3|320|Wailmer|yes|yes|yes|Fish Good|10-30|20%|type1=Water}} | ||
{{ | {{catch/entry3|370|Luvdisc|yes|yes|yes|Fish Good|10-30|20%|type1=Water}} | ||
{{catch/entry3|222|Corsola|yes|yes|yes|Fish Super|30-35|15%|type1=Water|type2=Rock}} | |||
{{catch/entry3|320|Wailmer|yes|yes|yes|Fish Super|30-45|45%|type1=Water}} | |||
{{catch/entry3|370|Luvdisc|yes|yes|yes|Fish Super|30-35|40%|type1=Water}} | |||
{{Catch/footer|ocean}} | |||
===Generation VI=== | |||
{{Catch/header|ocean|no}} | |||
{{Catch/div|ocean|Surfing}} | |||
{{Catch/entryoras|072|Tentacool|yes|yes|Surf|25|50%|type1=Water|type2=Poison}} | |||
{{Catch/entryoras|073|Tentacruel|yes|yes|Surf|30|15%|type1=Water|type2=Poison}} | |||
{{Catch/entryoras|279|Pelipper|yes|yes|Surf|25, 30, 35|35%|type1=Water|type2=Flying}} | |||
{{Catch/div|ocean|Surfing (exclusively as {{color2|000|DexNav#Hidden Pokémon|hidden Pokémon}})<br><small>After defeating or capturing {{pcolor|Groudon|000}}/{{pcolor|Kyogre|000}}</small>}} | |||
{{Catch/entryoras|456|Finneon|yes|yes|Surf|30|??%|type1=Water}} | |||
{{Catch/entryoras|592{{#ifexpr: ({{#time: H}} mod 2)=0||F}}|Frillish|yes|yes|Surf|30|??%|type1=Water|type2=Ghost}} | |||
{{Catch/entryoras|594|Alomomola|yes|yes|Surf|30|??%|type1=Water}} | |||
{{Catch/div|ocean|Fishing}} | |||
{{Catch/entryoras|072|Tentacool|yes|yes|Fish Old|5|35%|type1=Water|type2=Poison}} | |||
{{Catch/entryoras|129|Magikarp|yes|yes|Fish Old|10, 15|65%|type1=Water}} | |||
{{Catch/entryoras|129|Magikarp|yes|yes|Fish Good|25|60%|type1=Water}} | |||
{{Catch/entryoras|320|Wailmer|yes|yes|Fish Good|25|5%|type1=Water}} | |||
{{Catch/entryoras|370|Luvdisc|yes|yes|Fish Good|25|35%|type1=Water}} | |||
{{Catch/entryoras|222|Corsola|yes|yes|Fish Super|40|5%|type1=Water|type2=Rock}} | |||
{{Catch/entryoras|320|Wailmer|yes|yes|Fish Super|30|35%|type1=Water}} | |||
{{Catch/entryoras|370|Luvdisc|yes|yes|Fish Super|35|60%|type1=Water}} | |||
{{Catch/footer|ocean}} | |||
====Underwater==== | |||
{{Catch/header|underwater|no}} | |||
{{Catch/entryoras|170|Chinchou|yes|yes|Seaweed|25|50%|type1=Water|type2=Electric}} | |||
{{Catch/entryoras|171|Lanturn|yes|yes|Seaweed|30|15%|type1=Water|type2=Electric}} | |||
{{Catch/entryoras|222|Corsola|yes|yes|Seaweed|30|4%|type1=Water|type2=Rock}} | |||
{{Catch/entryoras|366|Clamperl|yes|yes|Seaweed|30|30%|type1=Water}} | |||
{{Catch/entryoras|369|Relicanth|yes|yes|Seaweed|35|1%|type1=Water|type2=Rock}} | |||
{{Catch/footer|underwater}} | |||
==Trainers== | |||
==={{game|Ruby and Sapphire|s}}=== | |||
{{trainerheader|ocean}} | |||
{{trainerentry|Spr RS Cooltrainer M.png|Cooltrainer|Ruben|1632|3|275|Shiftry|♂|34||075|Graveler|♂|34||294|Loudred|♂|34|36=ジュン|37=Jun}} | |||
{{trainerdiv|ocean}} | |||
{{trainerentry|Spr RS Cooltrainer F.png|Cooltrainer|Alexa|1680|2|044|Gloom|♀|35||184|Azumarill|♀|35|36=サヤカ|37=Sayaka}} | |||
{{trainerdiv|ocean}} | |||
{{trainerentry|Spr RS Fisherman.png|Fisherman|Wayne|1280|4|072|Tentacool|♂|30||072|Tentacool|♂|30||320|Wailmer|♂|35||073|Tentacruel|♂|32|36=コウサク|37=Kōsaku}} | |||
{{trainerdiv|ocean}} | |||
{{trainerentry|Spr RS Triathlete Swimmer M.png|Triathlete|Isaiah|1440|1|120|Staryu||36||38=Nav|36=エイスケ|37=Eisuke}} | |||
{{trainerdiv|ocean}} | |||
{{trainerentry|Spr RS Triathlete Swimmer F.png|Triathlete|Katelyn|1440|1|120|Staryu||36||38=Nav|36=ナツミ|37=Natsumi}} | |||
{{trainerdiv|ocean|Rematch}} | |||
{{trainerentry|Spr RS Triathlete Swimmer M.png|Triathlete|Isaiah{{tt|*|First and second rematch}}|{{tt|1560|First rematch}}/{{tt|1680|Second rematch}}|1|120|Staryu||{{tt|39|First rematch}}/{{tt|42|Second rematch}}||38=Nav|36=エイスケ|37=Eisuke}} | |||
{{trainerentry|Spr RS Triathlete Swimmer M.png|Triathlete|Isaiah{{tt|*|Third and fourth rematch onwards}}|{{tt|1800|Third rematch}}/{{tt|1920|Fourth rematch onwards}}|1|121|Starmie||{{tt|45|Third rematch}}/{{tt|48|Fourth rematch onwards}}||38=Nav|36=エイスケ|37=Eisuke}} | |||
{{trainerdiv|ocean}} | |||
{{trainerentry|Spr RS Triathlete Swimmer F.png|Triathlete|Katelyn{{tt|*|First and second rematch}}|{{tt|1560|First rematch}}/{{tt|1680|Second rematch}}|1|120|Staryu||{{tt|39|First rematch}}/{{tt|42|Second rematch}}||38=Nav|36=ナツミ|37=Natsumi}} | |||
{{trainerentry|Spr RS Triathlete Swimmer F.png|Triathlete|Katelyn{{tt|*|Third and fourth rematch onwards}}|{{tt|1800|Third rematch}}/{{tt|1920|Fourth rematch onwards}}|1|121|Starmie||{{tt|45|Third rematch}}/{{tt|48|Fourth rematch onwards}}||38=Nav|36=ナツミ|37=Natsumi}} | |||
{{trainerfooter|ocean|3}} | |||
==={{game|Emerald}}=== | |||
{{trainerheader|ocean}} | |||
{{trainerentry|Spr RS Cooltrainer M.png|Cooltrainer|Ruben|1632|2|275|Shiftry|♂|34||299|Nosepass|♂|34|36=ジュン|37=Jun}} | |||
{{trainerdiv|ocean}} | |||
{{trainerentry|Spr RS Cooltrainer F.png|Cooltrainer|Alexa|1632|2|044|Gloom|♀|34||184|Azumarill|♀|34|36=サヤカ|37=Sayaka}} | |||
{{trainerdiv|ocean}} | |||
{{trainerentry|Spr RS Fisherman.png|Fisherman|Wayne|1440|3|072|Tentacool|♂|31||072|Tentacool|♂|31||320|Wailmer|♂|36|36=コウサク|37=Kōsaku}} | |||
{{trainerdiv|ocean}} | |||
{{trainerentry|Spr RS Triathlete Swimmer M.png|Triathlete|Isaiah|1400|1|120|Staryu||35||38=Nav|36=エイスケ|37=Eisuke}} | |||
{{trainerdiv|ocean}} | |||
{{trainerentry|Spr RS Triathlete Swimmer F.png|Triathlete|Katelyn|1400|1|120|Staryu||35||38=Nav|36=ナツミ|37=Natsumi}} | |||
{{trainerdiv|ocean}} | |||
{{trainerentry|Spr RS Swimmer F.png|Swimmer|Carlee|280<br><small>Potential [[Double Battle]] with Harrison</small>|1|119|Seaking|♀|35|36=クニコ|37=Kuniko}} | |||
{{trainerentry|Spr RS Swimmer M.png|Swimmer|Harrison|280<br><small>Potential [[Double Battle]] with Carlee</small>|1|073|Tentacruel|♂|35|36=マサアキ|37=Masaaki}} | |||
{{trainerdiv|ocean|Rematch}} | |||
{{trainerentry|Spr RS Triathlete Swimmer M.png|Triathlete|Isaiah{{tt|*|First and second rematch}}|{{tt|1560|First rematch}}/{{tt|1680|Second rematch}}|1|120|Staryu||{{tt|39|First rematch}}/{{tt|42|Second rematch}}||38=Nav|36=エイスケ|37=Eisuke}} | |||
{{trainerentry|Spr RS Triathlete Swimmer M.png|Triathlete|Isaiah{{tt|*|Third and fourth rematch onwards}}|{{tt|1800|Third rematch}}/{{tt|1920|Fourth rematch onwards}}|1|121|Starmie||{{tt|45|Third rematch}}/{{tt|48|Fourth rematch onwards}}||38=Nav|36=エイスケ|37=Eisuke}} | |||
{{trainerdiv|ocean}} | |||
{{trainerentry|Spr RS Triathlete Swimmer F.png|Triathlete|Katelyn{{tt|*|First and second rematch}}|{{tt|1560|First rematch}}/{{tt|1680|Second rematch}}|1|120|Staryu||{{tt|39|First rematch}}/{{tt|42|Second rematch}}||38=Nav|36=ナツミ|37=Natsumi}} | |||
{{trainerentry|Spr RS Triathlete Swimmer F.png|Triathlete|Katelyn{{tt|*|Third and fourth rematch onwards}}|{{tt|1800|Third rematch}}/{{tt|1920|Fourth rematch onwards}}|1|121|Starmie||{{tt|45|Third rematch}}/{{tt|48|Fourth rematch onwards}}||38=Nav|36=ナツミ|37=Natsumi}} | |||
{{trainerfooter|ocean|3}} | |||
==={{g|Omega Ruby and Alpha Sapphire}}=== | |||
{{trainerheader|ocean}} | |||
{{trainerentry|VSAce Trainer M ORAS.png{{!}}150px|game=6|Ace Trainer|Cornelius|2,340<br><small>Requires {{m|Surf}}</small>|2|076|Golem|♂|39||026|Raichu|♂|39|36=ジン|37=Jin}} | |||
{{trainerdiv|ocean}} | |||
{{trainerentry|VSFisherman ORAS.png{{!}}150px|game=6|Fisherman|Wayne|1,184|2|320|Wailmer|♂|37||117|Seadra|♂|37|36=コウサク|37=Kōsaku}} | |||
{{trainerdiv|ocean}} | |||
{{trainerentry|VSTuber M.png{{!}}150px|game=6|Tuber|Delmar|152<br><small>Requires {{m|Surf}}</small>|1|370|Luvdisc|♀|38||36=テルヒコ|37=Teruhiko}} | |||
{{trainerdiv|ocean}} | |||
{{trainerentry|VSTuber F.png{{!}}150px|game=6|Tuber|Marlene|152<br><small>Requires {{m|Surf}}</small>|1|370|Luvdisc|♀|38||36=マツリ|37=Matsuri}} | |||
{{trainerdiv|ocean}} | |||
{{trainerentry|VSTriathlete Swimmer.png{{!}}150px|game=6|Triathlete|Isaiah|1,440<br><small>Requires {{m|Surf}}</small>|1|121|Starmie||36||36=エイスケ|37=Eisuke|38=Nav}} | |||
{{trainerdiv|ocean|Requires Surf and Dive}} | |||
{{trainerentry|VSFree Diver.png{{!}}150px|game=6|Free Diver|Mayu|1,560|2|370|Luvdisc|♀|39||370|Luvdisc|♀|39|36=マユナ|37=Mayuna}} | |||
{{trainerdiv|ocean|Rematch}} | |||
{{trainerentry|VSTriathlete Swimmer.png{{!}}150px|game=6|Triathlete|Isaiah|1,640<br><small>After earning the {{badge|Mind}}</small>|1|121|Starmie||41||36=エイスケ|37=Eisuke}} | |||
{{trainerentry|VSTriathlete Swimmer.png{{!}}150px|game=6|Triathlete|Isaiah|1,800<br><small>After earning the {{badge|Rain}}</small>|1|121|Starmie||45||36=エイスケ|37=Eisuke}} | |||
{{trainerentry|VSTriathlete Swimmer.png{{!}}150px|game=6|Triathlete|Isaiah|1,960<br><small>After entering the [[Hall of Fame]]</small>|2|419|Floatzel|♂|49||121|Starmie||49||36=エイスケ|37=Eisuke}} | |||
{{trainerfooter|ocean|3}} | |||
==Appearance== | |||
{| class="roundy" style="margin:auto; background: #000; border: 3px solid #{{locationcolor/dark|ocean}}" | |||
|- | |||
! style="background:#{{locationcolor/light|ocean}}; {{roundytl|5px}}" | Game | |||
! style="background:#{{locationcolor/light|ocean}}" | Surface | |||
! style="background:#{{locationcolor/light|ocean}}; {{roundytr|5px}}" | Underwater | |||
|- | |||
! style="background:#{{ruby color}}" | {{color2|fff|Pokémon Ruby and Sapphire Versions|Ruby}} | |||
| rowspan="3" | [[File:Hoenn Route 128 RSE.png|300px]] | |||
| rowspan="3" | [[File:Hoenn Route 128 underwater RSE.png|300px]] | |||
|- | |||
! style="background:#{{sapphire color}}" | {{color2|fff|Pokémon Ruby and Sapphire Versions|Sapphire}} | |||
|- | |||
! style="background:#{{emerald color}}" | {{color2|fff|Pokémon Emerald Version|Emerald}} | |||
|- | |||
! style="background:#{{omega ruby color}}" | {{color2|fff|Pokémon Omega Ruby and Alpha Sapphire|Omega Ruby}} | |||
| rowspan="2" | [[File:Hoenn Route 128 ORAS.png|300px]] | |||
| rowspan="2" | [[File:Hoenn Route 128 underwater ORAS.png|300px]] | |||
|- | |||
! style="background:#{{alpha sapphire color}}" | {{color2|fff|Pokémon Omega Ruby and Alpha Sapphire|Alpha Sapphire}} | |||
|- | |||
| colspan="3" style="background:#{{locationcolor/light|ocean}}; {{roundybottom|5px}}" | | |||
|} | |||
==In the anime== | |||
[[File:Hoenn Route 128 PG.png|thumb|250px|Route 128 in [[Pokémon Generations]]]] | |||
===Pokémon Generations=== | |||
Route 128 briefly appeared in ''[[PG07|The Vision]]''. Like in the games, Seafloor Cavern is located here. It was shown in a vision that [[Courtney]] had. In the vision, [[Primal Reversion|Primal]] {{p|Groudon}} appeared from Seafloor Cavern and caused destruction at Route 128 by using {{m|Solar Beam}}. | |||
{{-}} | |||
==See also== | ==See also== | ||
*[[Seafloor Cavern]] | * [[Seafloor Cavern]] | ||
* [[Underwater]] | |||
{{Hoenn}} | {{Hoenn}}<br> | ||
{{Project Routes}} | {{Project Routes notice}} | ||
[[Category:Hoenn locations|Route 128]] | [[Category:Hoenn locations|Route 128]] | ||
[[Category:Routes|Route 128]] | [[Category:Routes|Route 128]] | ||
[[Category:Ruby and Sapphire locations|Route 128]] | [[Category:Ruby and Sapphire locations|Route 128]] | ||
[[Category:Emerald locations|Route 128]] | [[Category:Emerald locations|Route 128]] | ||
[[Category:Omega Ruby and Alpha Sapphire locations|Route 128]] | |||
[[Category:Underwater locations|Route 128]] | |||
[[de:Route 128]] | [[de:Route 128 (Hoenn)]] | ||
[[ja:128ばんすいどう]] | [[es:Ruta 128]] | ||
[[fr:Chenal 128]] | |||
[[it:Percorso 128 (Hoenn)]] | |||
[[ja:128ばんすいどう (ホウエン地方)]] | |||
[[zh:128号水路(丰缘)]] | |||
Latest revision as of 21:43, 26 July 2024

|
The picture used in this article is unsatisfactory. Please feel free to replace it so it conforms to Bulbapedia conventions. Reason: Guidebook labels |
| |||||||||||||||
| |||||||||||||||
Map description
| |||||||||||||||
| Required for navigation
| |||||||||||||||
Connecting locations
| |||||||||||||||
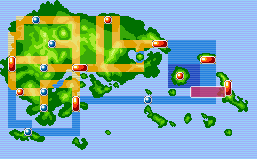
Location  Location of Route 128 in Hoenn. | |||||||||||||||
Pokémon world routes
| |||||||||||||||
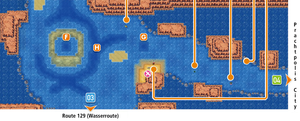
Route 128 (Japanese: 128番水道 Water Route 128) is a water route in southeast Hoenn, connecting Route 127, Route 129, and Ever Grande City. The Seafloor Cavern is located underwater near the center of the route.
Route description
Route 128 retains the north-south alignment of Route 127 as it proceeds south past a pair of islands with one Trainer each. The route turns to the southeast as it swerves to avoid the top of the Seafloor Cavern. On the east side of the cavern's surface, Route 128 splits into two paths, the main north-south path and an east-west path leading to the base of Ever Grande.
The main path of Route 128 continues southwest from this junction, passing two more islands and a Trainer before turning to the south and becoming Route 129.
Ever Grande connector
To bypass an island located due east of the path's western terminus, the connector heads to the northeast, then to the southeast before taking on an easterly alignment near a large island playing host to a Fisherman. After passing a Triathlete, the path enters the city limits of Ever Grande a short distance to the east.
Underwater
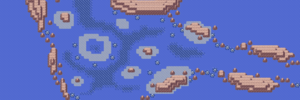
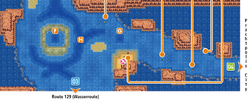
Most of the western portion of Route 128, including the area around the Seafloor Cavern, contains underwater passages that can be reached using Dive. The entrance to the Seafloor Cavern is, fittingly, on the seafloor near the southern terminus of Route 128. North of the cavern, the underwater passage continues onto the seafloor of Route 127.
Items
All items on Route 128 can only be accessed with the use of Surf, except for the Heart Scale on the island with the route sign in Omega Ruby and Alpha Sapphire, which may be accessed using Fly (after visiting Ever Grande City) or Soar.
| Item | Location | Games | |
|---|---|---|---|
| Heart Scale ×3 |
|
R S E | |
| Heart Scale ×3 |
|
OR AS | |
| Zinc | 15% chance of receiving one after a rematch with Triathlete Isaiah | OR AS | |
Underwater
All items found underwater necessarily require Surf and Dive.
| Item | Location | Games | |
|---|---|---|---|
| Protein | On the rock in the small Dive spot at the center of the ring-shaped island (hidden) | R S E | |
| Pearl | On the rock in the easternmost Dive spot (hidden) | R S E | |
| Stone Plate | In the main area, in the northwest corner, one tile away from the north and west edges (hidden) | OR AS | |
| Draco Plate | In the main area, in the middle of the west side, in a line directly north from the westernmost edge of the Dive spot to the south (hidden) | OR AS | |
| Pixie Plate | In the main area, in the southeast, three tiles north of the end of the southeast leg of the Dive spot (hidden) | OR AS | |
| Adamant Orb | In the central area (accessed by the Dive spot at the center of the ring-shaped island), in the center one tile south of the northmost wall (hidden) | OR AS | |
| Protein | In the eastern area—accessed by the small Dive spot at the mouth of the branch to Ever Grande City—in the southwest corner of the patch of bare seafloor among the seaweed (hidden) | OR AS | |
| Pearl | In the eastern area—accessed by the small Dive spot at the mouth of the branch to Ever Grande City—one tile north and west away from the southeast corner (hidden) | OR AS | |
Pokémon
Generation III
| Pokémon | Games | Location | Levels | Rate | |||||||||||
|---|---|---|---|---|---|---|---|---|---|---|---|---|---|---|---|
| Surfing | |||||||||||||||
|
R | S | E |
|
5-35 | 60% | |||||||||
|
R | S | E |
|
10-30 | 35% | |||||||||
|
R | S | E |
|
25-30 | 5% | |||||||||
| Fishing | |||||||||||||||
|
R | S | E |
|
5-10 | 30% | |||||||||
|
R | S | E |
|
5-10 | 70% | |||||||||
|
R | S | E |
|
10-30 | 60% | |||||||||
|
R | S | E |
|
10-30 | 20% | |||||||||
|
R | S | E |
|
10-30 | 20% | |||||||||
|
R | S | E |
|
30-35 | 15% | |||||||||
|
R | S | E |
|
30-45 | 45% | |||||||||
|
R | S | E |
|
30-35 | 40% | |||||||||
| A colored background means that the Pokémon can be found in this location in the specified game. A white background with a colored letter means that the Pokémon cannot be found here. | |||||||||||||||
Generation VI
| Pokémon | Games | Location | Levels | Rate | ||||||||||||
|---|---|---|---|---|---|---|---|---|---|---|---|---|---|---|---|---|
| Surfing | ||||||||||||||||
|
OR | AS |
|
25 | 50% | |||||||||||
|
OR | AS |
|
30 | 15% | |||||||||||
|
OR | AS |
|
25, 30, 35 | 35% | |||||||||||
| Surfing (exclusively as hidden Pokémon) After defeating or capturing Groudon/Kyogre | ||||||||||||||||
|
OR | AS |
|
30 | ??% | |||||||||||
|
OR | AS |
|
30 | ??% | |||||||||||
|
OR | AS |
|
30 | ??% | |||||||||||
| Fishing | ||||||||||||||||
|
OR | AS |
|
5 | 35% | |||||||||||
|
OR | AS |
|
10, 15 | 65% | |||||||||||
|
OR | AS |
|
25 | 60% | |||||||||||
|
OR | AS |
|
25 | 5% | |||||||||||
|
OR | AS |
|
25 | 35% | |||||||||||
|
OR | AS |
|
40 | 5% | |||||||||||
|
OR | AS |
|
30 | 35% | |||||||||||
|
OR | AS |
|
35 | 60% | |||||||||||
| A colored background means that the Pokémon can be found in this location in the specified game. A white background with a colored letter means that the Pokémon cannot be found here. | ||||||||||||||||
Underwater
| Pokémon | Games | Location | Levels | Rate | ||||||||||||
|---|---|---|---|---|---|---|---|---|---|---|---|---|---|---|---|---|
|
OR | AS |
|
25 | 50% | |||||||||||
|
OR | AS |
|
30 | 15% | |||||||||||
|
OR | AS |
|
30 | 4% | |||||||||||
|
OR | AS |
|
30 | 30% | |||||||||||
|
OR | AS |
|
35 | 1% | |||||||||||
| A colored background means that the Pokémon can be found in this location in the specified game. A white background with a colored letter means that the Pokémon cannot be found here. | ||||||||||||||||
Trainers
Pokémon Ruby and Sapphire
| Trainer | Pokémon | |||||||||||
|---|---|---|---|---|---|---|---|---|---|---|---|---|
|
| |||||||||||
| ||||||||||||
| ||||||||||||
|
| |||||||||||
| ||||||||||||
|
| |||||||||||
| ||||||||||||
| ||||||||||||
| ||||||||||||
|
| |||||||||||
|
| |||||||||||
| Rematch | ||||||||||||
|
| |||||||||||
|
| |||||||||||
|
| |||||||||||
|
| |||||||||||
| Trainers with a PokéNav by their names will be registered in the Trainer's Eyes or Match Call function after the first battle, and may have a rematch with the player with higher-level Pokémon. | ||||||||||||
Pokémon Emerald
| Trainer | Pokémon | |||||||||||
|---|---|---|---|---|---|---|---|---|---|---|---|---|
|
| |||||||||||
| ||||||||||||
|
| |||||||||||
| ||||||||||||
|
| |||||||||||
| ||||||||||||
| ||||||||||||
|
| |||||||||||
|
| |||||||||||
|
| |||||||||||
|
| |||||||||||
| Rematch | ||||||||||||
|
| |||||||||||
|
| |||||||||||
|
| |||||||||||
|
| |||||||||||
| Trainers with a PokéNav by their names will be registered in the Trainer's Eyes or Match Call function after the first battle, and may have a rematch with the player with higher-level Pokémon. | ||||||||||||
Pokémon Omega Ruby and Alpha Sapphire
| Trainer | Pokémon | |||||||||||
|---|---|---|---|---|---|---|---|---|---|---|---|---|
|
| |||||||||||
| ||||||||||||
|
| |||||||||||
| ||||||||||||
|
| |||||||||||
|
| |||||||||||
|
| |||||||||||
| Requires Surf and Dive | ||||||||||||
|
| |||||||||||
| ||||||||||||
| Rematch | ||||||||||||
|
| |||||||||||
|
| |||||||||||
|
| |||||||||||
| ||||||||||||
| Trainers with a PokéNav by their names will be registered in the Trainer's Eyes or Match Call function after the first battle, and may have a rematch with the player with higher-level Pokémon. | ||||||||||||
Appearance
| Game | Surface | Underwater |
|---|---|---|
| Ruby | 
|

|
| Sapphire | ||
| Emerald | ||
| Omega Ruby | 
|

|
| Alpha Sapphire | ||
In the anime

Pokémon Generations
Route 128 briefly appeared in The Vision. Like in the games, Seafloor Cavern is located here. It was shown in a vision that Courtney had. In the vision, Primal Groudon appeared from Seafloor Cavern and caused destruction at Route 128 by using Solar Beam.
See also

|
This article is part of Project Routes, a Bulbapedia project that aims to write comprehensive articles on every route in the Pokémon world. |


